The Best Hikes in Joshua Tree National Park: Complete Guide
While Joshua Tree has quite a few cool sights that you can see from the road, the best way to truly experience the park is by hiking. Exploring the many trails in the park allows you to get up close to the otherworldly yucca trees, the massive boulders, and the many unique desert landmarks.
There are plenty of challenging trails for the more adventurous hikers, but one of the best things about Joshua Tree is that there are a ton of easy hikes to do, as well. This means hikers of all skill levels can explore the beautiful desert landscape of the park.
I’m a California native based in the Southern California area, and I’ve spent plenty of time hiking through this incredible park. In order to help you plan the perfect hiking trip, I’m going to highlight all of the absolute best hikes in Joshua Tree National Park.

Disclaimer: Some of the links below are affiliate links, which means that if you click on one and purchase something, we make a small portion of the sale at no additional cost to you. It goes without saying that we would never recommend something we wouldn’t use or do ourselves.
Things to Know Before Hiking in Joshua Tree National Park
There are a few things you’ll want to know before visiting and hiking in the park. Here’s what to keep in mind while planning your visit, as well as tips and tricks to make the most of your Joshua Tree hiking trip.
BYO Water
One of the most important things to know before you visit is that the availability of water within the park is super limited. There are only a few water stations, and for the most part, they aren’t located by Joshua Tree hiking trails or in the busier areas that you’re likely to explore.
Assume that you won’t be able to fill up your water bottle, and bring a ton of water with you (more than you think you need!). The park suggests two gallons of water per person, per day.
If you arrive at the park without enough water, the most convenient water station is located at the West Entrance Station (which is likely where you’ll be entering the park).
Alternatively, you can stop by one of the casual eateries in town to buy extra water bottles. Roadrunner Grab-and-Go and The Dez are both good options.
There are also quite a few grocery stores in Yucca Valley, which is just about a 15-minute drive west of the town of Joshua Tree.
Bring Plenty of Sun Protection
Shade is hard to find in Joshua Tree, so you’re going to need to have ample sun protection. Bring lots of sunscreen, sunglasses, and a hat to keep your skin and eyes shielded against the desert sun. It’s also smart to wear UV protection clothing, if you have any.
Leave the Dogs at Home
Unfortunately, four-legged friends can’t join you on the hiking trails at Joshua Tree National Park.
While dogs are allowed to enter the park, they must stay within 100 feet of roads, picnic areas, and campgrounds, and they are not allowed on trails. With this in mind, you’ll have to leave your dog at home if you’re planning on doing any hiking.
There is an exception for service animals. Service animals are allowed on the trails, but note that they need to be kept on a 6-foot leash at all times.
Wear Supportive Shoes for Rock Scrambling
Besides the actual Joshua trees, this park is probably best known for the ginormous, super climbable boulders.
Even if you don’t consider yourself a big rock climber, half of the fun of hiking in Joshua Tree National Park is finding easy-to-climb boulders that offer amazing views of the park. I am definitely not a climber, but I still really enjoy doing this when I visit the park. I highly recommend you try it out, too!
In order to have the best and safest experience scrambling over rocks in Joshua Tree, you’ll need to wear appropriate shoes. Bring along a pair that has good traction so that you have the friction needed to climb over boulders.
Pay Park Entrance Fees Online or In Person
As you enter the park, you’ll need to pay an entrance fee. Currently, you can get a seven-day permit for $30 per vehicle, or $25.00 per motorcycle. All entrance stations take debit and credit cards.
Rather than paying in person, you can also choose to buy your permit in advance online. Permits are the same price, regardless of whether you purchase online or in-person. Once purchased, you can either download it to your phone or print it out.
Pre-purchasing your permit may help you skip past the lines of visitors who still need to purchase their permits. I highly recommend you do this if you plan on visiting during the spring or around the winter holidays (when the park is the busiest).
The other option is to invest in an America the Beautiful Pass, which is an annual pass that covers all national recreation areas (national parks, national forests, national monuments, etc) for $80.
If you’re planning on visiting three or more national parks in the next 12 months (or a couple of national parks and some national forests/monuments), then it makes sense.
Download Offline Maps
Service in the park is super spotty, so you won’t want to rely on using online maps. For navigating the area, I recommend downloading a map for offline use via Google Maps (here’s a guide on how to do this!).
If you have an AllTrails Pro account, I also suggest downloading the trails you plan on hiking for offline use. While this isn’t a must (especially for the shorter and more populated trails), it can give you some peace of mind when you’re out on your hike.
The Best Time to Go Hiking in Joshua Tree
The best times to hike in the park are during the spring and late fall, but the winter is also a nice option.
I’ll go over some key information to know about hiking in these seasons, but if you want a more in-depth guide, check out our guide on the best time to visit Joshua Tree National Park.
Hiking in the Spring
In the early spring, daytime temperatures are typically in the 70s and mid-80s, which is perfect hiking weather.
It does start to get warmer in May (generally around the higher 80s), so you may want to plan a trip earlier in the season if you’re sensitive to heat. Beyond the great weather, another benefit is that it is an ideal time to see desert wildflowers in bloom.
Note that, since the weather is perfect during this season, this is the most popular time to visit. While still a great time to explore the park, you should expect to deal with big crowds, especially on weekends.
Hiking in the Fall
I don’t recommend heading to Joshua Tree in the early fall – we’ll touch on that in a moment. However, the later fall is a really great time to visit. Daytime temperatures can range from the high 60s to low 80s, so it’s also a really nice time of the year for hiking.
Keep in mind that nighttime temperatures can drop down to the 40s and 50s, so come prepared with layers if you’ll be doing some early morning or post-sunset exploring.
In the fall, it’s generally not quite as crowded as it is in the spring. That said, you should still expect there to be some crowds. Also note that the park does tend to get busier around Thanksgiving.
Hiking in the Winter
The winter is also an ideal time to visit, especially since it tends to be less crowded (except for around the holidays). Just be prepared for cooler (but certainly still bearable!) daytime weather, typically around the low 60s. While it’s not super common, the park does occasionally see a bit of snow, so keep that in mind.
If you’re planning on hiking or exploring the park in the early morning or after sunset, come prepared with layers. You can expect temperatures to drop into the 30s and 40s.
When Not to Hike in Joshua Tree
The absolute worst time to hike in Joshua Tree is during the summer and early fall.
During this time, the weather is simply too hot to even visit the park, let alone hike. The temperatures can jump well above 100 degrees during the hottest parts of the summer, and it’s still typically in the mid-90s through September and early October.
Wait for things to cool off before heading to the park for your hiking trip.
The Best Hikes in Joshua Tree National Park
Now, let’s get to the best hikes in Joshua Tree National Park. In order to help you easily plan your itinerary, this list starts on the northern section of the park, and moves south.
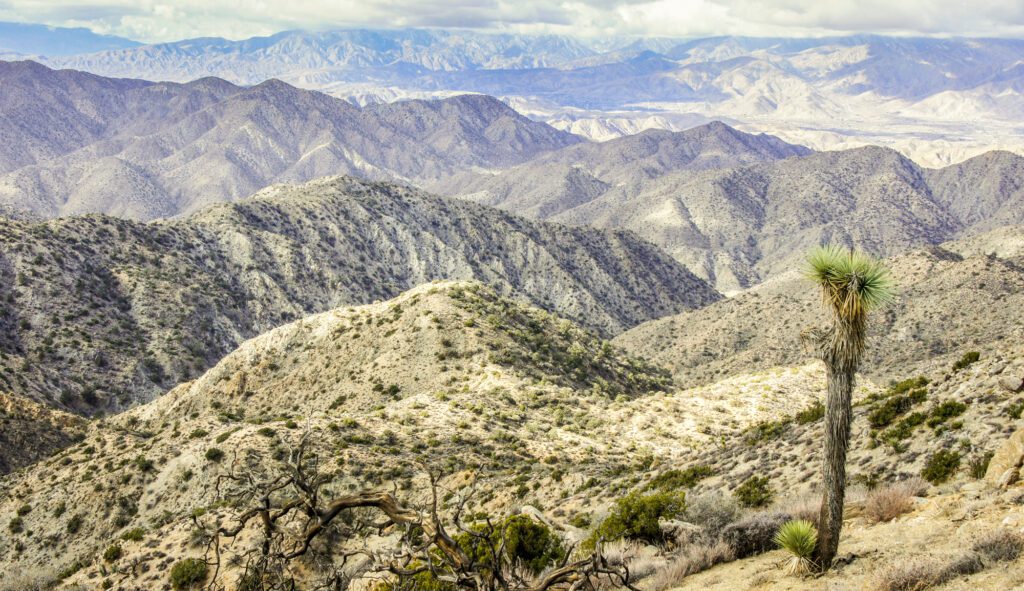
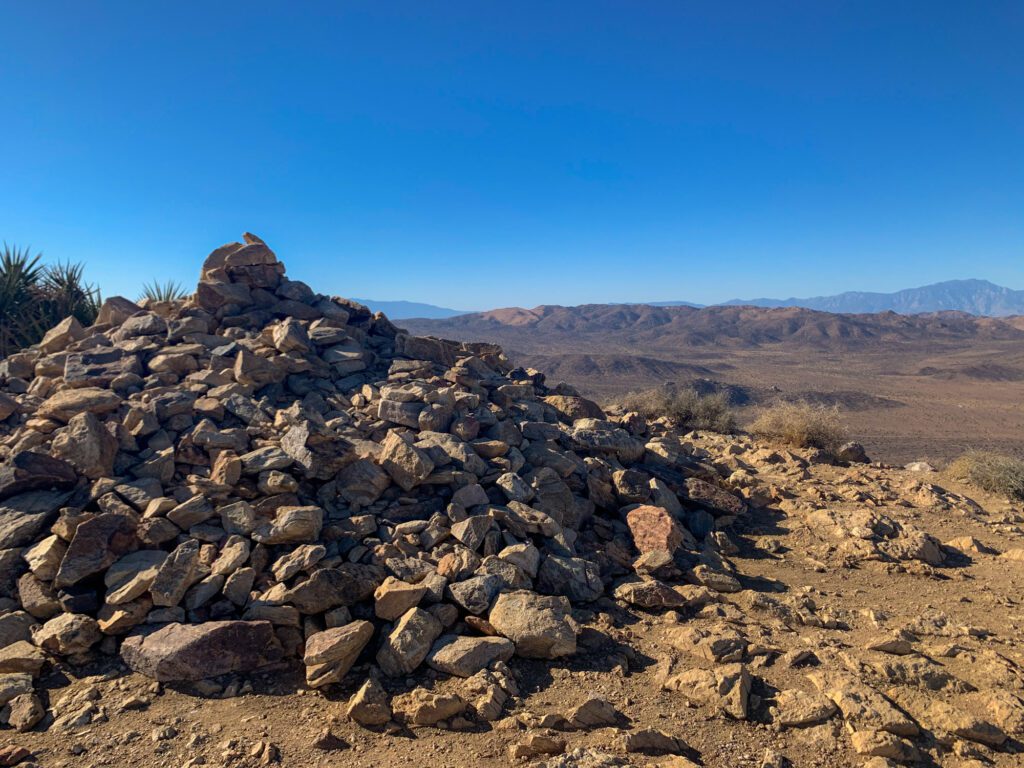
Warren Peak
- Length: 6.3 miles
- Elevation Gain: 1,105 feet
- Trail Type: Out and Back
- Difficulty: Moderate
- Trailhead Location: Warren Peak Trailhead
This is one of the best Joshua Tree hikes for getting panoramic views of the park and surrounding area. The out and back trail has plenty of beautiful yucca trees and other desert plants, and leads you up to Warren Peak.
Once you make your way up the sandy trail and reach the peak, you get beautiful views of the mountains and desert landscape.
The majority of the elevation gain really kicks in around the final half mile as you make your way to the peak, so be prepared for some climbing! The hike leading up to this point is otherwise fairly easy.
The Warren Peak trail isn’t quite as well-known as other trails in the park, partially due to the fact that it’s a bit removed from the popular destinations that are also in the northern half of the park.
This trail is located on the very northwestern side of the park, about a half hour drive west of Hidden Valley Nature Trail, Barker Dam Nature Trail, and other popular trails.
While it’s still on park land, you actually won’t even need to go through a park entrance station to get to it (although it’s still in a fee area, so make sure you have your permit!).
While more removed, Warren Peak is still a popular hike, so don’t expect to have the trail to yourself. It is also located right by Black Rock Canyon Campground, so it can’t be missed if you’re planning on camping there.
Note that there are a few different connected trails in this area, all of which share the same trailhead. You’ll be walking along the Black Rock Canyon Trail for just under two miles before hitting a junction.
At this point, you’ll want to veer right to make your way to Warren Peak. If you go towards the left, you’ll end up doing the Panorama Loop. Be sure to pay attention to signs and refer to your downloaded map if needed to make sure you’re headed in the right direction!
This is one of the longer trails on the list, so plan accordingly. Hikers will typically need about three hours to complete the hike.
Parking for Warren Peak can be found just to the left of the trailhead, on the side of Campground Road. There’s a restroom just a short walk across the street.
Find more Warren Peak trail information and read recent trail reports here.
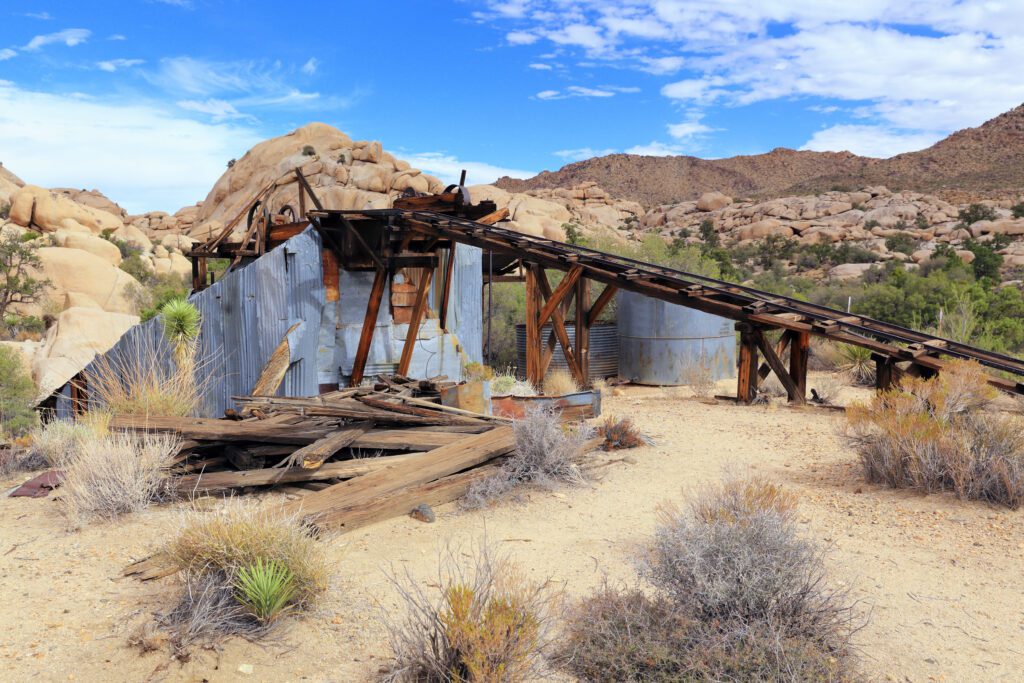
Wall Street Mill
- Length: 2.0 miles
- Elevation Gain: 75 feet
- Trail Type: Out and Back
- Difficulty: Easy
- Trailhead Location: Wall Street Mill Trailhead
The Wall Street Mill Trail is an excellent option for anyone interested in seeing unique historic sites in the park. If you’re planning on doing Barker Dam (more on that next), I suggest also adding on this hike, since they’re right next to each other. Both trails are easy with very little elevation gain, and are particularly suitable choices if you’re bringing along younger hikers.
The main point of interest (which you’ll see at the very end of the trail before turning around) is the ruins of Wall Street Mill. This two-stamp gold ore crushing mill was in operation from around 1930 to the mid-1960s.
As you hike the trail, you’ll also pass by an old windmill and water pump. There’s a small loop towards the start of the trail that takes you right up to an abandoned rusty car and the remains of a house.
On average, it takes hikers less than 40 minutes to complete the Wall Street Mill Trail. However, you might want to budget in an extra 5 or 10 minutes to check out the different sights along the way.
There is a small dirt parking lot right by the trailhead. You can also park at the Barker Dam Nature Trail parking lot and just walk over (it’s under a half-mile walk). You’ll see a large informational sign right by the parking lot pointing you in the right direction.
Both of these parking lots are fairly small, so if you’re visiting during a busier time, there’s a chance you’ll need to park along the road on Barker Dam Road and walk over. If you need a restroom, you’ll find vault toilets right by the Barker Dam parking lot.
Find more information about Wall Street Mill Trail and read recent trail reports here.
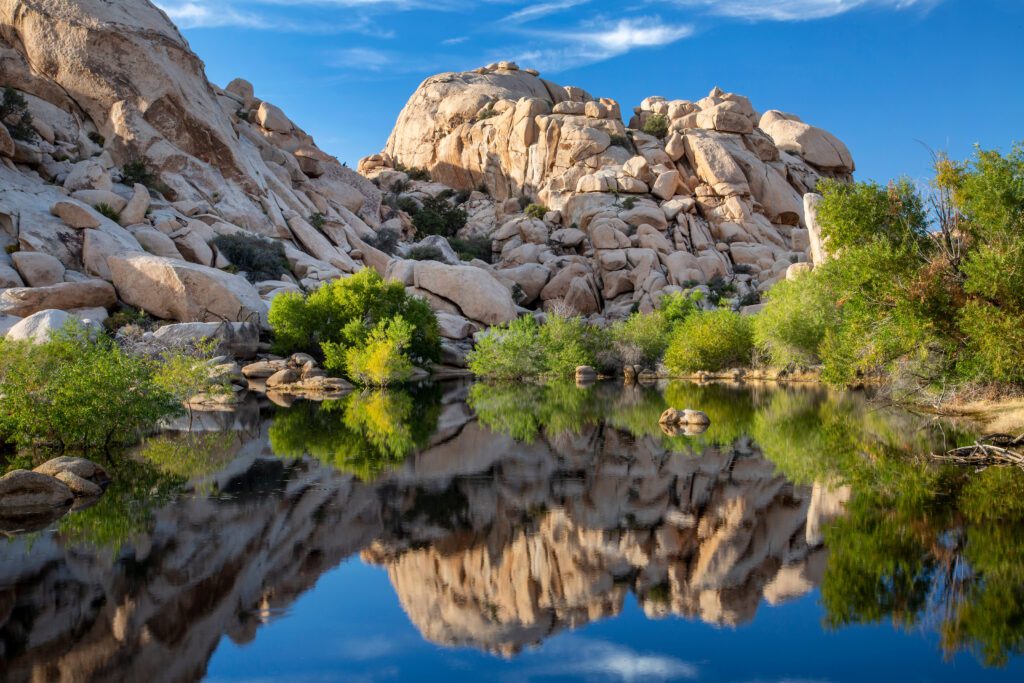
Barker Dam
- Length: 1.1 miles
- Elevation Gain: 59 feet
- Trail Type: Loop
- Difficulty: Easy
- Trailhead Location: Barker Dam Nature Trail Trailhead
After (or before) checking out Wall Street Mill, head over to Barker Dam Nature Trail. The main point of interest on this easy and short hike is, of course, Barker Dam. A group of cattlemen built this dam around 1900.
There often isn’t actually any water here, thanks to the dry desert environment. However, if you visit after a rainy period, you may get lucky.
Even if there isn’t water at the dam, it’s an incredibly cool area to explore. I haven’t had the chance to see Barker Dam after rain, but I’ve still enjoyed hiking through the area in the past. The trail is surrounded by massive rock formations, and there’s no shortage of Joshua trees, cacti, and additional desert plants.
The dam is also a popular hangout spot for bighorn sheep and other critters, so you’ll want to keep an eye out.
In addition to the dam, you’ll also want to make sure you check out the ancient Native American petroglyphs. While they’ve most likely been altered since originally created, these petroglyphs give a really interesting insight into the history of the land.
You’ll be able to see the petroglyphs from the trail, so be sure to keep your distance and don’t climb on the rocks.
These petroglyphs are located on the side of a short trail off-shoot, so they can be easy to miss. If you’re interested in checking them out, make a note of where they are on the map. There is a small sign on the trail that points to where they’re located. If you’re going clockwise, you’ll pass by them at the 0.4-mile mark.
In general, it will take hikers under half an hour to complete the hike. As mentioned above, there’s a parking lot right by the Barker Dam trailhead, as well as one by the Wall Street Mill trailhead.
Alternatively, if you can’t grab a spot in one of the lots, you can park on the street and walk over. You can find restrooms at the Barker Dam parking lot.
Find more information and recent reports about Barker Dam Nature Trail here.
Hidden Valley Nature Trail
- Length: 1 mile
- Elevation Gain: 118 feet
- Trail Type: Loop
- Difficulty: Easy
- Trailhead Location: Hidden Valley Nature Trail Trailhead
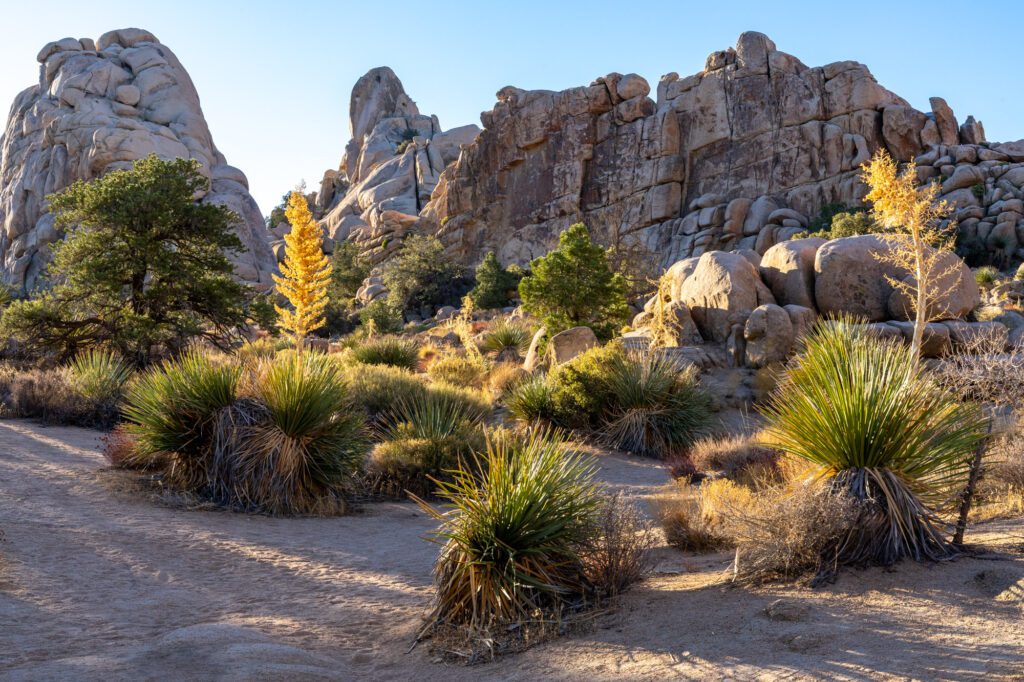
Hidden Valley Nature Trail is personally one of my favorite easy hiking trails in Joshua Tree. This loop trail offers everything you’d want from a hike in the park. Giant boulders create an otherworldly valley filled with cacti, Joshua trees, seasonal wildflowers, and even some small caves.
There are also plenty of fun opportunities to clamber up the different rock formations to get a view of the valley and the park from above.
This trail is definitely short, but you should expect to spend some extra time going a bit off trail and climbing up some boulders to enjoy the scenery. While you could complete the hike in under half an hour, I suggest giving yourself an hour in your Joshua Tree itinerary so that you have plenty of time to explore.
Hidden Valley has one of the larger parking lots in the park, so it’s generally not too hard to grab a spot.
You can find restrooms with vault toilets right by the trailhead, as well as on the opposite side of the parking lot. There are also quite a few picnic tables all around the parking lot, making the area a nice spot to stop for a bite to eat or to rest your feet.
Find more information about Hidden Valley and recent reports here.
Hall of Horrors
- Length: 0.6 miles
- Elevation Gain: 26 feet
- Trail Type: Loop
- Difficulty: Easy
- Trailhead Location: Hall of Horrors Trailhead
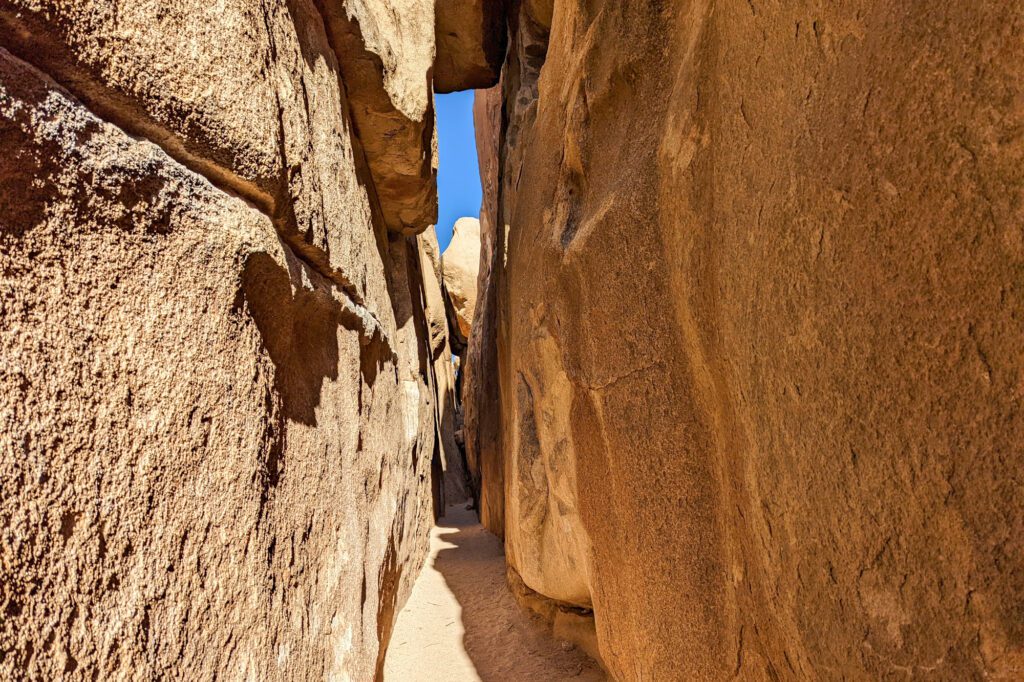
If you’re feeling adventurous and want to explore a slot canyon in Joshua Tree, Hall of Horrors is the place to go. The actual trail doesn’t lead directly to the canyon (which is called Hall of Horrors), but with a bit of rock scrambling and exploring, you’ll be able to find it.
First, let’s talk about what you’ll find on the trail. The Hall of Horrors trail feels a lot like a mini version of Hidden Valley Nature Trail. There are tons of large rock formations surrounding the area, as well as plenty of cool desert plants.
Even if you decide not to go into the slot canyon, there are lots of opportunities for rock scrambling in the area.
While the trail itself is short and very easy to hike, you’ll face more of a challenge if you decide to go off trail to the slot canyon. You’ll need to clamber over some rocks and make your way through tight spaces. Make sure you’re wearing comfortable and sturdy shoes with great traction!
There are three large boulder clusters in the Hall of Horrors area. The slot canyon is located in the large rock cluster that is furthest away from the parking lot.
Save these coordinates to Google Maps to see the exact location of the canyon. Alternatively, you can see it marked on the AllTrails map linked below.
As you start on the trail, you’ll see this cluster just about 0.1 miles into the hike.
After making your way halfway through the 0.6-mile trail, you’ll see a few paths on your right side (if hiking counterclockwise) that lead to the “entrance” to this cluster of rocks. This is where you’ll want to start scrambling over the rocks to find your way to the Hall of Horrors.
This slot canyon can be tricky to find (even if you have the coordinates saved), since there are so many rocks to climb over. It’s still a really cool area to explore, so don’t sweat it if you aren’t able to find the actual Hall of Horrors!
If you’re just doing the trail, you can expect to be done in less than 15 minutes. However, if you’re also planning on finding the Hall of Horrors, add at least another twenty minutes to your itinerary.
There’s a parking lot for the Hall of Horrors area right by the trailhead. Here, you’ll also find vault toilet restrooms.
Find more information about the Hall of Horrors trail and recent reports here.
Ryan Mountain
- Length: 2.9 miles
- Elevation Gain: 1,062 feet
- Trail Type: Out and Back
- Difficulty: Moderate
- Trailhead Location: Ryan Mountain Trailhead
Alongside Warren Peak, Ryan Mountain is another one of the best hikes for getting sweeping views of Joshua Tree National Park. It’s also a much shorter hike than Warren Peak, so it’s a perfect fit for any hiker trying to get amazing views without having to make as long of a trek.
Ryan Mountain Trail is located in the middle of some of the most visited hikes and sights in the park. It’s one of the more popular moderate-rated hikes in Joshua Tree, so expect to see other park visitors. It can be narrow at times, which means you’ll need to make way as you pass by hikers on the trail.
As you hike the trail and make your way to the peak, you’ll see a variety of different desert plants. You’ll also pass by some massive boulders at the very beginning of the trail. It’s a steady climb the entire way up the mountain, with much of the trail being made up of stairs.
While it’s shorter than Warren Peak, it’s certainly not an easy hike, so be mentally (and physically!) ready for some uphill hiking the first half of the hike.
There’s never a bad time during the day to hike Ryan Mountain, but this is a particularly nice trail to hike around sunrise and sunset. Around those times, you’ll be able to see practically the entire park in golden hour light. Of course, if you plan on hiking when it’s dark out, make sure you have the appropriate gear with you.
On average, it will take hikers about two hours to complete this hike. Add a bit of extra time if you want to relax and enjoy the views from the peak.
There are plenty of parking spots at the trailhead for Ryan Mountain. You’ll also find vault toilet restrooms right by the parking lot.
Find more information about Ryan Mountain Trail and read recent reports here.
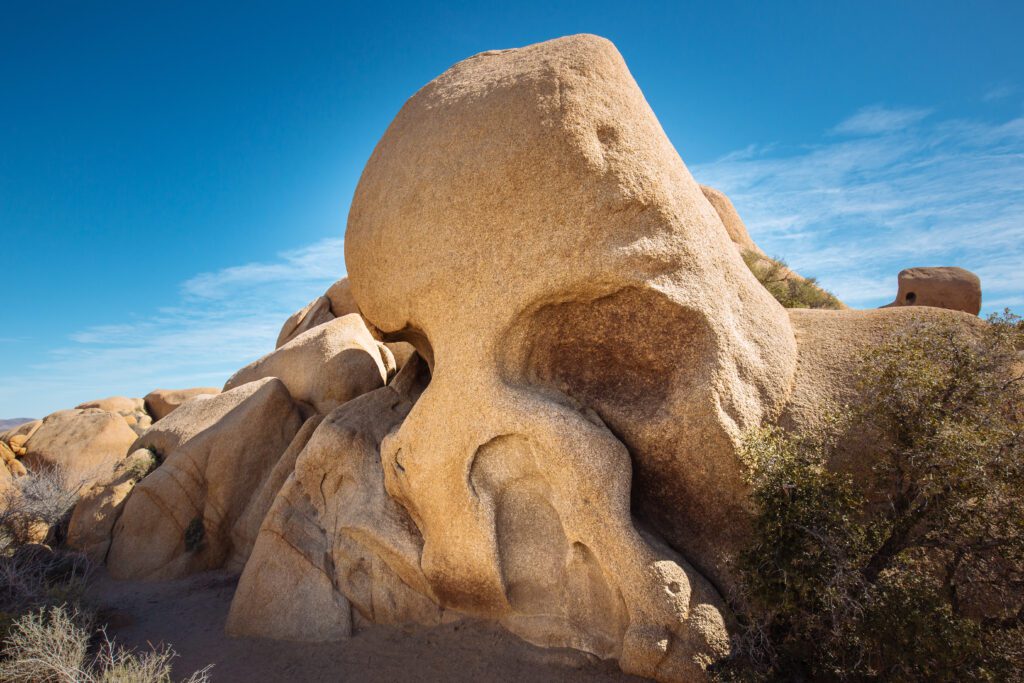
Skull Rock Loop
- Length: 1.7 miles
- Elevation Gain: 160 feet
- Trail Type: Loop
- Difficulty: Easy
- Trailhead Location: Skull Rock Loop Trailhead
Just about a 10-minute drive down the road from the Ryan Mountain Trailhead is Skull Rock Loop Trail. This trail cuts through Jumbo Rocks Campground, and is an absolute must-do if you’re camping there. This area in general is very popular, especially given that the trail is easy and very scenic. Expect to see plenty of other people as you hike.
Of course, one of the key things to see on this trail is Skull Rock. This skull-shaped boulder is one of the most photographed rocks in the park. Over many years, water slowly eroded the rock, creating two hollowed-out eyes.
Side note: if you’re short on time and just want to see the Skull Rock, it’s located right off Park Boulevard, and can be accessed without doing any hiking. I still recommend doing the entire trail as there’s a ton to see, but this is something to keep in mind if you’re planning a shorter visit.
While the loop is named after this rock, there’s a lot more to explore along the trail. After seeing Skull Rock at the very beginning of the trail, you’ll continue for about a third of a mile before hitting Jumbo Rocks (if going clockwise).
As you can guess from the name, this area is densely packed with giant boulders. This is one of the best places in the entire park for climbing up rocks. You’ll likely go off trail a bit to spend some time scrambling over the different boulders in the area.
After making your way through Jumbo Rocks, you’ll cross over Park Boulevard to another section of the trail that features incredible, massive boulders. I personally love this area, because (in my experience) it tends to be less crowded, despite the fact that it’s just as scenic and fun to explore.
Most of the crowds tend to stay on the Skull Rock and Jumbo Rocks side of the road, and don’t venture to the other side. You can easily get to super high vantage points by climbing up the rocks in the area, so have fun going off trail and exploring the area!
I will note that the trail isn’t always super clearly marked over here, so make note of where the road is, and keep an eye on the AllTrails map if you have it. That said, you’re never super far away from Park Boulevard, so it’s easy to find your way back, even if you get turned around.
On average, it takes hikers less than 40 minutes to complete the trail, but I’d definitely plan on spending at least an hour and a half here. Since there will be plenty of opportunities for scrambling up rocks, give yourself plenty of extra time to fully explore the beautiful area.
There isn’t a parking lot for this loop, so you’ll need to park on Park Boulevard. The whole section of Park Boulevard from Jumbo Rocks to the entrance to Split Rock Road can get very busy, so you may need to park a little ways away and walk over to the trailhead.
If you’re staying at Jumbo Rocks Campground, just leave your car in the lot there and join the loop trail near your campsite. You’ll also find two vault toilet restrooms in the campground.
When looking at the AllTrails map, note that this trail crosses over Park Boulevard twice. If you park further west (by the entrance to Jumbo Rocks Campground, rather than by Skull Rock), I’d recommend joining the loop trail there, rather than walking down the street to the main trailhead.
Find more information about Skull Rock Loop Trail and read recent reports here.
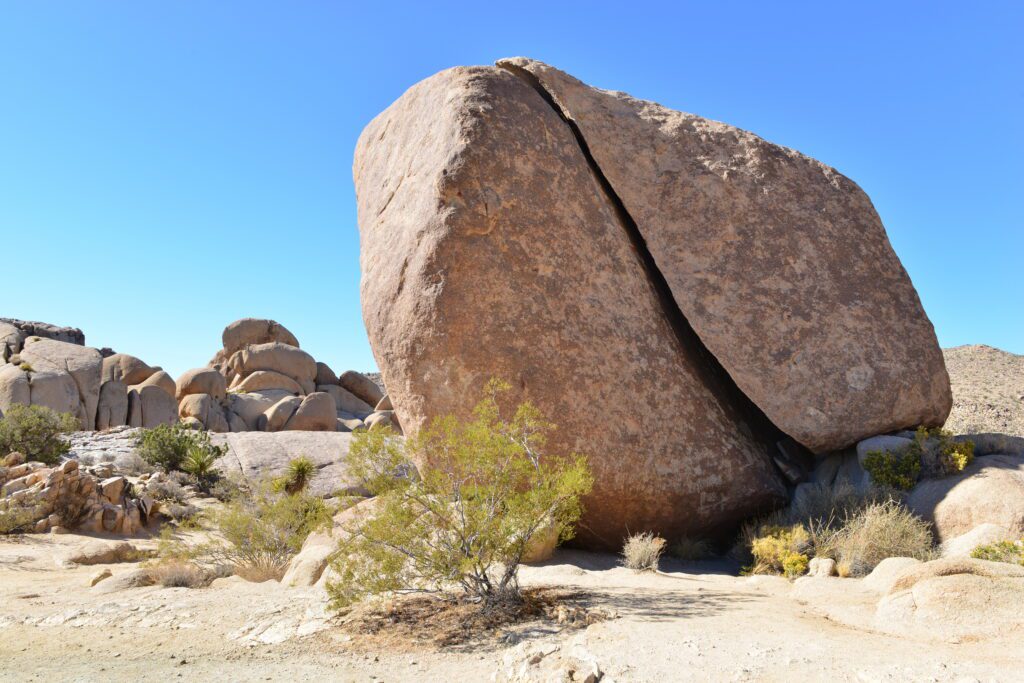
Split Rock Loop
- Length: 2.5 miles
- Elevation Gain: 275 feet
- Trail Type: Loop
- Difficulty: Easy
- Trailhead Location: Split Rock Loop Trailhead
A fun easy but slightly longer hike worth checking out is Split Rock Loop. This trail leads you through a quintessential Joshua Tree landscape.
There are tons of really picturesque rock formations of all sizes, as well as a diverse array of desert plants (if you want to learn more about the plants you’ll see on the trail, you can check out this NPS guide). It’s also a really great place to spot lizards, birds, rabbits, and other creatures.
At the trailhead, you’ll immediately see Split Rock. There are also plenty of tables here, so it’s a great spot to relax or stop for a bite to eat. About a mile and a half in, you’ll see Face Rock, which eerily looks like a person’s profile.
It’s easy to miss the off-shoot leading to Face Rock, so make sure you note where it’s located on the trail before embarking on your hike.
I have found that some sections of this trail aren’t super clearly marked. While you can find your way without it, it can definitely be useful to have a map of the trail downloaded for offline use.
On average, it will take about an hour to complete this hike. Like many others in the area, this is a well-trafficked trail, so you’ll most likely see other hikers.
There’s a parking lot right at the trailhead, but it’s very small. If there aren’t any free spots, you’ll need to park along Park Boulevard and walk to the trailhead. It’s a bit over half a mile. Unfortunately, you aren’t able to park on Split Rock Road.
Also note that there isn’t a restroom at this trail. The closest one is back at Jumbo Rocks Campground.
Find more information about Split Rock Loop Trail and read recent reports here.
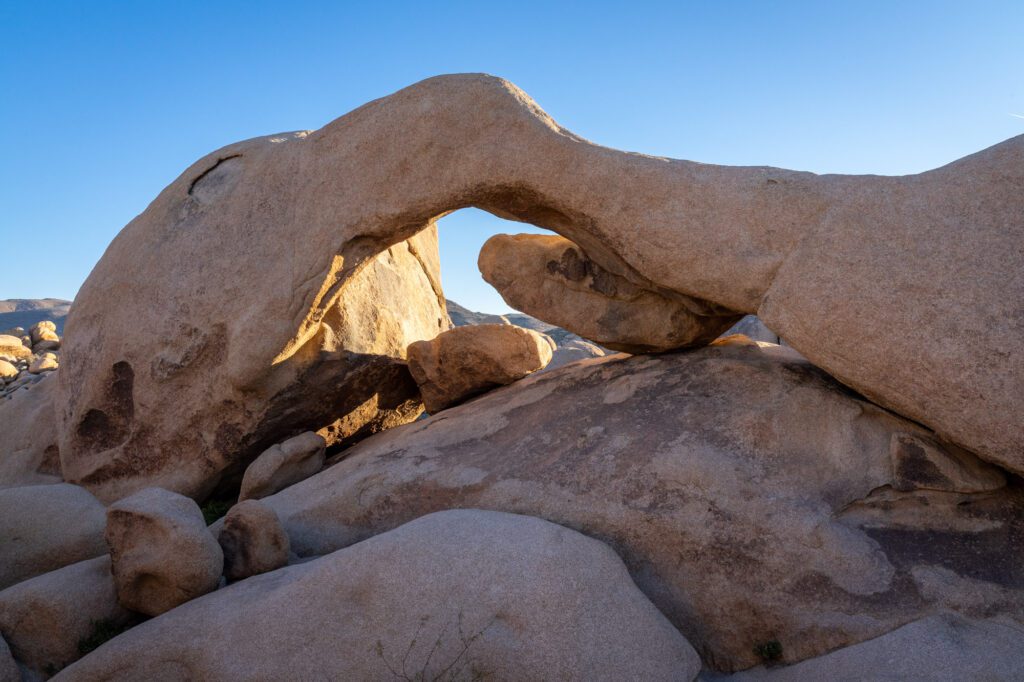
Arch Rock
- Length: 1.4 miles
- Elevation Gain: 88 feet
- Trail Type: Out and Back
- Difficulty: Easy
- Trailhead Location: Arch Rock Trailhead
One of the Joshua Tree hikes that you won’t want to miss is Arch Rock Nature Trail. Along with Skull Rock, Arch Rock is one of the most photographed rock formations in the park.
While the first half mile of the trail admittedly isn’t too exciting, it starts to get very cool once you get close to the densely packed collection of boulders where Arch Rock is located.
Make a note that you’ll need to go slightly off trail to get up close to Arch Rock. Save the coordinates so that you know exactly where to go.
If you want a photo underneath the arch, you do need to do a bit of rock scrambling, so be sure to wear good shoes! Keep in mind that this is a popular spot, so you may need to wait in line a bit to get your shot.
Like many other trails in Joshua Tree, there are some great opportunities for rock scrambling if you go off trail. Once you hit Arch Rock, rather than turning around and continuing on the trail, I suggest walking past the rock formation and exploring the many boulders in that area.
It’s easy to get turned around, so make sure you stay aware of what direction you came from so you can make your way back to the car.
If you’re feeling a little more adventurous, you can also go off trail to find Heart Rock, which is about 0.3 miles from Arch Rock. You can use this AllTrails Map as a guide to find it. I’d also recommend saving the coordinates for Heart Rock so that you know exactly where to go.
It will typically take hikers about half an hour to finish Arch Rock Nature Trail. That said, give yourself some extra time if you want to do some rock scrambling and off-trail exploring. Additionally, plan accordingly if you want to take a photo at Arch Rock, since you’ll likely need to wait in line.
There is a small parking lot at the Arch Rock trailhead. Note that you’ll be parking on the opposite side of the road from Arch Rock. Follow the trail for about 0.1 miles, cross over Pinto Basin Road, and then make your way to the rock.
If you happen to be camping at White Tank Campground, you can easily hike over to Arch Rock from your campsite. You’ll actually be much closer to the rock than you would be if you parked at the main trailhead. Look for the Arch Rock Nature Trail sign towards the north side of the campground.
There isn’t a restroom at the parking lot, but there is one near White Tank Campground. Note that it’s a bit of a walk from Arch Rock in the opposite direction from where you’ll be coming from, so it’s not super convenient.
Find more information about Arch Rock Nature Trail and read recent reports here.
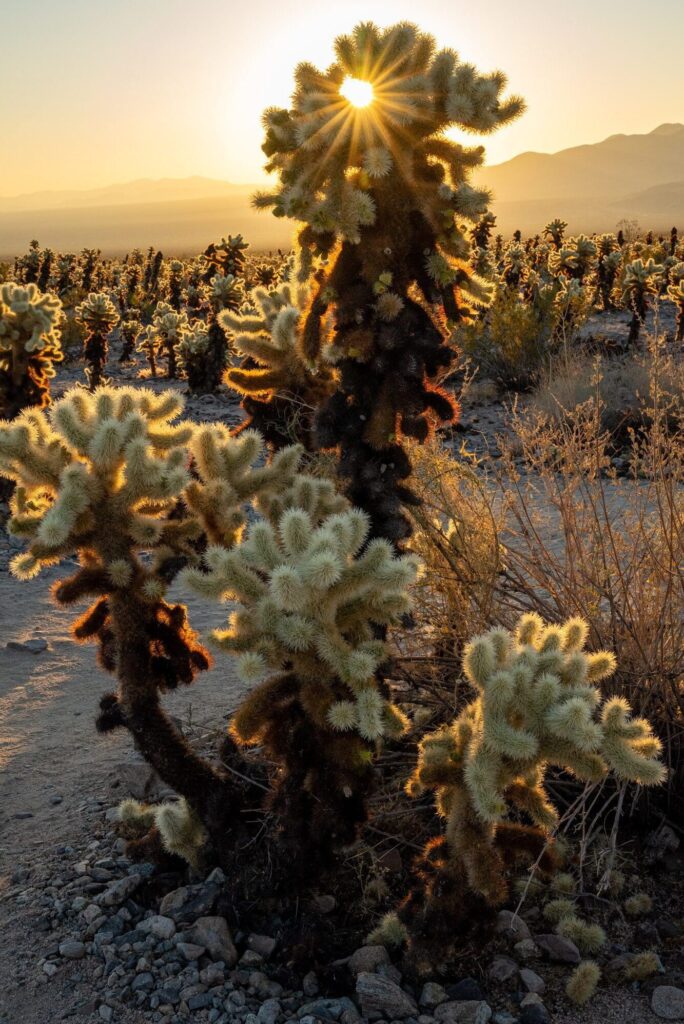
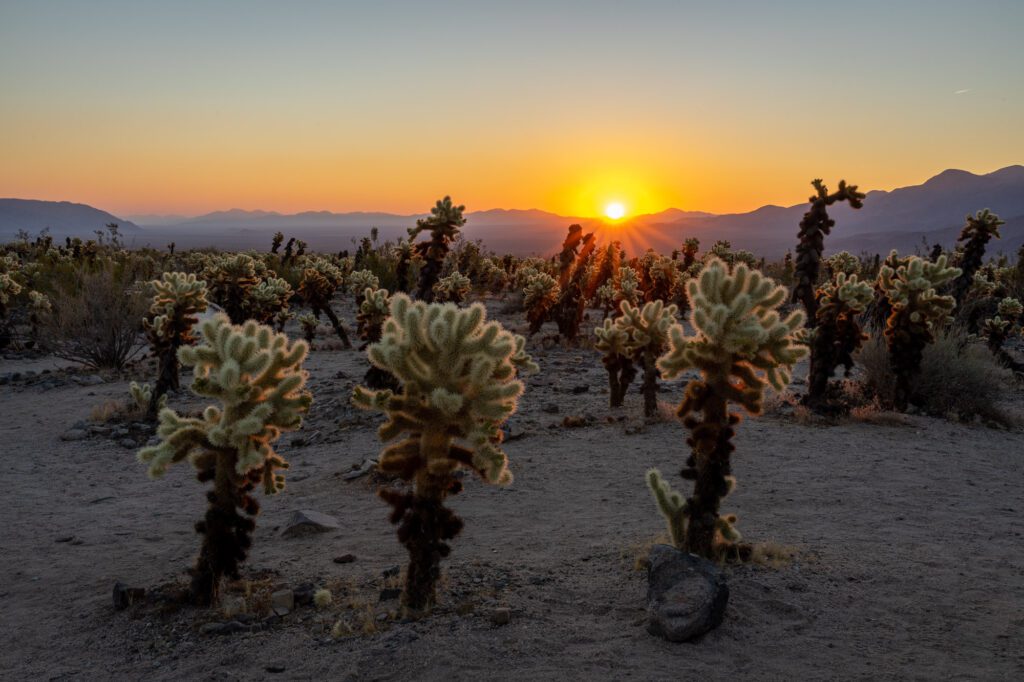
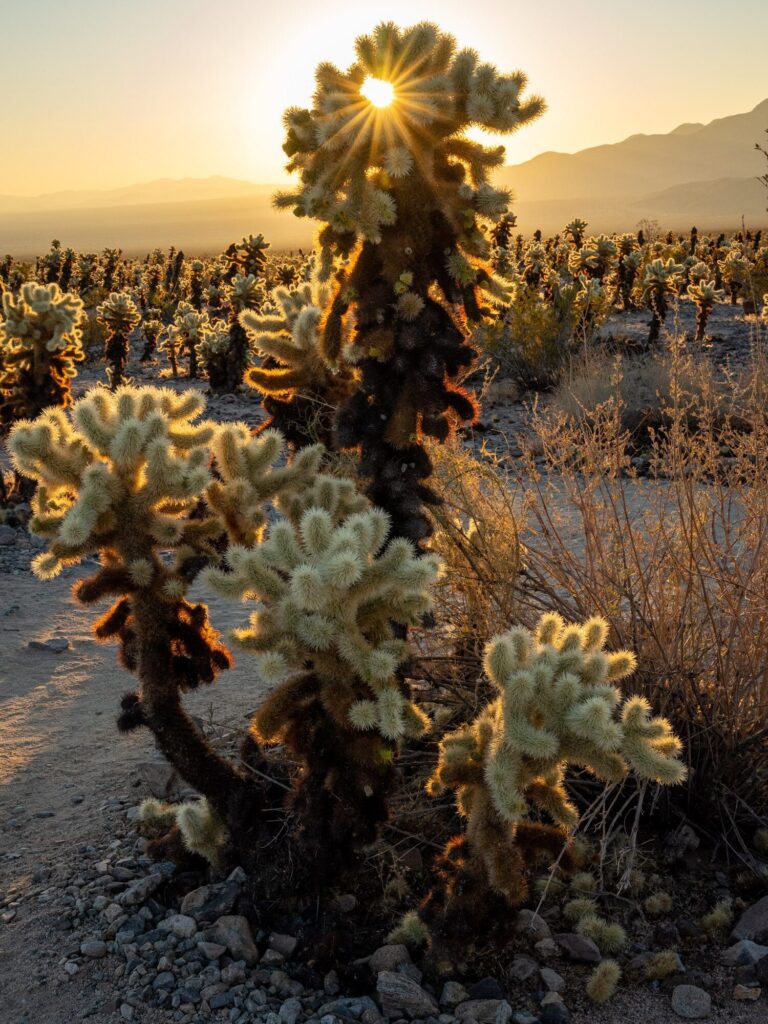
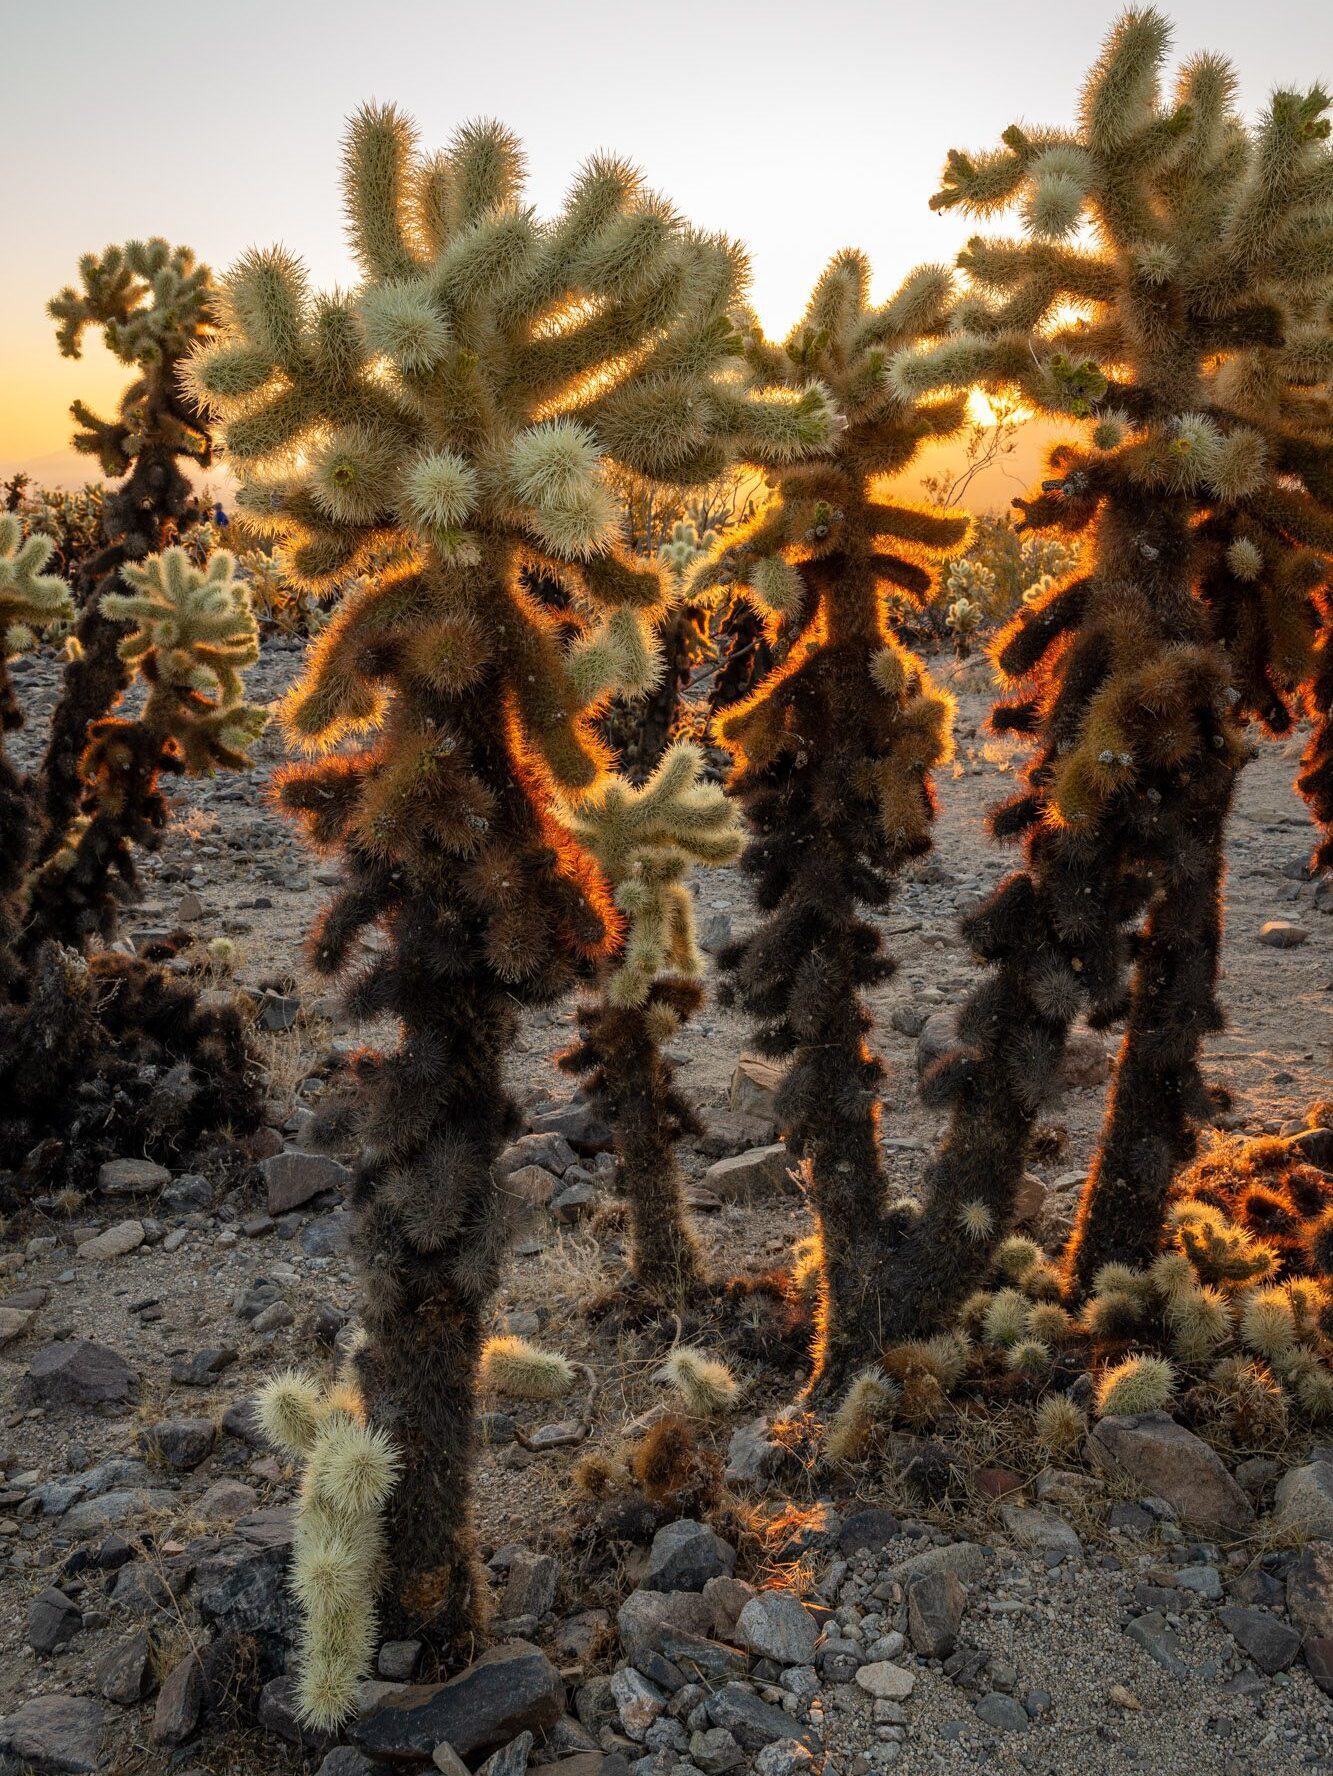
Cholla Cactus Garden
- Length: 0.3 miles
- Elevation Gain: 9 feet
- Trail Type: Loop
- Difficulty: Easy
- Trailhead Location: Cholla Cactus Garden Trailhead
The very short Cholla Cactus Garden Trail can hardly be considered a full-fledged hike, but it offers an experience very unique to Joshua Tree, so it’s still definitely worth a visit. This loop trail leads you through an area that is jam-packed with cholla cacti.
Depending on when you visit, you may see an array of different desert wildflowers in bloom, as well. You can read more about the plants in the area on this NPS guide.
Cholla cacti have unique, super concentrated needles that are somewhat translucent. These needles glow in the golden hour light, so this is a particularly great place to visit right around sunrise and the hour or so before sunset.
The loop trail is busiest around these times (particularly around sunset), so be prepared for some crowds.
One of the most important things to know before visiting this trail is that cholla cactus needles are very spiky. They’ve been given the nickname “jumping cholla,” since the stems easily break off and fall to the ground.
Be aware of your surroundings, and lookout for broken off cacti stems – you don’t want them attaching to your shoes or ankles! With this in mind, this is also an area that you definitely don’t want to explore off the trail.
If you’re interested in stargazing, this is a really excellent place to do so. Since the garden is towards the center of the park, it’s further away from the light pollution from the town of Joshua Tree and the surrounding communities.
This creates the perfect conditions for stargazing. I suggest visiting Cholla Cactus Garden around sunset, and packing dinner to enjoy as you wait for the sun to completely go down. Once it gets dark, I highly recommend you stay in the parking lot or near the road to avoid accidentally running into a cactus!
A walk along this loop trail should only take about 5 minutes. Of course, schedule in some extra time to admire the views.
There’s a small parking lot at the trailhead for Cholla Cactus Garden. Since it’s a very popular spot, you may need to street park on Pinto Basin Road, especially if you’re visiting around sunset. Note that there is not a restroom at this trail.
Find more information about Cholla Cactus Garden and read recent reports here.
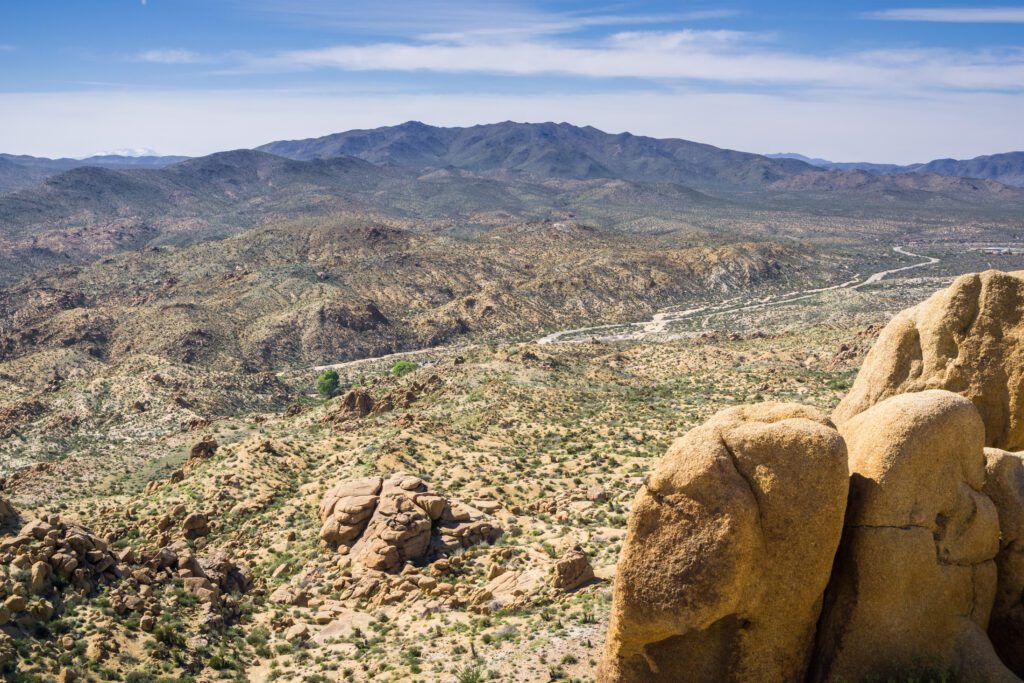
Mastodon Peak
- Length: 2.6 miles
- Elevation Gain: 423 feet
- Trail Type: Loop
- Difficulty: Easy
- Trailhead Location: Mastodon Peak Trailhead
Mastodon Peak is another great trail worth checking out, especially if you’re interested in exploring the less visited southern part of the park. This loop trail starts at Cottonwood Spring Oasis, a picturesque oasis packed with fan palm trees.
A mile into the hike, you’ll reach Mastodon Peak, where you can scramble up some boulders to get to the highest point. Shortly after, you’ll reach what remains of the Mastodon gold ore mine, which dates back to 1934. While of course now closed off, you can still see the mine shaft from the trail.
It’s important to note that this loop trail is located quite a distance away from the most popular trails in the park.
The trailhead for Mastodon Peak is about a 50-minute drive south of some of the more commonly visited trails in the park, such as Skull Rock Loop and Arch Rock Nature Trail. Keep this in mind when planning your itinerary.
The fact that it is so far south means that it’s not as heavily trafficked as many other trails. It’s still a popular place to hike, but it likely won’t be as crowded as other trails you visit during your trip. It typically takes hikers a bit over an hour to finish this hike.
There’s a parking lot at the very end of Cottonwood Oasis Road, right at the trailhead. You can also park along the road if the lot is full. There isn’t a restroom here, but you can find one at Cottonwood Visitor Center, which is about a mile up the road.
Find more information about Mastodon Peak and read recent reports here.
Lost Palms Oasis

- Length: 7.5 miles
- Elevation Gain: 1,046 feet
- Trail Type: Out and Back
- Difficulty: Moderate
- Trailhead Location: Lost Palms Oasis Trailhead
If you’re craving a longer and more challenging hike, Lost Palms Oasis Trail is one of your best options. It’s a fairly popular spot, but just like the Mastodon Peak hike, it’s not quite as well trafficked as other trails in the park, since it’s so far south.
This trail takes you through the desert landscape, eventually leading you to a palm tree oasis. Be prepared to climb up and down some hills along the way. You will also need to scramble down some rocks to actually get to the oasis, so keep that in mind.
If you’re worried about climbing back up, admire the oasis from above instead!
For the first three-quarters of a mile, the Lost Palms Oasis hike shares the same trail as the Mastodon Peak hike. This means you’ll also get to enjoy the Cottonwood Spring Oasis right at the start of the hike.
Once you hike about three-quarters of a mile, you’ll continue straight rather than turning left towards the peak. If you’d like to, you can take a quick detour to go up to Mastodon Peak. It’ll only add a little over half a mile to your hike.
On average, it takes hikers a bit over three hours to finish this hike (not including Mastodon Peak). Since it’s one of the longer trails in the park, be sure you bring extra water, snacks, and plenty of sun protection.
I also suggest starting this hike earlier in the morning to avoid the midday heat. Signs in the area recommend starting no later than 10:00am, but the earlier, the better.
This trail shares the same parking lot as Mastodon Peak Loop Trail, located at the end of Cottonwood Oasis Road. If you need a restroom, drive a mile down the road to the Cottonwood Visitor Center.
Find more information about Lost Palms Oasis Trail and read recent reports here.
You Might Also Like
- JOSHUA TREE: How to Plan an Amazing Joshua Tree Itinerary
- JOSHUA TREE: How to Spend One Day in Joshua Tree National Park
- JOSHUA TREE: Where to Stay near Joshua Tree National Park
- JOSHUA TREE: The Best Time to Visit Joshua Tree National Park (+ the Worst Time)
- PALM SPRINGS: How to Spend an Amazing Weekend in Palm Springs
- DEATH VALLEY: How to Plan an Incredible Death Valley Itinerary (3 Days)