How to Plan an Amazing Washington State Road Trip
Looking to plan an amazing Washington State Road Trip? You’re in the right place. Matt’s family still lives in the Seattle area, and we regularly venture north from our home base in Oregon to explore Washington State. Some of our favorite memories from the past few years (including when we spent the better part of a summer living in a van road tripping around Washington) were made in the northwest corner of the US.
In this detailed guide, we’re going to go over a perfect road trip itinerary that takes you to all three national parks in Washington over 14 days, which is based on our own experiences exploring the state.
Have more or less time than that? Have no fear, we’ve got ideas on how to structure a trip with more and less time below the main itinerary, and you can use the details in the main itinerary to help you plan out your trip.
Now, we might be biased since Matt grew up in the Seattle area, but we firmly believe that this has to be the most scenic road trip in the United States.
From the diverse collection of landscapes on the Olympic Peninsula, to majestic Mount Rainier and the rugged North Cascades, prepare to be immersed in some of the most stunning landscapes in the country, full of awesome hikes and jaw-dropping views from beginning to end.
In this complete guide to planning your Washington road trip itinerary, we’re going to give you the logistics you need to know – when to visit and our recommended route – along with a mini guide to each place on the itinerary.
That mini guide will have information like what to do and where to stay – all based on our own experiences exploring Washington – along with links to more in-depth content we’ve written on the destination.
In each “where to stay” section, we’ll give you options for camping (which is what we usually do) and not camping, which we recognize is what the vast majority of people prefer.
Finally, at the end, we’ll give you some ideas on how to shorten or lengthen the itinerary to fit your particular trip.
Sound good to you? This guide is super detailed, full of our tips and favorite places based on our extensive experience exploring Washington, which means it’s LONG. Strap yourself in, grab a cup of coffee (or beer or wine, no judgment here), and let’s get to exploring Washington State!
Disclaimer: Some of the links in this post, like hotel links, are affiliate links, meaning at no additional cost to you, we make a little bit of money if you click through and book. That being said, we would never recommend something to you that we don’t stand behind 100%.
How Many Days Do You Need for This Road Trip?
The short version of the longer answer below is at least 14 days, if you want to see all three national parks in the state. With less time, you can still plan a great trip, but you’ll need to make some decisions and focus a little bit.
There’s going to be a lot of driving (things are further than you think), but if you plan it right and spend at least two days in all of the parks, it’s going to be magical.
If you want to fit in Washington’s three national parks – Olympic, Mount Rainier, and the North Cascades – you’re going to need at least 14 days.
11 or 12 days would be doable if you’re willing to cut the North Cascades, which is a big drive from the other places on this itinerary.
Each park deserves two to three days at the very least to justify the amount of driving you’ll need to do to connect them.
If you have anything less than 10 days, we’d strongly recommend cutting the North Cascades (a shame, we know) and focusing on Olympic, Mount Rainier, and the Seattle area.
You could still head over to Leavenworth for a day and hike Colchuck Lake, but the North Cascades are going to be too far out of the way to justify the drive time.
With 7 days, you can do a sweet little loop that covers the Olympic Peninsula and Mount Rainier. That trip basically follows the first seven days of the itinerary below. The breakdown would essentially be three days in Olympic National Park (here’s a guide!), three days in Rainier, and one day in Seattle.
We have an entire section dedicated to what to do with less time with some itinerary ideas at the bottom of this guide.
With more than two weeks, we’d recommend choosing two places to add a couple of extra days each.
The locations we’d choose between are the San Juan Islands, Seattle, and Mount Baker, and we have a “More Time” section below the main itinerary covering what to do and see and where to stay in each place.
Want to experience Washington State in a campervan?
We own a van from Peace Vans in Seattle (their “modern” model, built on a Mercedes Metris) and highly recommend them.
The metris is a smaller footprint than the big Sprinter and Dodge Ram Promaster, which is why we like it. There’s still plenty of space, and the pop-top makes it even more spacious.
You can rent a van from Peace Vans on Outdoorsy, which would be a great way to experience Washington State (trust us, we’ve done it!).
The Best Time to Plan a Road Trip in Washington State
This is a very, very important section in this guide, which is why it’s one of the first things we’re talking about.
If you are interested in hiking in the Cascades – specifically near Mount Rainier and in the North Cascades – your trip will need to be sometime between late July and mid-October.
Otherwise, high elevation hiking trails (like the ones in both of those parks) will be covered in snow, and some roads and sections of the parks will be closed.
You can still access certain parts of the parks – Paradise at Rainier is open year round (except in notable snow storms) and the North Cascades Highway is usually open up to Ross Dam in the winter and spring (same caveat about storms here), but that’s about it.
The exact timing depends on the year, precipitation, and spring temperatures (among other factors), but you will be most safe with a trip in August or September.
Late July and October can depend on the year, but we’ve been to both Rainier and the North Cascades in late July and found a bit of snow, but nothing crazy.
Check road conditions for Rainier here, and the North Cascades here.
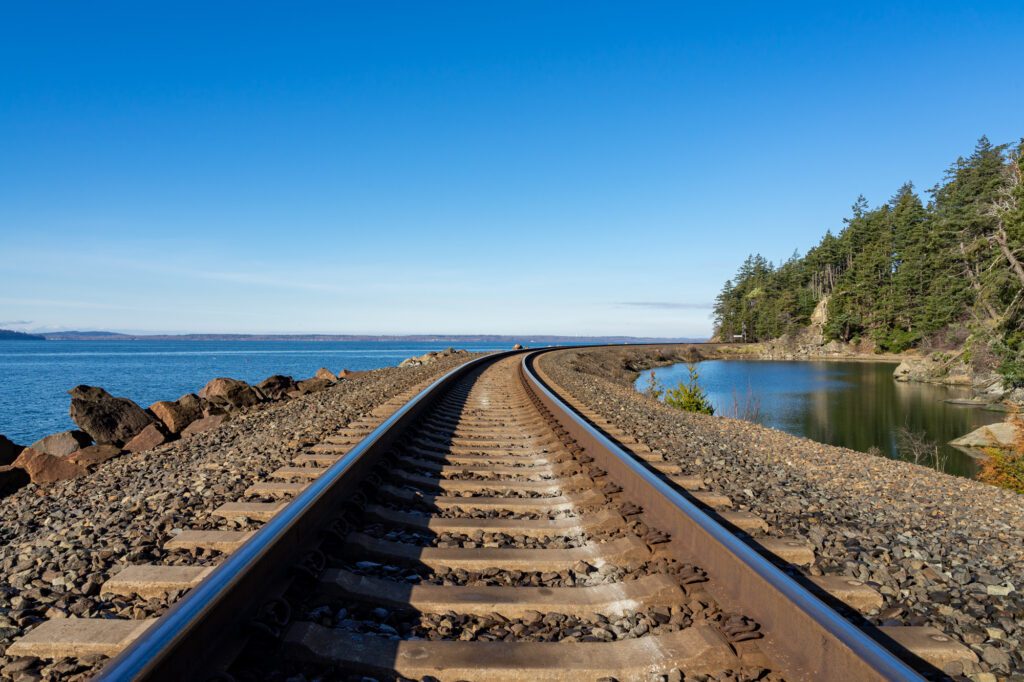
Where to Start and End Your Road Trip
The road trip route below starts and ends in Seattle. The easiest place to fly into is going to be Seattle-Tacoma International Airport (SEA), known as “SeaTac” to most people who live in and around Seattle.
You could rearrange this road trip to start in Seattle and end in Portland, if you’re interested in exploring the area around Portland at the end of your trip. Which we both love and recommend (because, you know, we live in Portland).
How to Plan a Perfect 14 Day Washington Road Trip Itinerary
Here is the route that we’d recommend with 14 days in Washington – which features all three of the National Parks in Washington State, and makes a big loop around the state starting and ending in Seattle.
- Day 1: Arrive in Seattle, Drive to Olympic National Park
- Day 2: Olympic National Park (Hurricane Ridge + Lake Crescent)
- Day 3: Olympic National Park (Around Forks – Rainforests + Beaches)
- Day 4: Olympic National Park (Around Forks – Rainforests + Beaches)
- Day 5: Mount Rainier National Park (Paradise)
- Day 6: Mount Rainier National Park (Paradise)
- Day 7: Mount Rainier National Park (Sunrise)
- Day 8: Bellingham
- Day 9: North Cascades National Park
- Day 10: North Cascades National Park
- Day 11: Leavenworth
- Day 12: Leavenworth
- Day 13: Seattle
- Day 14: Seattle & Fly Home
Of course, that’s just the base itinerary that we’d recommend. The exact route you take is going to depend on your particular interests, what time of year you’re visiting, and more factors than we can possibly take into account here.
We have ideas for shorter and longer itineraries below the main itinerary if you have more or less time.
We’ll do our best to give you all the information you need to plan YOUR road trip in Washington, but if we miss something or you have more questions, leave us a comment below and we’ll do our best to either answer your question, or point you to someone who can.
Now that we’ve covered the important logistics, let’s get into the detailed itinerary!
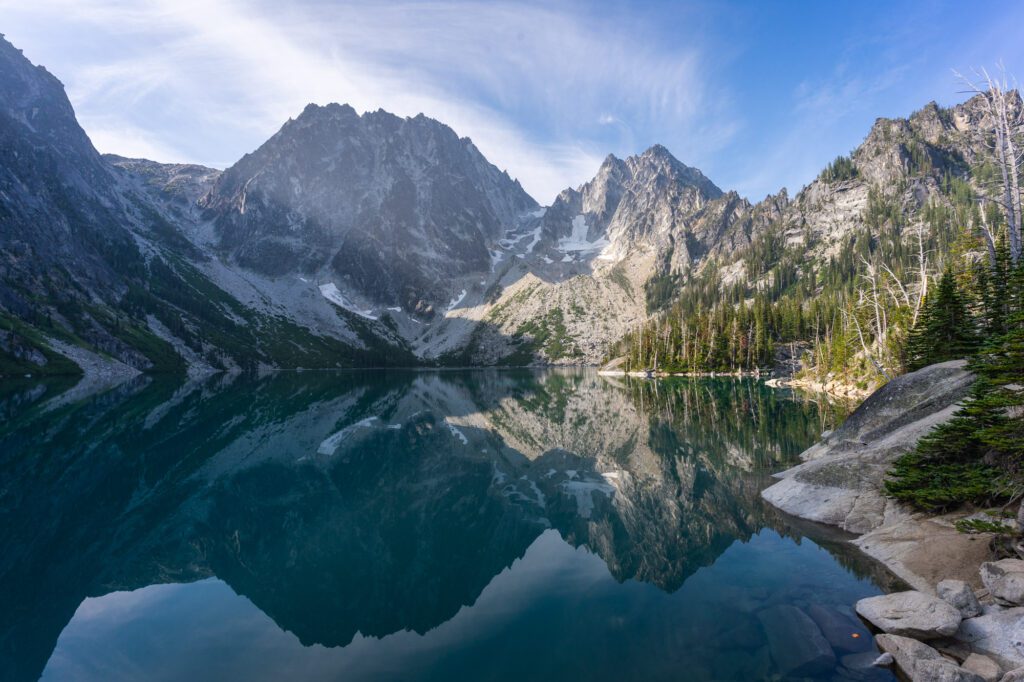
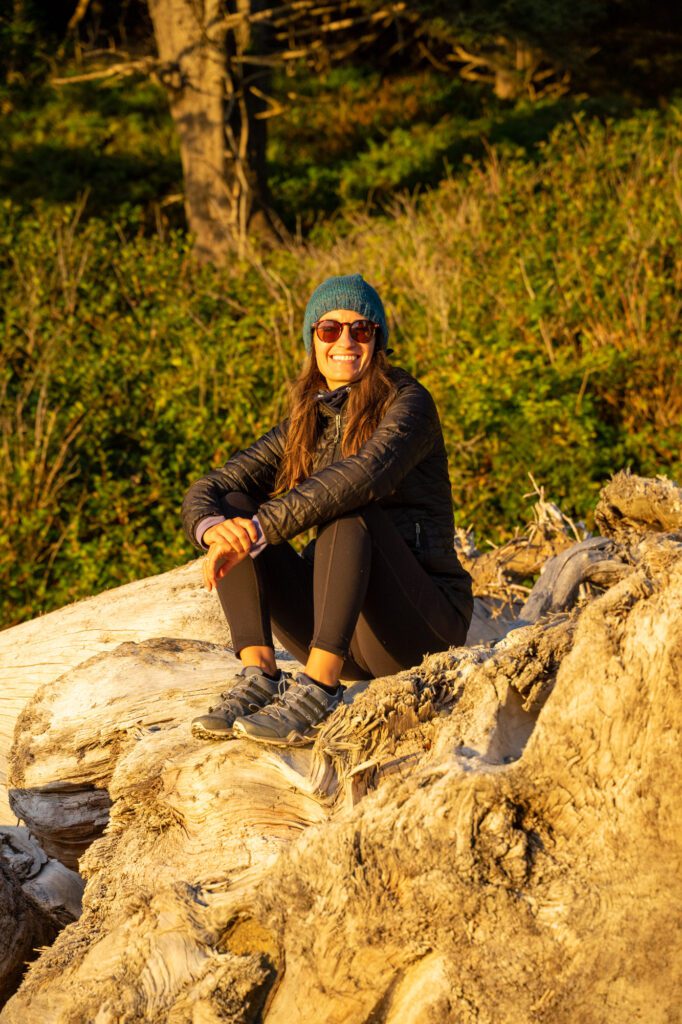
Days 1-4: Olympic National Park
Before we get into the best places to explore in Olympic National Park, it would make sense to quickly cover geography first.
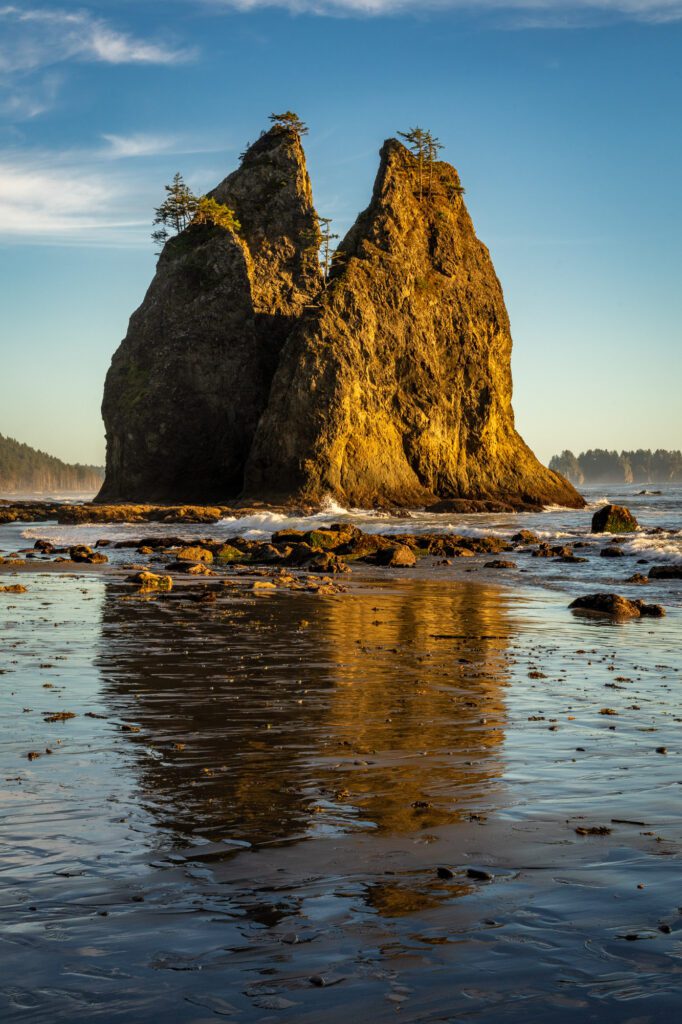
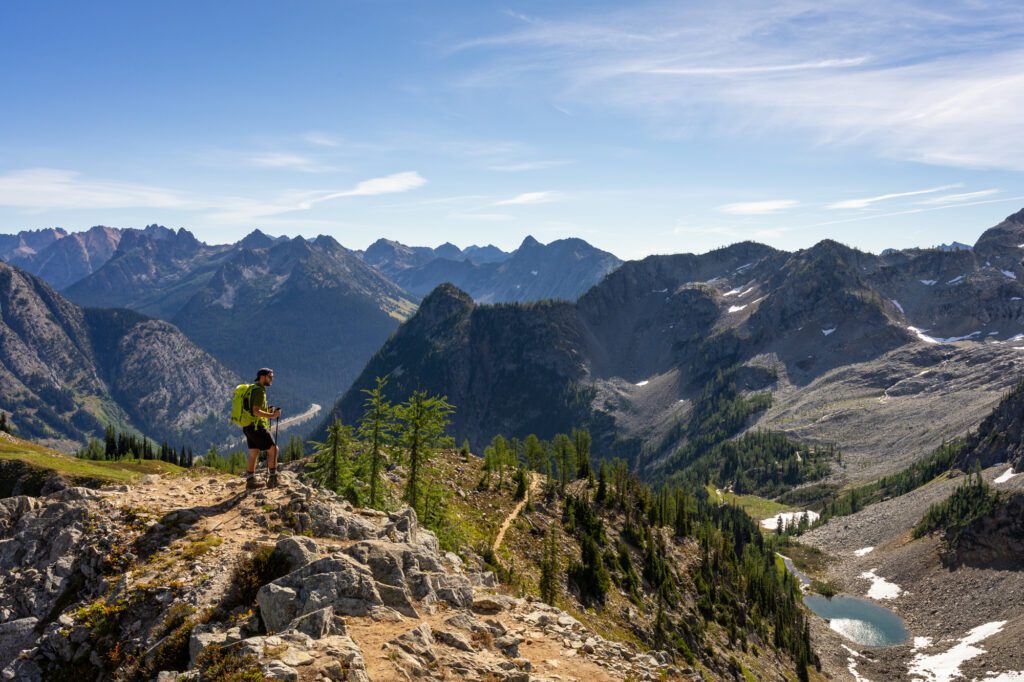
Olympic National Park is GIGANTIC. It’s also incredibly diverse – you’ll see everything from towering sea stacks rising out of the sandy beach on the Pacific Ocean, to the most spectacular temperate rainforest in the United States, and waterfalls galore.
The other thing to know is that it is WET. It rains a ton, hence the rainforests. Bring a rain jacket and waterproof shoes and thank us later.
There are four main regions of the park that we’d recommend that you take the time to explore.
- Hurricane Ridge & Lake Crescent – This region features towering mountains on the north side of the Olympic Peninsula. It’s easy to get to from all points east, like Seattle, and it also sits just 17 miles south of Port Angeles. Don’t miss Sol Duc Falls, Marymere Falls, and Hurricane Hill.
- La Push Beaches – Rialto, First, Second, and Third Beach will all provide you with million-dollar sunsets and views onto the sea stacks with cliffs rising up from the sea. Make sure to look up too! You might spot the elusive bald eagle waiting patiently for its next meal (we saw two on our recent trip).
- Hoh Rainforest – This is the moss-covered rainforest region that features sphagnum moss, wildlife, old-growth Sitka spruce, ferns, banana slugs, and wildlife of all kinds.
- Lake Quinault – This is a region in the western part of the park that features the stunning Lake Quinault, located within the extraordinary Quinault Rainforest.
To make the most of your time here, you’ll want to make a counter-clockwise loop starting with Hurricane Ridge and Lake Crescent, moving west to Forks and the Pacific Coast, and ending with a drive south along the coast, with a few beach stops along the way.
It also makes sense to split your time in terms of where you stay, staying two nights in the northern region of the park, and two nights out on the coast near Forks.
You’ll want to spend your first two nights near Port Angeles, a good home base for Hurricane Ridge and Lake Crescent, then spend the next two nights in Forks (yep, that Forks) to do the Hoh Rainforest and Pacific Beaches.
One other thing: There are no two ways about it – getting from the Olympic Peninsula to Mount Rainier National Park requires some driving, so be prepared for a long drive at the end of this leg.
Getting to Olympic National Park
On your first day, pick up your rental car and drive out to the area around Port Angeles, which is the perfect home base for Hurricane Ridge and Lake Crescent.
There are two possible routes – one that involves driving into Seattle and taking an expensive ferry to Bainbridge Island, and one that involves driving around to the south and taking the Narrows Bridge in Tacoma to get onto the Peninsula.
If you’re coming from Seattle-Tacoma International Airport, you’re already about 30 minutes south of the city, and traffic going into the city is basically a nightmare at all hours these days.
We’d opt for the long (and also, free) way around, because it means you don’t have to deal with driving into Seattle (which can be a veritable nightmare) and you don’t have to pay to take the ferry (which can be expensive with a car).
The drive from SeaTac to Port Angeles should take you around two and a half hours, depending on traffic.
What to Do in Olympic National Park
Here are some of our favorite things to do in Olympic National Park. Again, it’s a big, sprawling park, so we’ve included the region in parentheses to help you figure out how to fit it all together.
We’ll also start from the northern edge around Hurricane Ridge and Lake Crescent and make our way counter-clockwise, just like we’ve recommended you do, so these places will be mostly in chronological order in terms of when you’ll encounter them.
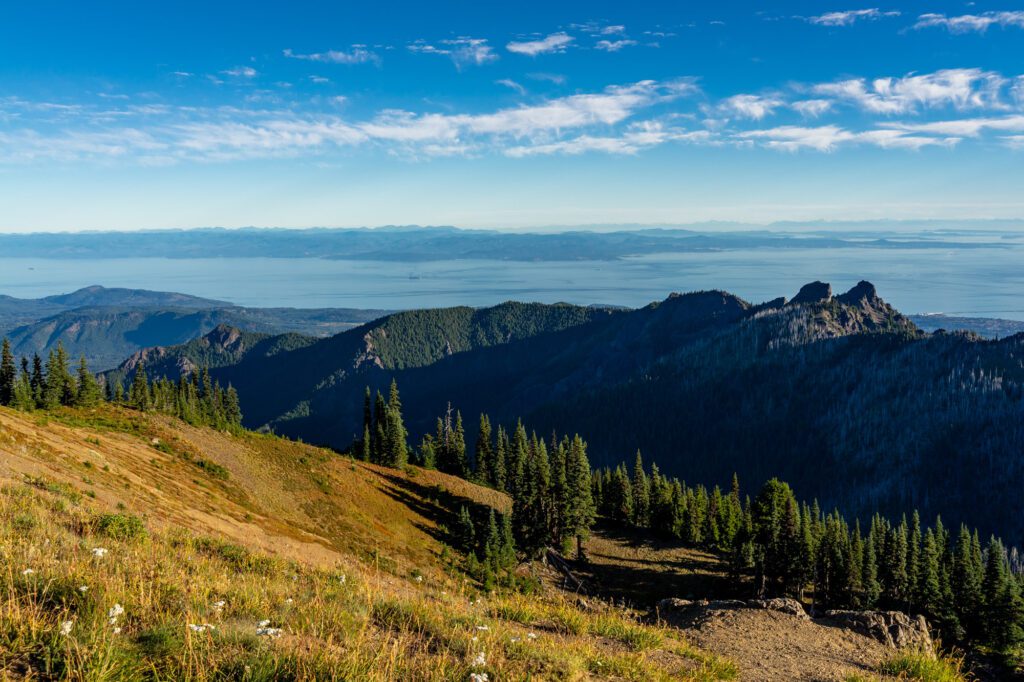
Hike Hurricane Hill (Hurricane Ridge): A nice, paved path takes you up to the top of Hurricane Hill. From the top of the hike on a clear day, you’ll have sweeping views in all directions, including Vancouver Island and the Strait of Juan de Fuca to the north, Mount Baker and the San Juan Islands to the west, and the Olympic Range to the south. It’s a relatively easy hike. 3.2 miles / 650 feet elevation gain. More trail information here.
Explore Around Lake Crescent (Lake Crescent): Lake Crescent is a huge lake on the northern edge of the park. There’s a nice trail through the woods to the historic Lake Crescent Lodge, which would be a good place for lunch (if you didn’t pack your own), or a drink along the lake shore. After a break, do the short hike over to Marymere Falls, an easy stroll through the woods to a beautiful waterfall that is 90 feet high. If you’re feeling up for an adventure, hike up to Mount Storm King for sweeping views out over the lake (it’s a tough hike, and we think there are better options in the park).
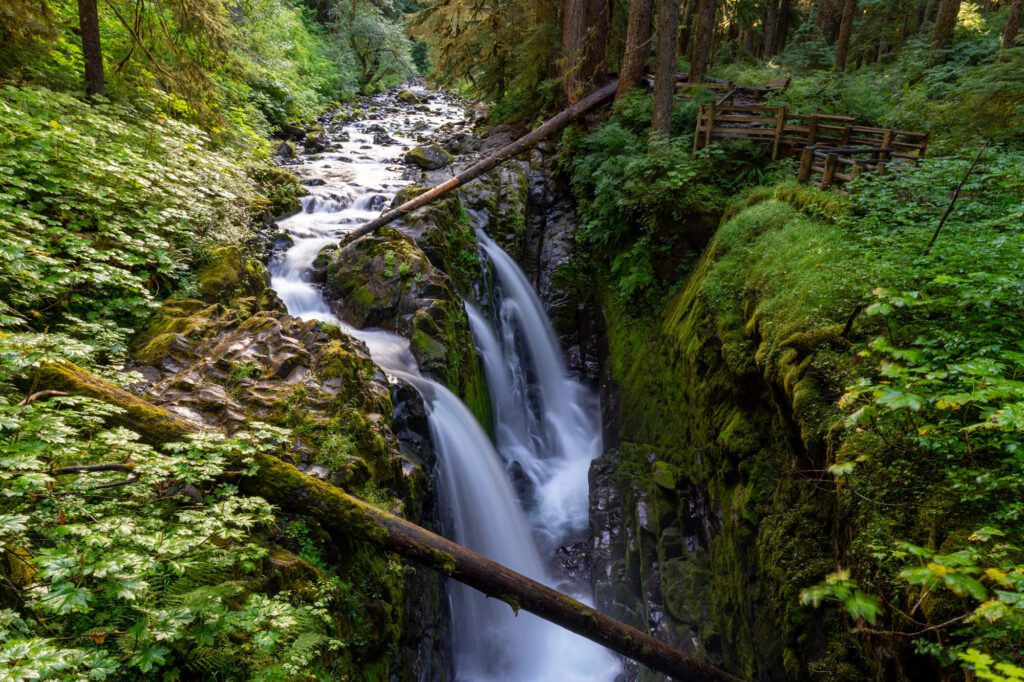
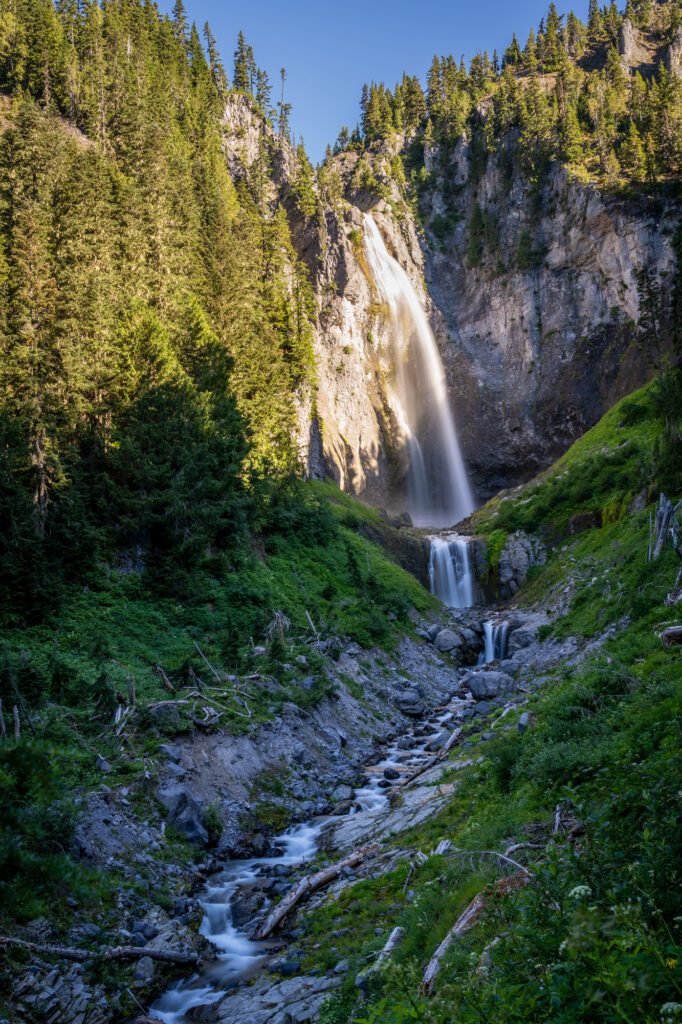
Sol Duc Falls (Lake Crescent): A short hike through a mossy forest brings you to Sol Duc Falls, a beautiful waterfall that you view from above thanks to a wooden bridge over the river. It’s a quick and easy hike, and it’s one of our favorite waterfalls in Washington State.
Shi Shi Beach and Cape Flattery (Pacific Coast): The northern Pacific Coast is the more rugged, less-visited stretch of coast. It takes a bit longer to reach (it’s about an hour from the junction on Highway 101), but the drive is beautiful and takes you along the northern coast through Neah Bay. It’s worth stopping at the Makah Museum to learn about the tribe that calls this area home, and pick up a recreation pass that you need to park at both of these places. Cape Flattery is the northwestern tip of the contiguous United States, and a short boardwalk leads you out to a nice view. Shi Shi Beach is one of the best beaches in the park, and also one of the least-visited. It’s a short, relatively easy hike out to the beach, and then you can walk for miles along the beach (we’d go to Point of Arches at the southern end of the beach).
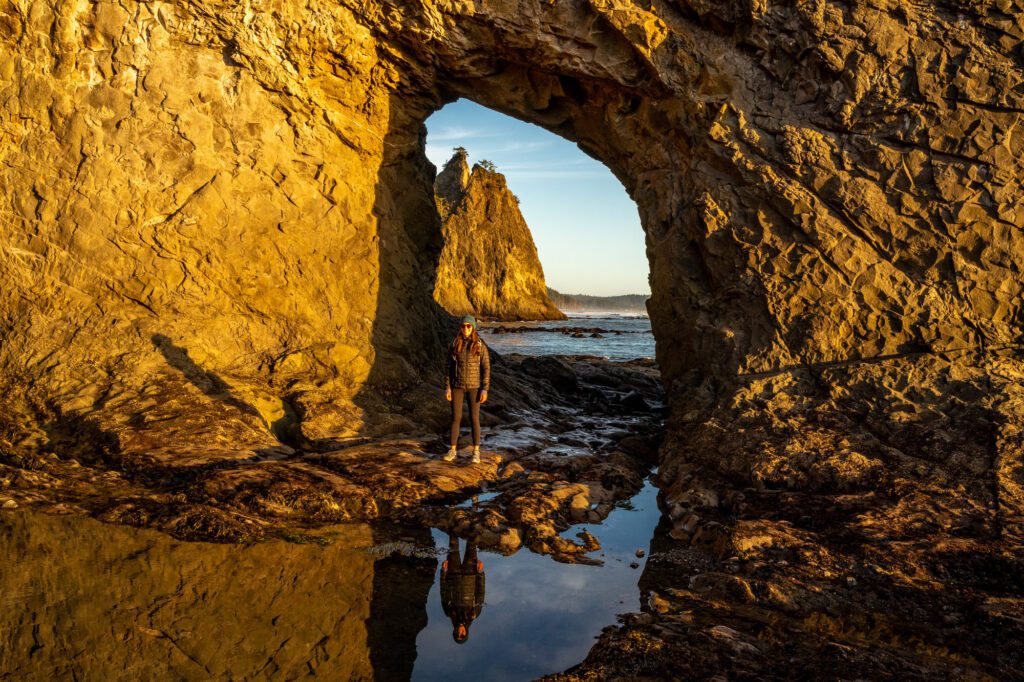
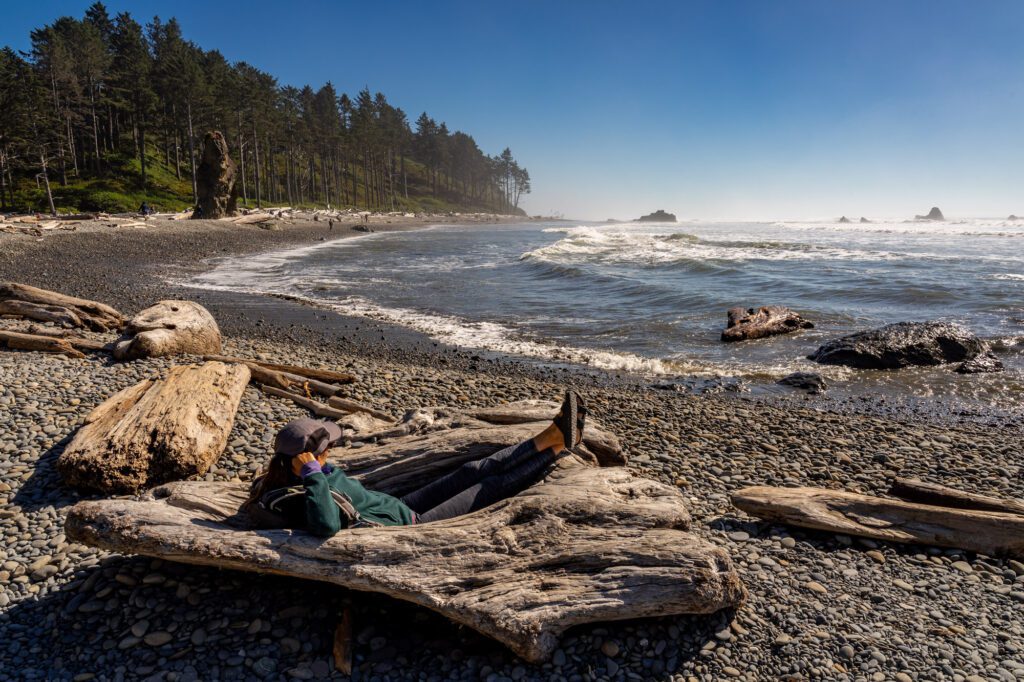
Rialto Beach and Hole-in-the-Wall (Pacific Coast): This is one of our favorite hikes in Olympic National Park, though it’s a little hard to call it a hike because it’s more of a stroll along the beach. We’ve been here multiple times now, and we still can’t get over the near-perfect weather we got on our first visit, a warm summer evening with a few clouds in the sky (which is rare out here). You’ll walk out a mile or so to a rock formation called Hole-in-the-Wall, which is exactly what it sounds like. Along the way, there are sea stacks towering over you and bald eagles waiting in the trees above. It’s magical, though it’s often rainy and/or foggy out here. Check tide tables for a low tide if you want to be able to walk through Hole-in-the-Wall.
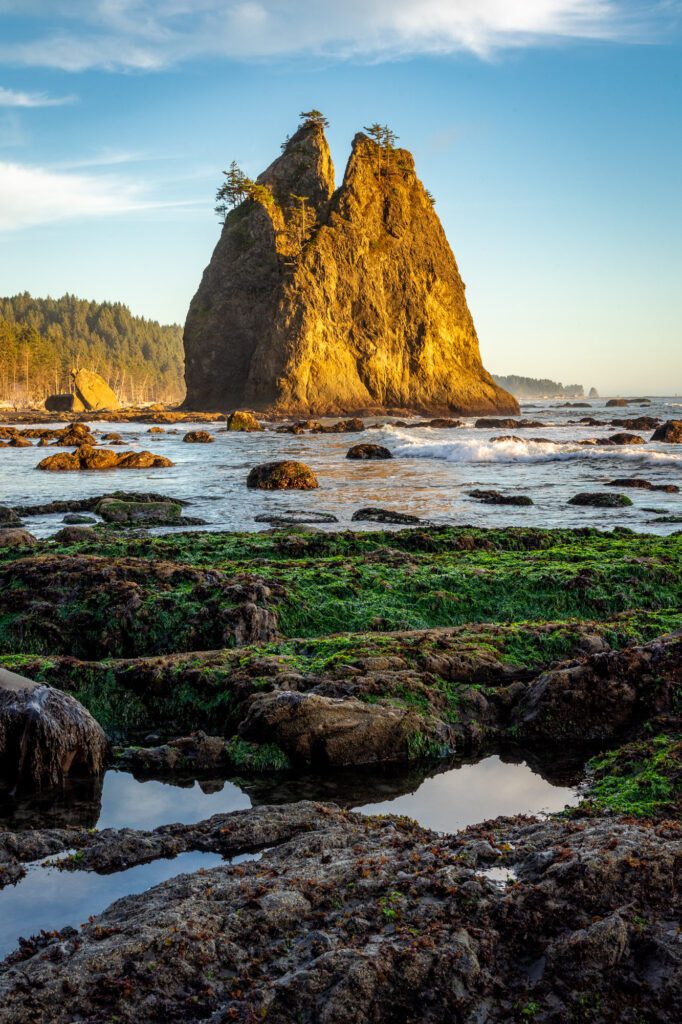
The other La Push Beaches (Pacific Coast): In our humble opinions, the two best beaches near La Push and Forks are Second Beach and Ruby Beach. Second Beach requires a little bit of hiking to get to, but it’s only two or three miles round trip, including some exploring on the beach. Ruby Beach is right off of the road (near the turnoff to the Hoh Rainforest). Once you’re down on either beach, you’re treated to sea stacks just off the coast, all sorts of fun driftwood along the water, crashing waves, and towering trees above you. There are two other beaches near Second Beach, First Beach and Third Beach, that are worth a visit if you have some extra time on your hands.
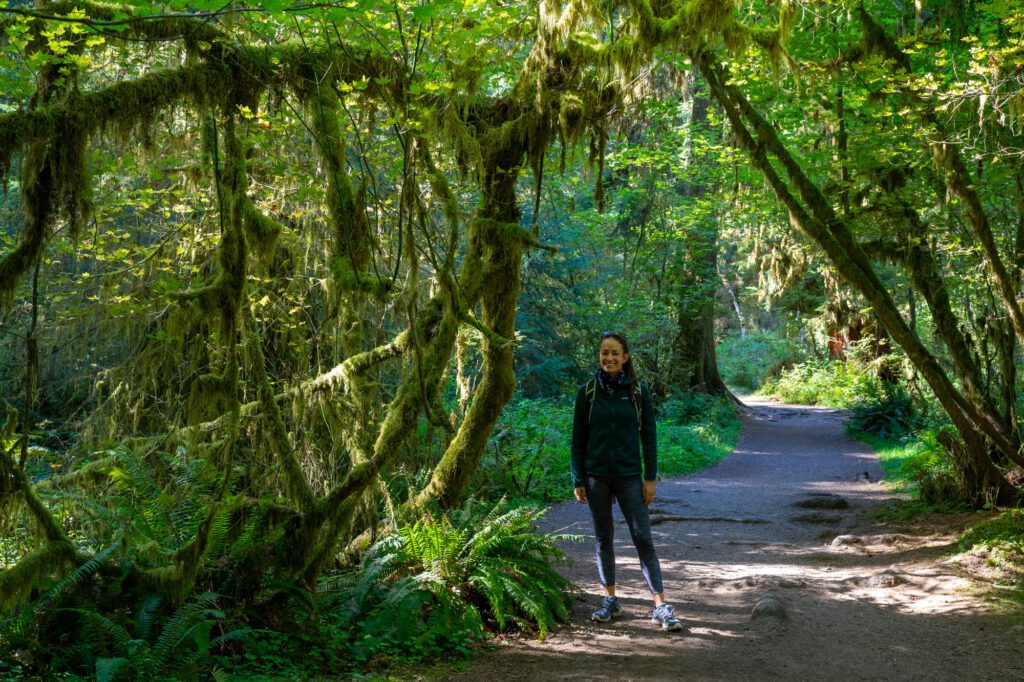
The Hoh Rainforest (Hoh Rainforest): The Hoh Rainforest is the crown jewel of the park because the coastal temperate rainforest that makes it famous needs very specific conditions to thrive (and it only thrives in a few places in North America). One of the key elements? A LOT of rain. As soon as you step into the rainforest, you’ll understand why. Thick moss and a forest floor of ferns cover every inch of the forest here. Definitely do the Hall of Mosses and Spruce Nature Trail, two short hikes from the parking lot. If you really want to venture deeper into the rainforest (and away from the crowds), head out along the Hoh River Trail, which follows the river out into the wilderness (you can go a few miles to Mount Tom Creek where the trail meets the river).
We have an entire guide dedicated to the best things to do in Olympic National Park, along with a detailed Olympic National Park itinerary that will help you plan and organize your time in the park.
Where to Stay in Olympic National Park
As we noted above, it makes sense to split your four nights here into two day stints on the northern side of the park and on the coast, which will save you literal hours of drive time.
There are some pretty incredible places to stay in Olympic National Park, from four historic national park lodges (we think they’re cool, but waaaayyy overpriced), to unique treehouses, cozy cabins, and coastal camping.
At a high level, here’s our recommendation in terms of where to stay:
- For your first two nights, stay on the northern edge of the park either in Port Angeles (a relatively small city with amenities like gas, grocery stores, and restaurants) and Lake Sutherland (a more secluded lakefront community that’s closer to Lake Crescent) Staying here puts you in perfect position to explore Hurricane Ridge and the area around Lake Crescent and the Sol Duc River. In Port Angeles, look at the Olympic Lodge or this gorgeous treehouse. Near Lake Sutherland, look at one of the many lakefront houses and cabins.
- For your last two nights, stay in Forks, which is the best area to stay to explore the Pacific Beaches and Hoh Rainforest. Your choice here revolves around whether or not you want to be in the town of Forks (which is fairly underwhelming, but has a grocery store and a couple of restaurants) or outside of town in a more wild setting. In town, the best options are the Woodland Inns or the Pacific Inn Motel. Outside of town, the Misty Valley Inn is a great option (~10 minutes to Forks), while the Hoh Valley Cabins offer a more rustic experience, situated in the Hoh Rainforest (which is less convenient, but more unique).
If you’re interested in camping, there are 14 campgrounds inside Olympic National Park (along with quite a few along the boundaries).
There are only several campgrounds that accept reservations in advance, including Sol Duc (meh), Mora (best campground in the park, 5 minutes from Rialto Beach), and Kalaloch (on the beach, but very big and crowded).
There are a few more, but those are ones that are in good locations that put you near the places we recommend staying above.
Book these well in advance as they fill up quickly, especially on summer weekends and holiday weekends.
All other campgrounds in the park are first-come, first-served, and they definitely fill up on summer weekends (if you show up on a Friday night expecting a site, we’ve got some bad news for you).
More information on camping in the park here.
Planning a Trip to Olympic National Park? You won’t want to miss our detailed guides to visiting the Olympic Peninsula that are all based on our own personal experience exploring the park.
- All of our Favorite Things to Do in Olympic National Park
- How to Plan a Perfect Olympic National Park Itinerary (3-4 Days)
- Where to Stay in Olympic National Park: A Complete Guide
- The Best Hikes in Olympic National Park: A Helpful Hiking Guide
- Hiking the Enchanted Valley Trail: A Perfect 2-3 Day Backpacking Trip in Olympic National Park
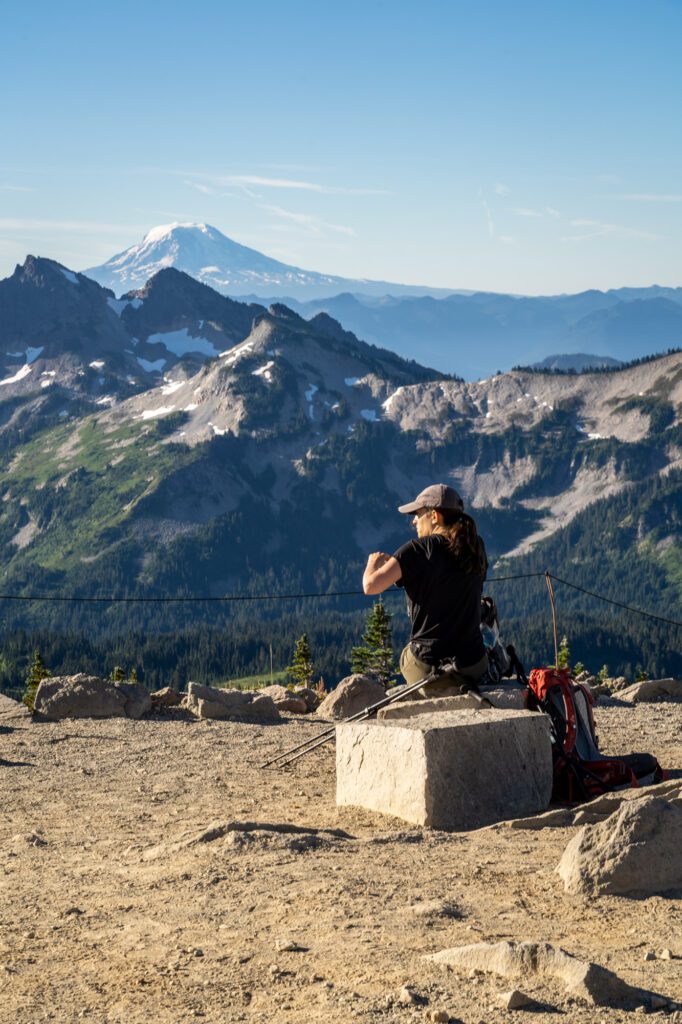
Days 5-7: Mount Rainier National Park
Drive time and distance: 4 hours // 200 miles
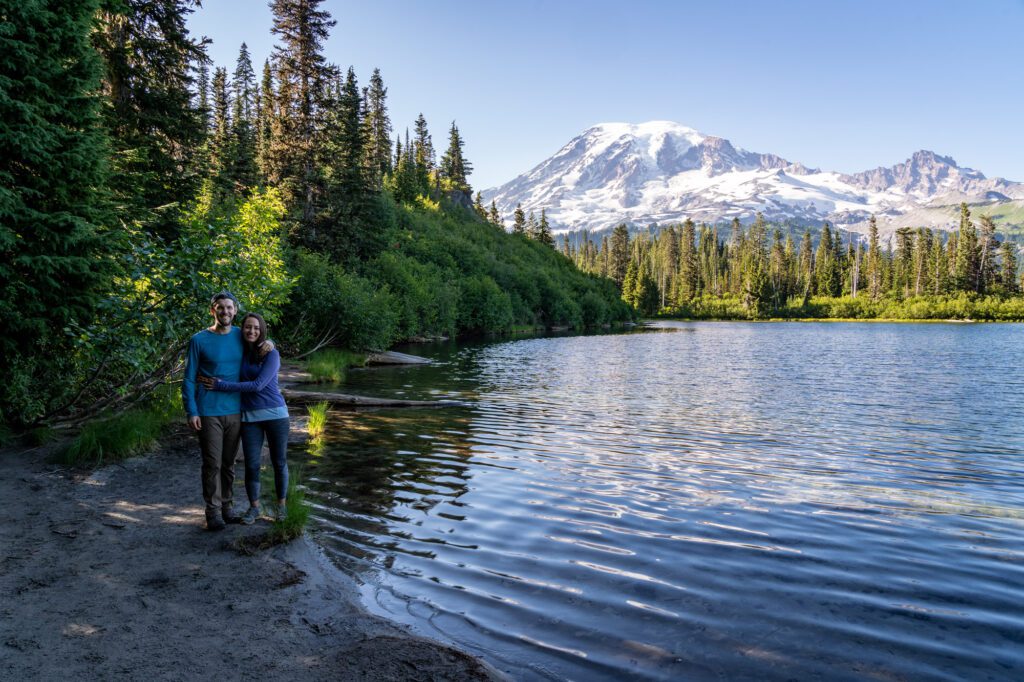
Mount Rainier National Park is arguably the crown jewel of Washington State. Visible from just about everywhere in the western half of the state, the towering mountain is impressive because the entire region around it is basically at sea level.
It’s majestic, and we make it a priority to make it up to Rainier at least once or twice every year from our home in Portland to catch the wildflower displays in the early summer.
There are five (or six, depending on who you ask) regions within Mount Rainier National Park, but the reality is that you’re not going to be able to fit them all in with a short visit to Washington.
With limited time, we’re going to recommend you focus on two regions: Paradise and Sunrise.
Your general route for exploring Mount Rainier National Park will be a counterclockwise half loop.
Start in Paradise, the most visited area on the south side of the Mountain, you’ll make your way east to Ohanapecosh, in the southeast corner of the park, then north to Sunrise, on the eastern side of Rainier.
These three regions – which are the most popular in the park – are going to give you some of the best hiking, waterfalls, and dramatic landscapes that make this national park one of the best on the west coast.
It takes a long, long time to get from Ashford (the town at the southwest entrance to the park, where you’ll be coming in) to Sunrise, and the road is closed until June or July most years.
For that reason, you’ll want to break up your three nights at the park, staying two in Ashford to explore Paradise, and one near Sunrise (spoiler: there aren’t very many options here!) to explore that portion of the park and set yourself up for a slightly shorter drive north the next day.
There are a couple of main attractions to tackle at Paradise in the morning, and then we’d recommend spending the afternoon exploring Ohanapecosh, which is halfway between Paradise and your final destination, Sunrise.
What to Do in Mount Rainier National Park
Here are our favorite things to do in Mount Rainier National Park.
We’ll start from the southern edge around Paradise and make our way counter-clockwise, just like we’ve recommended you do, so these things will be mostly in chronological order in terms of when you’ll encounter them.
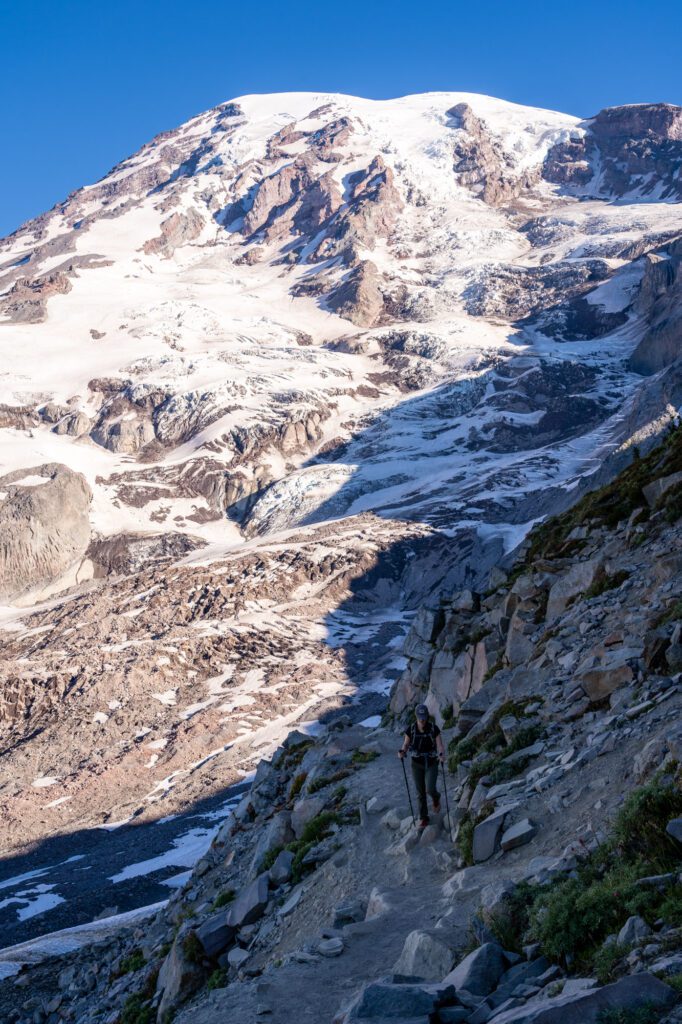
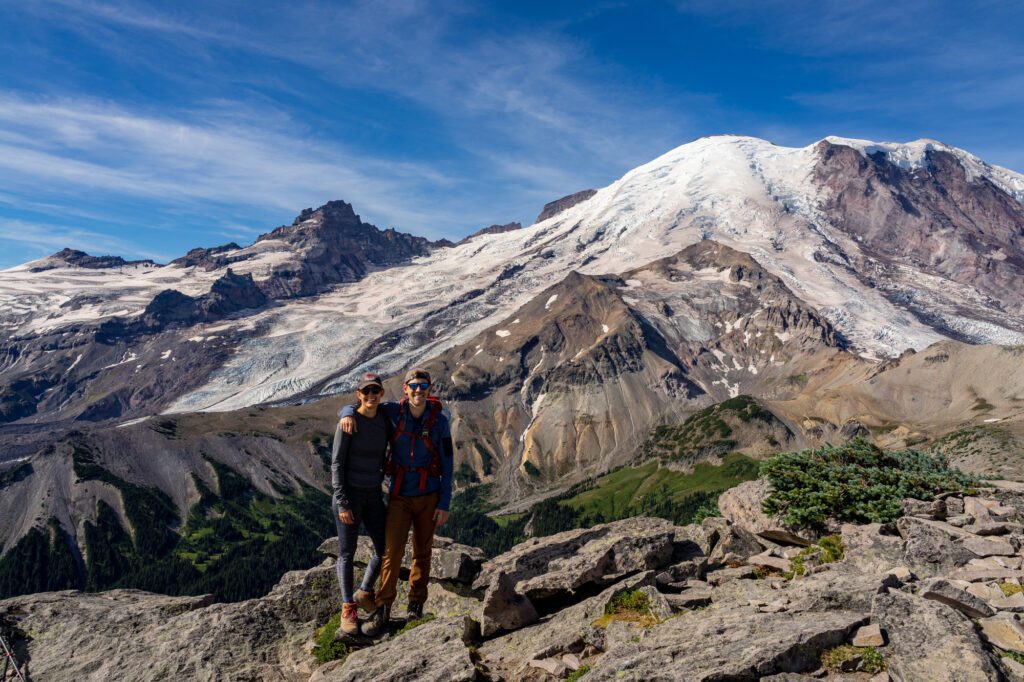
The Skyline Trail (Paradise): Your first order of business is the Skyline Trail, which along with the Maple – Heather Pass Loop in the North Cascades (we’ll get there, don’t you worry), is at the top of our list of our favorite hikes in Washington State. The hike leaves from the main parking lot at Paradise, just outside the Henry M. Jackson Visitor Center (here on Google Maps), which is a good spot to check with park rangers about trail conditions before you hit the trail. Get a bright and early start to secure a parking spot, and to have some peace and tranquility on the trail. Keep an eye out for marmots, the medium-sized rodent creatures that call the rocky landscapes at high elevations home. They’re pretty cute. The hike climbs to Panorama Point, where you’ll have a 360-degree view of the surrounding area, including a view of Mount Rainier that is one of the best in the park, and sweeping views out towards the Tatoosh Range, Mount Adams, and Mount St. Helens to the south. We have an entire guide dedicated to hiking the Skyline Trail, with far more details (including the parking situation, which direction to hike, and more).
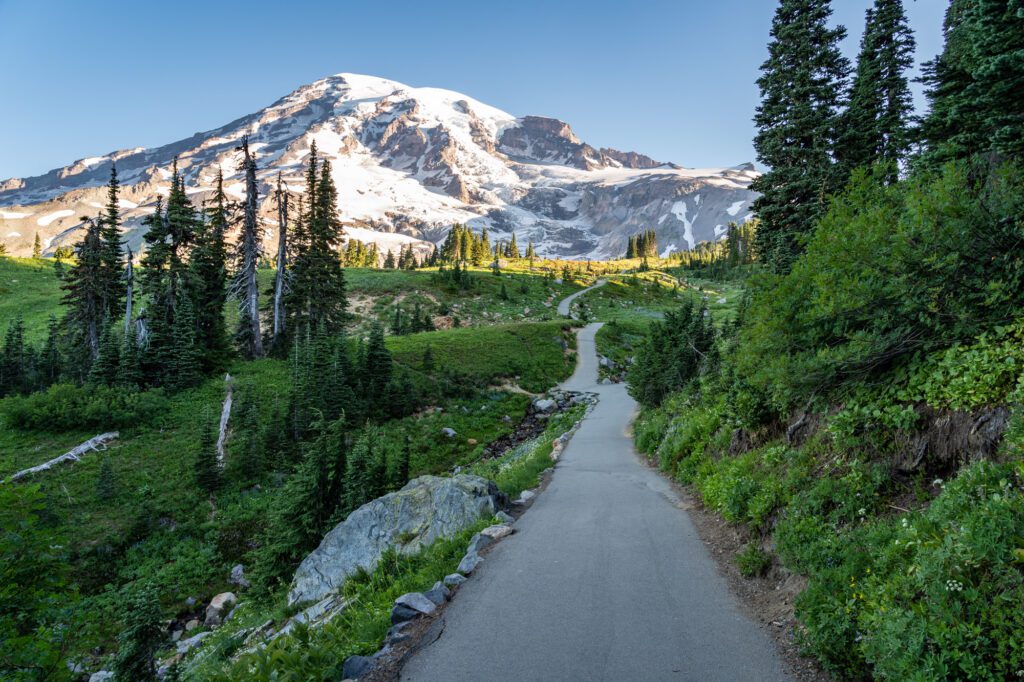
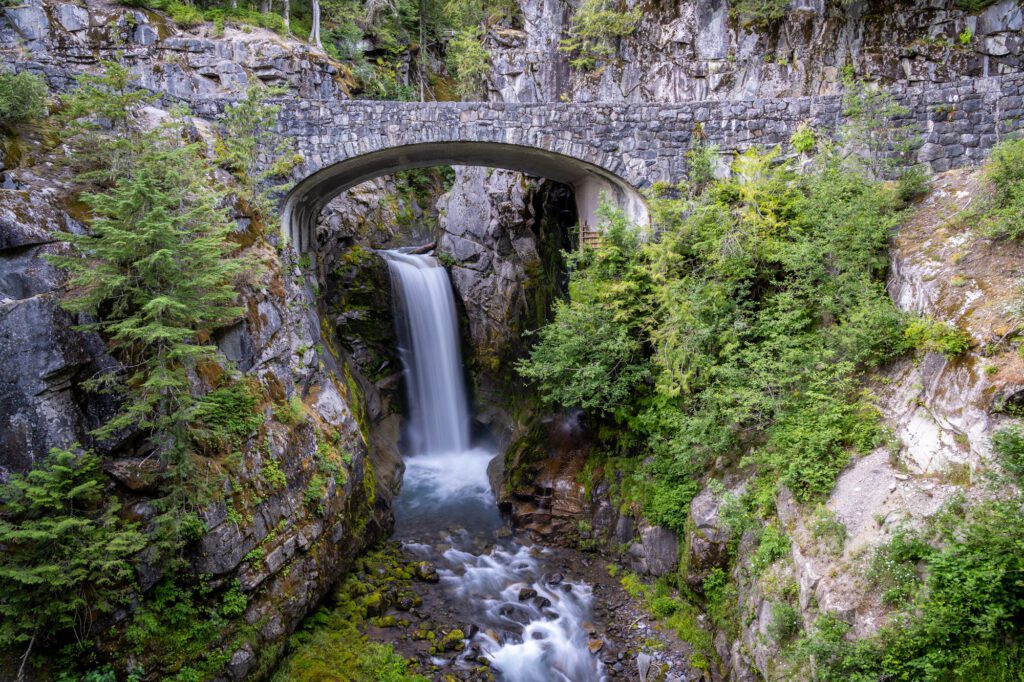
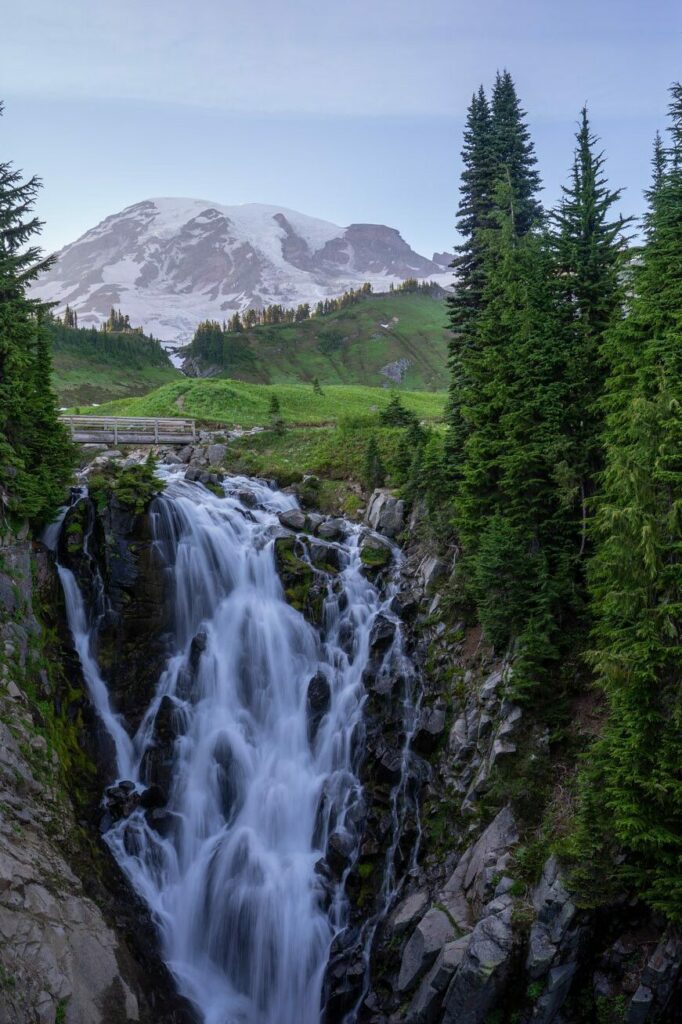
The Waterfalls (Paradise): If you hiked the Skyline Trail, you already saw Myrtle Falls, which might be the best waterfall in the park thanks to the view of Rainier looming behind it. There are two other waterfalls in the area that you can basically drive to – Narada Falls (here on Google Maps) and Christine Falls (here on Google Maps). Comet Falls, which might be the most impressive of the four in terms of the waterfall itself, is a steep four mile hike from the trailhead near Christine Falls, which might be a bit much if you’ve already done the Skyline Trail that day (here’s a guide to hiking to Comet Falls).
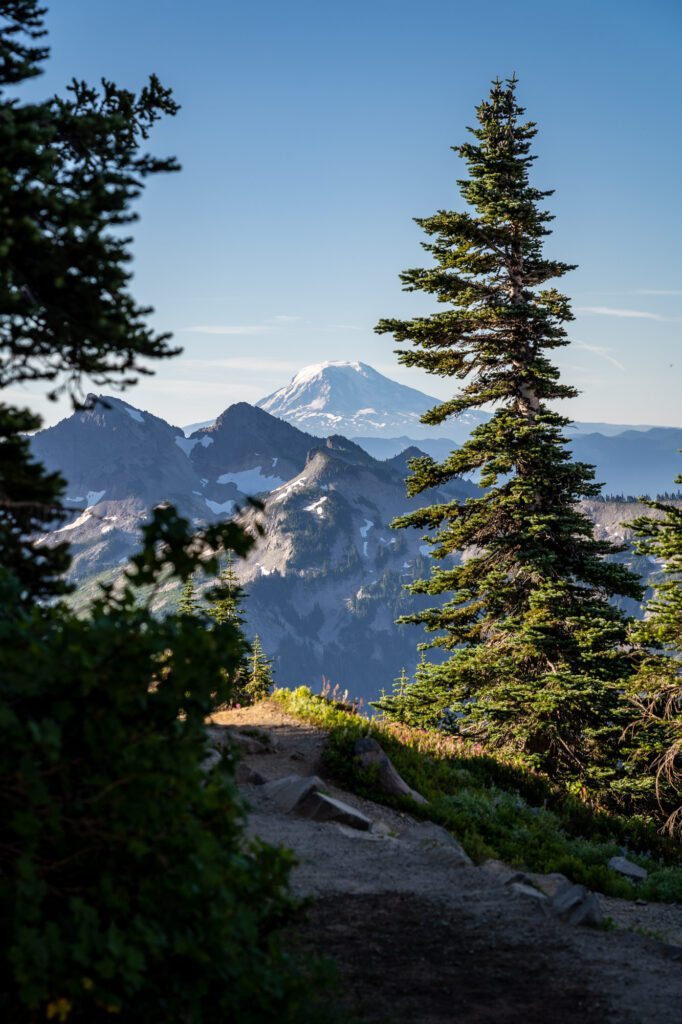
Tipsoo Lake and Naches Peak (Sunrise): From the road above Tipsoo, there’s a picture perfect view of the lake in the foreground with the glowing peak of Rainier in the distance. The light is great at both sunset and sunrise, which is when we’ve been here, and the peak gets a brilliant pink glow. This is also the starting point for the Naches Peak Trail, which is one of the best easy hikes in Washington and might be the best bang-for-your-buck hike in the entire state.
Hiking at Sunrise: The Sunrise portion of the park is heaven on earth for hikers who love alpine terrain and staggering mountain vistas. Which is us. This area is where you’ll find the highest concentration of the best hikes in Mount Rainier National Park (spoiler: they all leave from the same parking lot here on Google Maps). Here are three hikes we love, and think you will too. All three of these hikes follow the same basic path along Sourdough Ridge, where you’ll have incredible views of Rainier and the White River Valley, before diverging at Frozen Lake, heading in three different directions.
- The Burroughs Mountain Trail: Our favorite of the three here, this hike is hard. It takes you up to a point where it really feels like you can reach out and touch Mount Rainier’s face. There are three burroughs, and the journey to the first two is relatively easy. To get up to the third burrough, it’s a steep, long climb, but we think the views are worth it. Read our Burroughs Mountain Trail guide for more information.
- The Mount Fremont Lookout: Do this trail for the views from the retired fire lookout, which has a commanding view of the surrounding landscape, including Rainier. The hike heads right at Frozen Lake, and climbs up to a ridge that you follow out to the lookout. Keep your eyes open for marmots, and bring bug spray in the early summer – we’ve never seen more mosquitoes in our lives than we did at the top of this hike. More trail information here.
- Berkeley Park: This is the hike to do for an epic wildflower show in the summer (we had good success with the last week of July). The trail heads straight at Frozen Lake, dropping down into an idyllic meadow full of blankets of wildflowers, babbling brooks, and… black bears. This area is a favorite haunt of the park’s black bear population, and it’s easy to see why. We’d like to live there, too. Keep your wits about you, make some noise on the trail, and you’ll be fine. More trail information here.
Where to Stay in Mount Rainier National Park
Similar to Olympic National Park, you’re going to want to split up your three nights to spend two nights near Paradise (our favorite part of the park) and one night over at Sunrise (the highest point in the park you can drive to).
Here’s a summary of the best places to stay. For more details and information, head over to our guide to where to stay near Mount Rainier.
It’s worth repeating that if you want to spend all of your nights in one place, Packwood is the best place to do that. It’s about an hour from both Paradise and Sunrise, and it’s also the most well-equipped town near the park.
- Near Paradise, you have a few options. Ashford, the town right outside the park entrance, has a nice collection of hotels that will put you within about 45 minutes of the Henry M. Jackson Visitor Center at Paradise. There are also a bunch of great cabins in the woods near Ashford, if you’re looking for a little more space and the ability to cook for yourself (which we almost always do). Packwood has a better selection of places to stay (and eat and drink), but it’s a little further away (~1 hour). In terms of camping, Cougar Rock Campground is the only option inside the park near Paradise, and it’s very popular.
- Near Sunrise, the options are even more sparse. Camping is by far the best option here, with White River Campground being number one (inside the park), and Silver Springs Campground being second (just outside the park). If you’re not up for camping, the best option is probably Packwood again, which is a little further away but has the best selection of places to stay, especially on the eastern side of the park.
Planning a Trip to Mount Rainier National Park? You won’t want to miss our detailed guides to visiting Mount Rainier that are all based on our own personal experience exploring the park.
- All the Best Things to Do in Mount Rainier National Park
- How to Plan an Unforgettable Day Trip to Mount Rainier From Seattle
- Where to Stay near Mount Rainier National Park: A Complete Guide
- The Best Hikes in Mount Rainier National Park: A Helpful Hiking Guide
- Hiking the Skyline Trail: Is This the Best Hike in the Entire State?
- Hiking the Jaw-Dropping Burroughs Mountain Trail at Mount Rainier
- Hiking to Towering Comet Falls in Mount Rainier National Park
- The Naches Peak Loop: The Best Bang-for-your-Buck in Washington
Day 8: Bellingham
Drive time and distance: 3 hours 30 minutes // 165 miles
To this point, you’ve likely hiked a lot of miles over the first week of this itinerary, and Bellingham is a great place to take a day to rest your legs, catch your breath, and reset for the second half of this trip which features SPOILER ALERT even more hiking.
Bellingham is a charming little college town at its heart. It’s home to Western Washington University, and it almost feels sleepy during the summer when many of the city’s students aren’t around.
Still, between its location on the water and its good food and drink scene (thanks to the student population, we’d argue), it’s worth a stop.
What to Do in Bellingham
Bellingham itself is a pretty compact city, though there are some cool places to see just outside the city limits too that you should include, if you can.
It also has two of the most scenic drives in Washington nearby – Chuckanut Drive, which is a coastal drive south of Bellingham, and Highway 542 or Mt. Baker Highway. While you’re in Bellingham, you should do one of them.
Chuckanut Drive is definitely more accessible and would be our top pick – it fits nicely on your way into Bellingham (we have Mount Baker in the “with more time” section).
If you find yourself with an extra day, then the drive up to Picture Lake and Artist Point along the Mt. Baker Highway is the first thing we’d add. It’s spectacular.
Here’s a map of a mini road trip up Chuckanut Drive from south to north, ending in Bellingham, including some of our favorite stops along the way.
Here are some other places to visit, in no particular order.
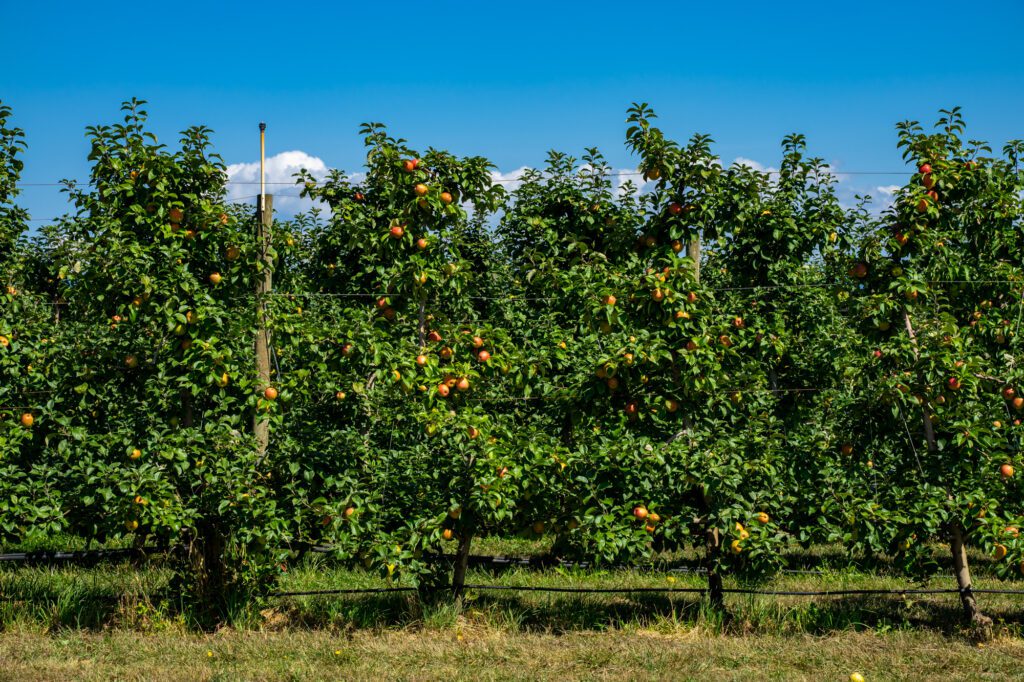
Bellewood Farms and Distillery: This is worth the journey north. They have an apple orchard that you can walk through, and make all of their spirits out of apples (so they’re all gluten free!). It’s cool to stroll the orchard and see all the different kinds of apples, and the store has all sorts of apple concoctions. If you’re there during the fall harvest, stop in for a u-pick apples experience.
Frelard Tamales: We know Frelard from their location in Seattle, and we basically stop by every time we’re within 10 miles for their excellent (and huge) tamales. The location in Seattle is basically just a to-go window (with a bigger, more built out space coming soon!), but their location in Bellingham is bigger with a more extensive menu. Plus, they share the space with a brewery, which makes it a perfect place for lunch or dinner in Bellingham. P.S. the chorizo and cheese tamale is the GOAT.
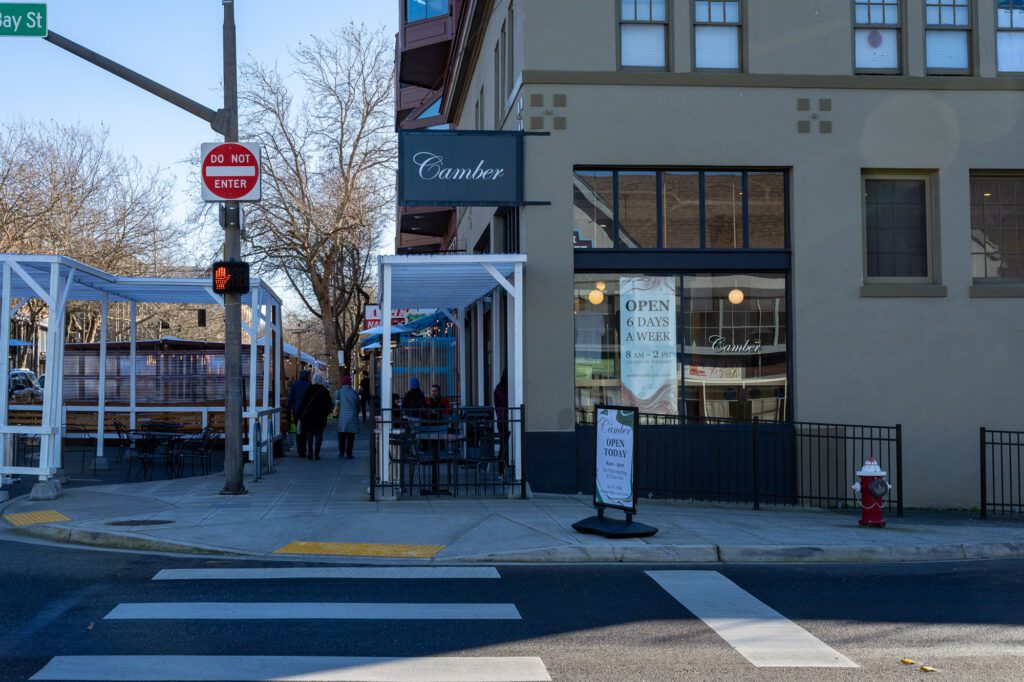
Camber Coffee: Is Camber the best coffee roaster in Washington? It’s close, and it’s hard for me to think of a more consistent roaster in the state. They have a lovely flagship location on a sunny corner in downtown Bellingham with plenty of seating both inside and outside, and it’s worth stopping by for a cup of coffee. They do pour over, usually have a couple of fun coffees available as espresso, and have a rotating menu of good specialty lattes that change with the seasons.
Drink some local cider: If you’re into cider, I have some good news for you. Because of all the apples grown nearby, Bellingham is paradise for cider lovers. Make sure to grab a drink at Lost Giants Cider, the best cidery in town (followed by Bellingham Cider Company). Even if you’ve never had cider before, it’s worth trying. When in Rome, right?
Where to Stay in Bellingham
We don’t have any strong perspectives on logistics here. With one night, it probably makes sense to stay downtown so you can walk everywhere. We’ve had our eyes on Hotel Leo for a weekend getaway for a while now.
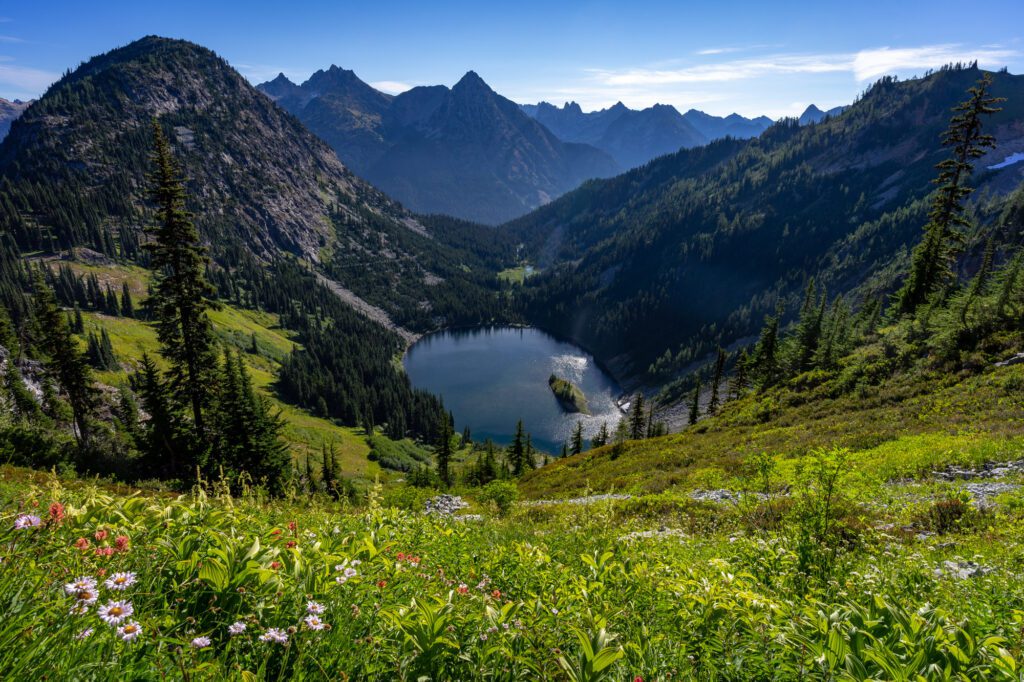
Days 9-10: North Cascades National Park
Drive time and distance: 2 hours // 92 miles
North Cascades National Park gets, by far, the least fanfare and visitors of the three Washington national parks. In our opinion, it’s no less spectacular, and we’ve found ourselves here multiple times over the past several years.
It’s the least visited mainly because it’s the least accessible thanks to winding mountain roads that close for large portions of the year and hiking trails covered in snow from October to July (sometimes late July!).
If you’re mountain people like us (versus, say, beach people), then the North Cascades are essentially paradise.
The crystal clear alpine lakes with rugged rocky peaks of the Cascades in the background are second to none, and you should spend most of your time here hiking and exploring the wealth of outdoor activities.
The park is located just south of the Canadian border, about two hours north of Seattle.
The North Cascades Scenic Highway runs through the park, connecting the wet, temperate areas in western Washington to the drier, more arid climate you’ll find east of the Cascades.
As a result, it’s a main artery of travel, and it’s one of the only national parks that does not require a fee to enter.
Aside from hiking, the other highlights of the park are the turquoise waters of Diablo Lake, the sprawling shores of Ross Lake (which is only accessible by boat), and the scenic drive up to Washington Pass, the high point of the road between western and eastern Washington.
Two days is a good amount of time to spend exploring here, and will set you up to do a couple of the best hikes in North Cascades National Park and take in some truly incredible views. And, if you’re lucky, mountain goats. Be careful, though, they can be aggressive!
One important note around logistics: There are very, very few places to stay on the western side of the park (the side closer to Bellingham). Unless you’re camping, we HIGHLY recommend staying in the eastern foothills of the Cascades, which puts you closer to the trailheads for our favorite hikes AND closer to your next stop, Leavenworth.
Look for a place to stay near the charming town of Winthrop. Spend your first day driving all the way through the park, stopping for an afternoon hike and some scenic views, and then spend your second day on the trail (more below).
What to Do in North Cascades National Park
Here are our favorite things to do in North Cascades National Park (spoiler, it’s mostly hiking!).
The Heather-Maple Pass Loop (Trailhead here) – 7.2 miles / 2,000 ft. elevation gain: This is the best hike in Washington in terms of bang for your buck. It has it all – a nice alpine lake, a climb to the top of a mountain pass for a good workout, and stunning views almost the entire way through the hike. And don’t forget the spectacular wildflowers in the summer and golden larches in October! It’s quintessential Washington State, and it’s not really that hard. It’s a 7.2 mile loop, and you’ll climb 2,000 feet over those miles. We always go counter-clockwise, which means a less-steep climb that goes on for longer, and a steep descent. Hiking poles will save your knees. Here’s our guide to hiking the Heather-Maple Pass Loop.
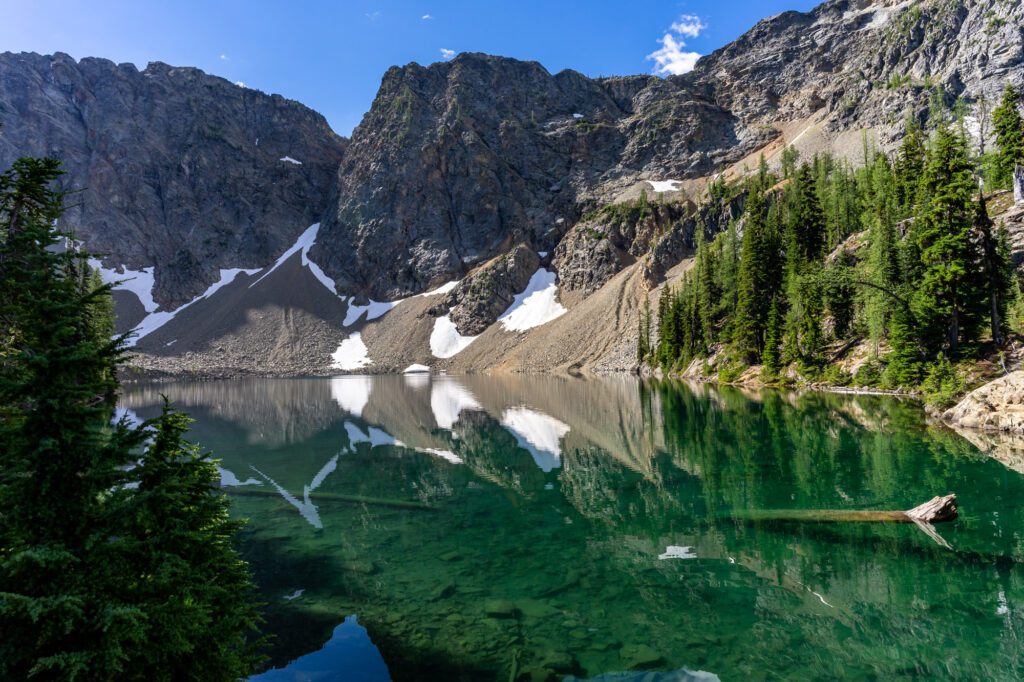
Blue Lake (Trailhead here) – 4.5 miles / 1,100 ft. elevation gain: Another great hike that isn’t terribly long or difficult. It takes you to a picturesque lake, set in between a couple of sets of rocky peaks. You’ll climb through the forest, with a little bit of elevation gain along the way. Definitely explore the trail up the hill on the right side of the lake. It’s a 4.4 mile out-and-back hike, with just 1,000 feet of elevation gain.
Hidden Lake Lookout (Trailhead here) – 8 miles / 3,300 ft. elevation gain: This was our first hike in the North Cascades, and it sure set the bar high for all future hikes. The road to get to the trailhead is gnarly, and it’s a good thing we borrowed my mom’s SUV because our van would have never made the journey (although, somehow, we saw a Prius at the trailhead). The hike itself is equally rough – 8 miles long, with 3,300 feet of elevation gain. And it feels like you’re climbing straight up the entire time. But when you get to the top, with views of the perched lake with the Cascades in the background, it’s all worth it. Even the pain you’ll feel in your thighs and calves for the next several days. You can actually sleep at the fire lookout at the top, but it’s first-come-first-served and in VERY high demand due to its Insta-fame these days.
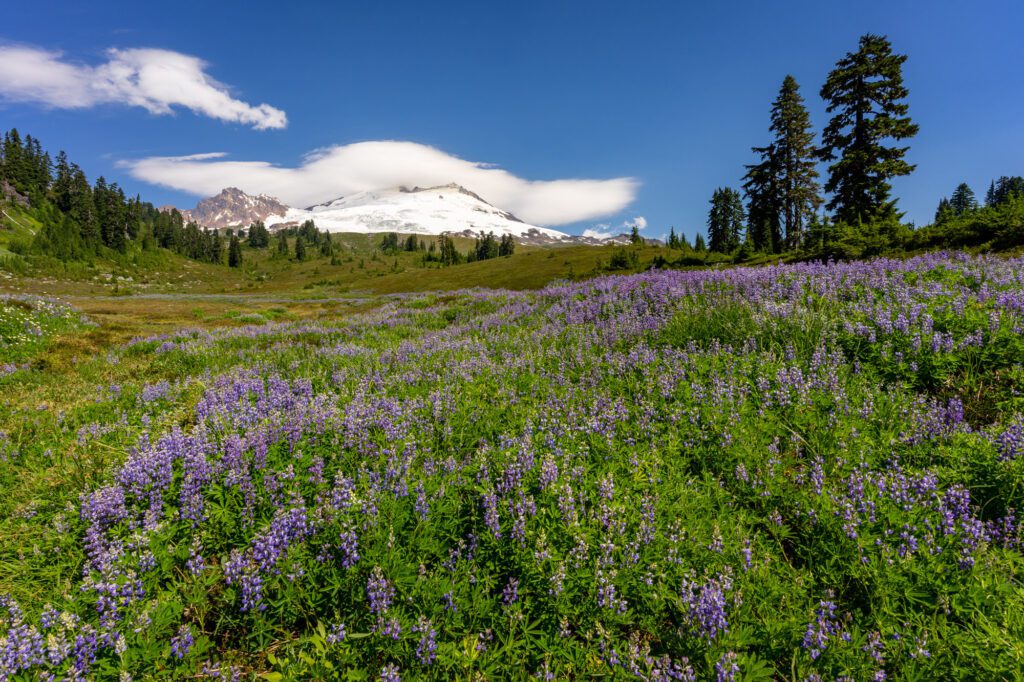
Park Butte (Trailhead here) – 7.5 miles / 2,200 ft. elevation gain: The road to the trailhead is a little rough, but we made it in our minivan, so it should be passable in most passenger vehicles. This hike is outside the park, but takes you up to an old fire lookout with an incredible view of the southern face of Mount Baker. In the summer, the meadows leading up to the lookout are blanketed in wildflowers like lupine, and the views of Baker get better and better. More trail information here.
A Scenic Drive along the North Cascades Highway: This is one of the more scenic drives in Washington, and there are plenty of places to get out, stretch your legs, and hike a little bit along the way.
The scenic portion of the drive starts at the North Cascades Visitor Center in Marblemount (here on Google Maps) and ends at the Washington Pass Overlook (here on Google Maps). Here are the stops you should make along the way.
- Trail of the Cedars: Your first opportunity to stretch your legs, this is a very short stroll through a forest with good interpretive signage that serves as a nice introduction to the flora and fauna in the Cascades. Plus, a fun suspension bridge! Park in the town of Newhalem, and you can do the next stop without moving your car. More trail information here.
- Ladder Creek Falls: A nice waterfall at the end of a short hike that crosses the Skagit River, passes the Gorge Powerhouse, and arrives at a waterfall after just a quarter of a mile or so. More trail information here.
- Diablo Lake Overlook: About 20 minutes (12 miles) east, you’ll run into Diablo Lake. First, you’ll drive over a bridge, which doesn’t really give you an accurate picture of the natural beauty that’s in store for you when you drive up the hill immediately after the bridge and pull into the overlook on the left. Here, you’re treated to a spectacular view of Diablo Lake’s turquoise water, backed by the rocky peaks of the Cascades.
- The Ross Dam Trail: Ross Lake, along with Diablo Lake, is the other huge lake in the park. There’s a cool resort in the middle of the lake – the Ross Lake Resort – that you can stay at overnight. It’s only accessible by water taxi. There’s also a short hiking trail that takes you down closer to the water and Ross Dam, which is worth doing.
- Washington Pass Overlook: Your final stop marks the top of the pass, and the border between the mild, temperate climate of western Washington and the harsher, drier climate in eastern Washington. It’s about 35 minutes from Ross Dam to the top of the pass, and it’s a windy, scenic drive.
From Washington Pass Overlook, it’s a downhill drive to your home base for the evening in the eastern Cascade foothills.
Where to Stay in North Cascades National Park
If you’re not up for camping, there really aren’t many good places to stay on the western side of the park, which is the direction you’ll be coming from.
Which is part of the reason we’d recommend doing the road trip across the Cascades, so that you can stay in Winthrop for the night, which is a beautiful little town in the foothills of the mountains.
There are some great places to stay in Winthrop – including hotels, resorts, and cool cabins. Here are three of our top picks.
- River’s Edge Resort: Just off of the main street in town along the Chewuch River, this collection of cottages has options for various group sizes, all with some sort of kitchen facilities.
- Alpine Woods Cabin: About 10 miles northwest of Winthrop – which means 10 minutes closer to the park – you’ll find a cozy cabin in the woods with two bedrooms, two bathrooms, and an open floor plan with plenty of windows and natural light.
- Artemisia – Zero Energy Home with a View: Perched on top of a hill above the town of Winthrop (but close enough to walk into town), this four bedroom eco-friendly, solar powered home is gorgeous. It’s full of natural light, has great views of the surrounding landscapes, and has plenty of room for bigger groups.
If you are up for camping, stay at Colonial Creek Campground (our top choice, having stayed at both main campgrounds in the park) right on the shores of Diablo Lake, or at Newhalem Campground closer to the western edge of the park.
For what it’s worth, we’ve camped at both, and we MUCH preferred Colonial Creek.
Planning a Trip to North Cascades National Park? You won’t want to miss our detailed guides to visiting the North Cascades that are all based on our own personal experience exploring the park.
- All of our Favorite Things to Do in North Cascades National Park
- How to Plan a Perfect North Cascades National Park Itinerary (2-3 Days)
- Where to Stay near North Cascades National Park: A Complete Guide
- The Best Hikes in North Cascades National Park: A Helpful Hiking Guide
- Hiking the Heather-Maple Pass Trail: A Complete Trail Guide
Days 11-12: Leavenworth
Drive time and distance: 2 hours 30 minutes // 115 miles
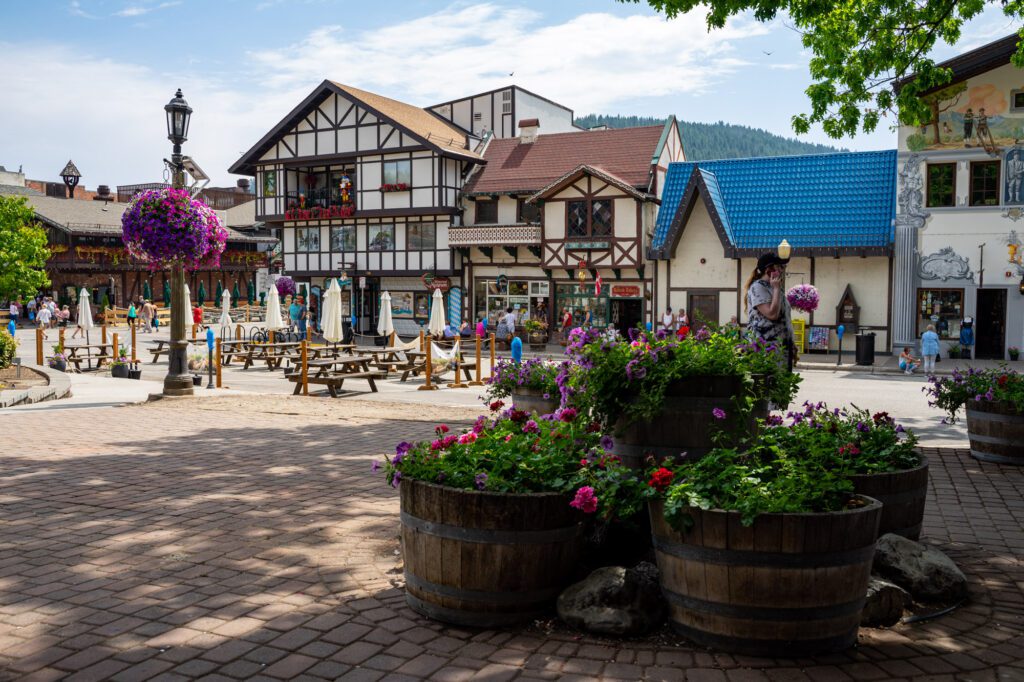
From North Cascades National Park, it’s roughly a two hour drive south to Leavenworth, a charming Bavarian-themed town set in the eastern foothills of the Cascades.
Leavenworth is fascinating to us because it was a timber town set right on the Great Northern Railway, which was a prosperous place to be in the 20th Century.
Then, in 1925, the railroad pulled the rug, packing up and moving to Wenatchee. After a few decades of decline, a committee got together and said “how can we revitalize this town?”
The winning idea was turning it into a Bavarian-themed town to attract tourists, which began in the 1960’s and has resulted in Leavenworth being firmly on the tourist map 60 years later.
Especially around Christmas, when the town is lit up by Christmas lights, with carolers caroling and mulled wine flowing.
For what it’s worth, we’ve been to plenty of kitschy towns that were built up around a theme to attract tourists, and Leavenworth is our favorite of them all, and pulls it off the best.
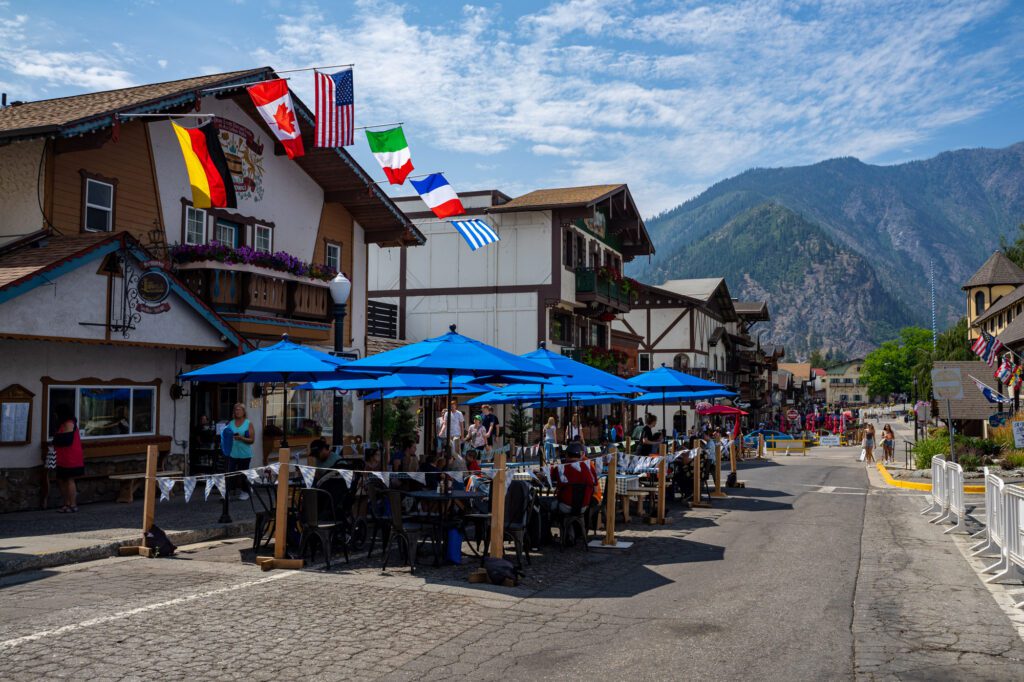
Everything – even the Starbucks in town – has been constructed along strict guidelines to immerse you in the “Bavaria, ish” feeling.
We enjoy Leavenworth, and it’s a good balance between the outdoor activities and the amenities of a city, which is why we’ve chosen to include it as a stop on this road trip. Plus, it’s the home base for a couple of excellent hikes (more on that in a second).
What to Do in Leavenworth
Here are some of our favorite things to do in Leavenworth.
Float the River: There’s nothing better on a hot summer day than jumping in the water and doing the leisurely float down the river. Here, you have two river options! You’ll need to go with a company that will drop you up north at the put-in, so you can float down the river and get out in town. Check out Leavenworth Outdoor Center for more information.
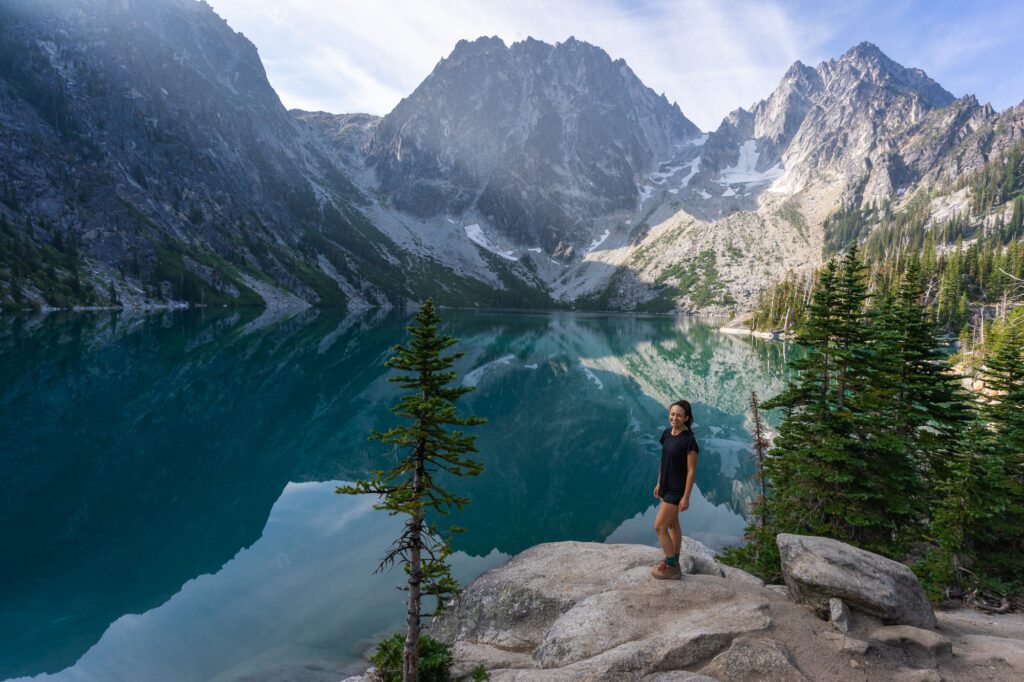
Hike to Colchuck Lake: We tackled this jaw-dropping hike as part of our longer backpacking trip in the Enchantments, but the hike to Colchuck Lake is one that should be on your Washington hiking bucket list. It’s an 8 mile out and back hike that gains 2,300 feet of elevation, and ends at a crystal clear blue-green gem of a lake. It also makes a great overnight backpacking trip, and serves as the gateway for backpacking in the Enchantments (but to get there, you have to climb Aasgard Pass, which gains 2,900 feet in less than a mile. Woof).
Indulge in some Wine, Beer, and Cider: For whatever reason, there’s a thriving alcoholic beverage scene in Leavenworth, with producers of beer, cider, and wine opening up tasting rooms lining the streets of Leavenworth. For wine, go to Icicle Ridge Winery or Archibald James (who also makes great cider), for local beer go to Icicle Brewing Company (who has a great outdoor patio area, perfect for an afternoon beer), and for cider go to Leavenworth Cider House or Bushel & Bee Taproom.
Eat a Sausage or Three: What’s the first thing you think of when you think of German cuisine (specifically, Bavarian)? Something about beer, sausage, and pork knuckle is probably at the top of the list, and that’s what we think you should eat in Leavenworth! The Leavenworth Sausage Garten is our go-to spot for post-hike sausage and beer or cider, though München Haus across the street is a close second and has pretzels, sausages, beer steins, and more German-ish things to eat and drink. Make sure to stop by Whistlepunk Ice Cream (Alysha’s favorite!) afterwards for a well-earned post-hike desert!
Wine Tasting: It might be a little bit surprising, but this region is actually known for wine. There are tasting rooms in town, and just outside of town to the east. Head out to Icicle Ridge Winery or Silvara Cellars to visit a winery with great views over the surrounding landscape and the Wenatchee River, or just stick to one of the many tasting rooms in the town of Leavenworth itself. Go to Bergdorf in the winter for their gluhwein, a German spiced wine that is best when it’s warm. My little brother and I drank our body weight in it every night when we were exploring the Christmas Markets in Germany.
Whitewater Rafting on the Wenatchee River: The Wenatchee River, for a few weeks between June and late July, is some of the most accessible whitewater rafting in Washington. It’s class II/III, which means it’s the perfect place for your first whitewater rafting adventure. I have personally rafted it multiple times since I used to work for a company that operated out there. Before you go, you should know that your experience is going to vary wildly based on the water levels that year, which are impossible to predict. Don’t book too early, otherwise you might end up spending part of the trip literally carrying the raft. The best time is usually June and early July. Go with Blue Sky Outfitters (full disclosure – I worked there in college many years ago).
Read More: All of Our Favorite Things to Do in Leavenworth, WA
Where to Stay in Leavenworth
Because it’s a very popular tourist destination, the town of Leavenworth has plenty of great options in terms of places to stay.
We like Loge (we stayed there last summer), which is an adventure-forward hotel company who have a downtown Leavenworth hotel, and a set of riverside cabins, the latter of which we’ve personally stayed at and enjoyed.
The other option we’d recommend is the Bavarian Lodge, which is as central as it gets and gets consistently glowing reviews.
If you’re camping, stay at Eightmile Campground (we’ve camped there!), which is a nice shady slice of paradise about 15 minutes outside of town, which puts you in the perfect position to tackle Colchuck and the gateway to the Enchantments on your second morning, if you’re up for the hike.
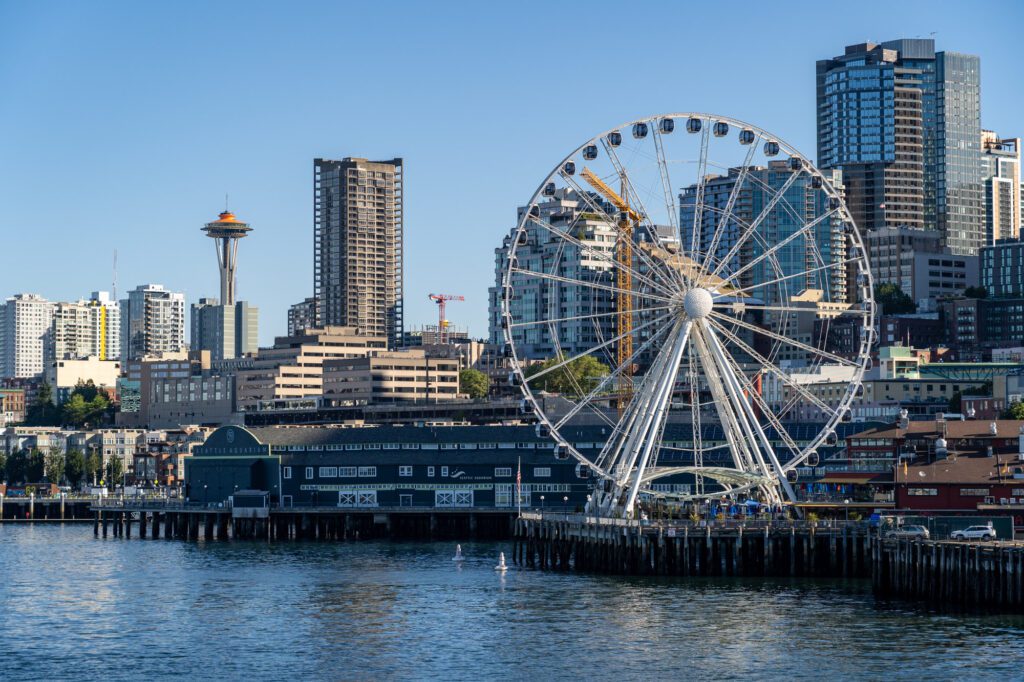
Days 13-14: Seattle
Drive time and distance: 2 hours 30 minutes // 135 miles
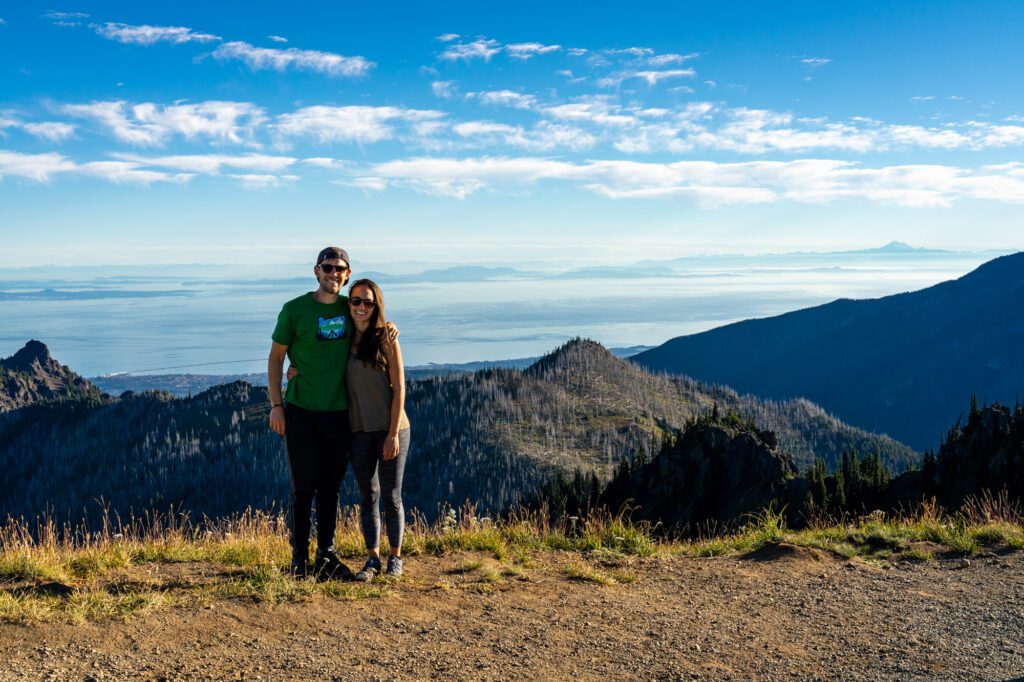
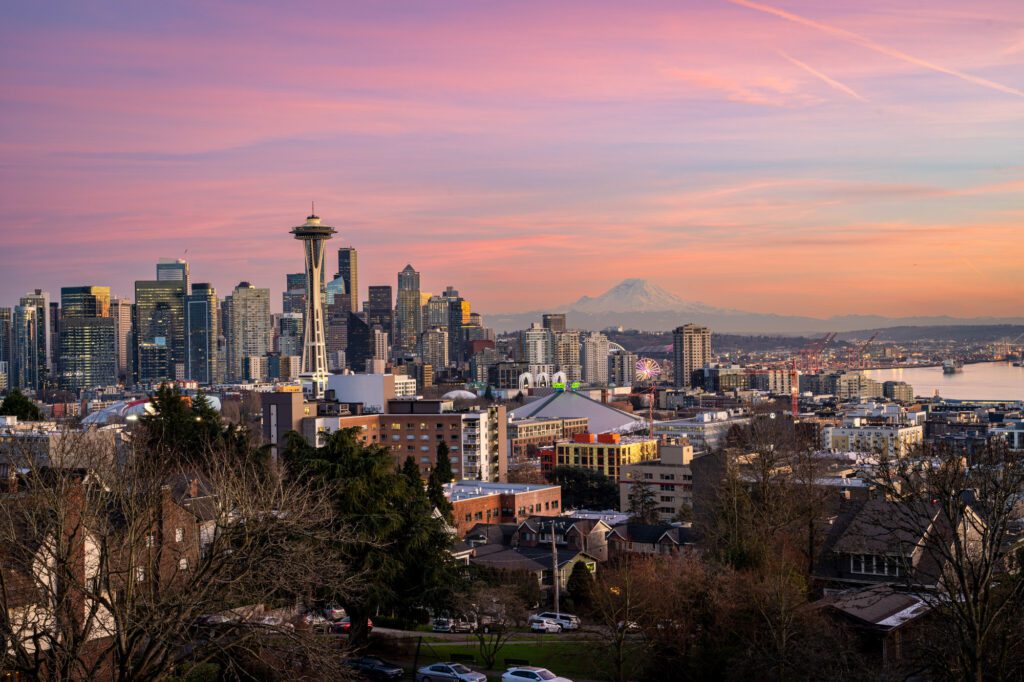
Seattle is, first and foremost, a beautiful city. Flanked by snowy mountain peaks on three all sides (the Cascades to the east, the Olympics to the west, Mount Baker to the north, and Mount Rainier to the south), it’s also set right on Elliott Bay which gives it a waterfront flair.
Seattle has changed a lot in the past few decades, and parts of the city are completely unrecognizable from when Matt was in college.
The influx of money, mostly from the thriving tech industry, has had a significant impact on the shape and feel of the city that Matt comments on every time we’re in Seattle.
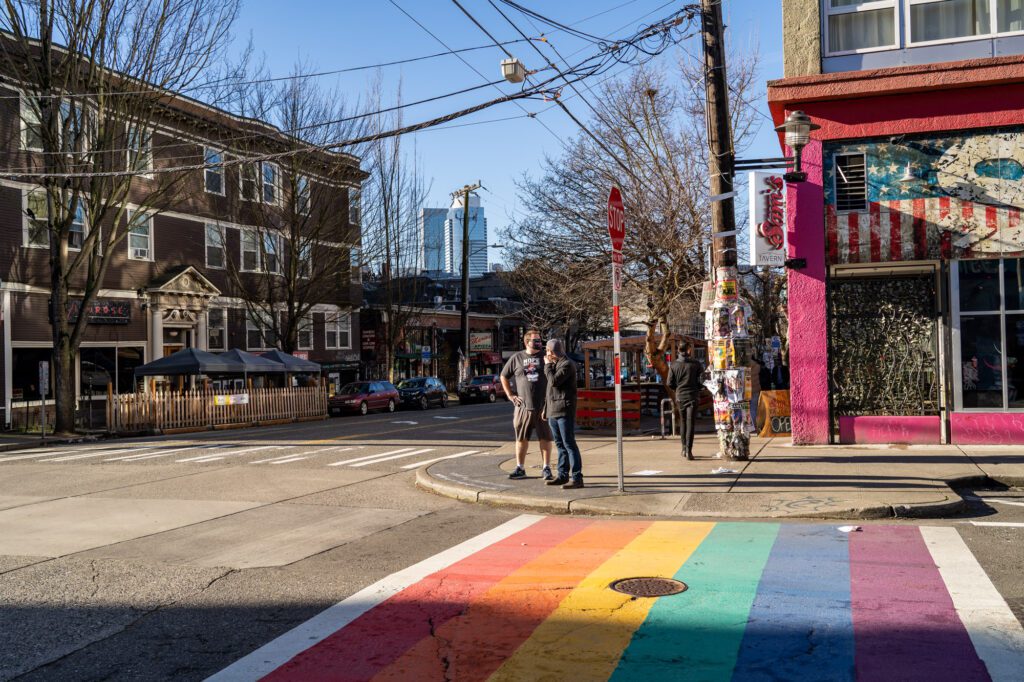
For us, Seattle is at its best in the neighborhoods outside the downtown core like Fremont, Ballard, and Capitol Hill (among others). That’s where we find ourselves gravitating towards when we visit.
With a couple of days in Seattle (really, about a day and a half), we’d recommend spending half of your time on the main sights in Downtown Seattle – Pike Place Market and the Seattle Center – and the other half exploring one or two of those aforementioned neighborhoods.
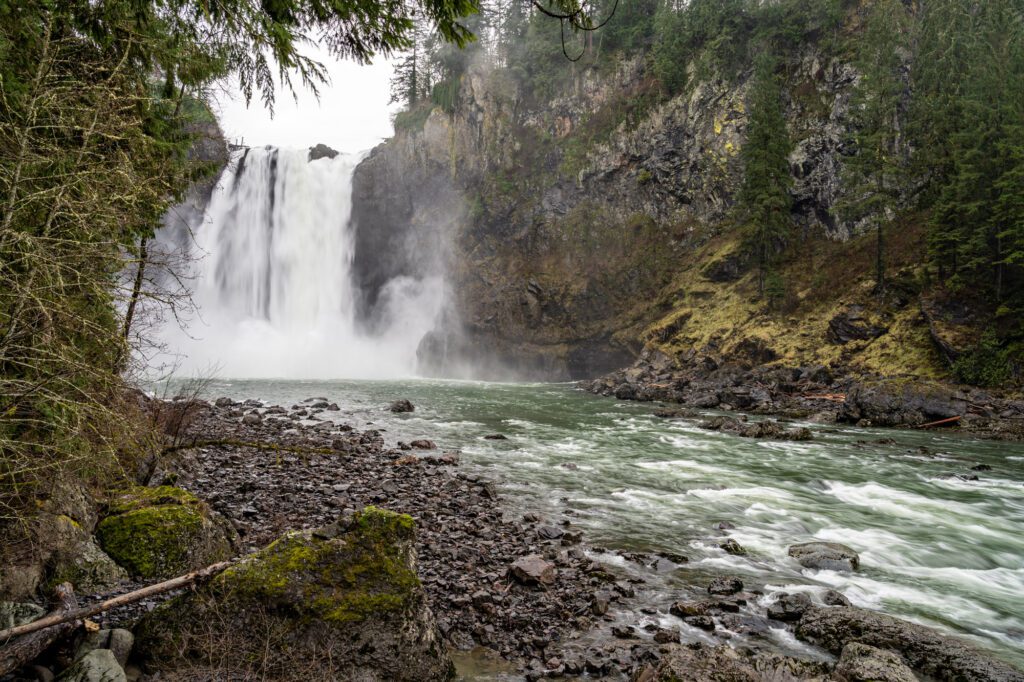
A note on the journey from Leavenworth to Seattle: To get from Leavenworth to Seattle, you’ll have to go up and over Snoqualmie Pass, which is home to some of the best hikes near Seattle. Depending on how you’re feeling, you could stop for a hike on your way into town (Snow Lake is a great option).
Regardless, you should definitely stop at Snoqualmie Falls (here on Google Maps), a powerful waterfall 40 minutes outside the city (make sure to go to both the upper and lower viewpoints).
What to Do in Seattle
You only have a couple of days in Seattle if you include the day you arrive, which we do. You’re going to want to see the highlights, which is what you’ll find below.
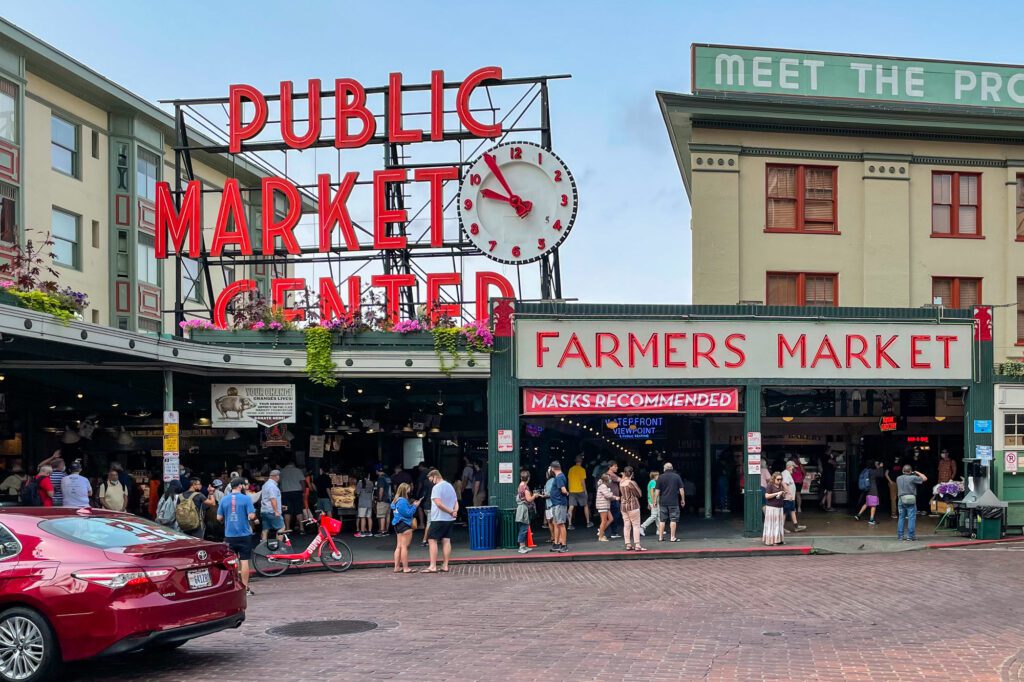
Pike Place Market: Probably the most famous attraction in Seattle, Pike Place Market lives up to the hype and then some. Though I can’t say the same for the also-famous but largely uninspired gum wall, which is downright disgusting if you really stop to think about it. Anyway, walk through the market and check out the vendors selling everything from candied nuts to flowers, and of course, the flying salmon. Stop by Rachel’s Ginger Beer, Beecher’s Cheese (their flagship cheese is one of my top three all time favorites), and Elleno’s Frozen Greek Yogurt while you’re there. To go a level deeper, take this awesome guided tour of Pike Place with a Local Chef, which my family has done before.
Discovery Park: Discovery Park is lovely, and is emblematic of Seattle’s natural beauty with mossy forests and beaches on the Puget Sound. Take an easy stroll out to the western edge of Seattle, where you’ll find yourself face-to-face with the Pacific Ocean. The West Point Lighthouse is pretty cool, and is definitely worth the price of admission, which is simply a three mile round trip hike to get to it. The loop trail (lined above) is our favorite hike in Seattle.
Explore Capitol Hill: Our favorite! “Cap Hill” as we locals call it, is home to the best selection of food, drinks, and coffee in the city. It’s packed full of interesting spots to stop in, whether you’re looking for vegan ice cream or a unique boutique selling who knows what. Our favorite stops are Espresso Vivace and Victrola Coffee for some of the best coffee in Seattle. Frankie and Jo’s and Molly Moons for awesome local ice cream (Frankie and Jo’s is 100% gluten free and vegan!). Elliott Bay Books for the best local bookstore in Seattle.
The Underground Tour: A little quirky and offbeat, kind of like Seattle, the Underground Tour is worth doing while you’re in Pioneer Square. The tour guides are funny, and you get to learn about the history of Seattle from a slightly different perspective.
Seattle Center: I actually don’t really recommend you go up to the top of the Space Needle. The views are cool (check out Kerry Park nearby for the best views in Seattle – it’s here on Google Maps), but it’s expensive and kind of uninspiring. Seattle Center has some cool attractions though. MoPop is a must for music and culture lovers, with tons of unique and fascinating exhibits about music and pop culture you won’t find anywhere else in the world. The Chihuly Garden and Glass is a one-of-a-kind art installation featuring hand blown glass in all sorts of shapes and sizes. The Pacific Science Center is a great stop for kids, with interactive exhibits that make for a perfect rainy day activity in Seattle.
Read More: Exactly How to Spend 2 Days in Seattle
Where to Stay in Seattle
If you’re in town for a couple of nights, you’re going to want to stay somewhere relatively central to maximize your time.
There are two central areas that we like and would recommend. Here’s a high-level overview.
- Our top recommendation for most people is Belltown. Belltown is, in our opinion, the best combination of central location and selection of restaurants and bars. It’s within walking distance of Pike Place and the Seattle Center. We’ve stayed at the Ace Hotel (a hipster classic!), which is right near Pike Place Market in the heart of Belltown, and we’d recommend it. Our dream hotel in Belltown is Hotel Ändra, which is a very hip boutique hotel right in the heart of some of our favorite food and drinks in the neighborhood.
- If you want to be in the coolest neighborhood in Seattle, with excellent food, drinks, shopping, and nightlife, stay in Capitol Hill. The downside is that there aren’t that many places to stay, but it’s by far our favorite place to hang out when we’re in Seattle. Great coffee, great bars, great food, and the best bookstore in Seattle – what’s not to love? In terms of where to stay, we’ve stayed with Sonder before in other cities, and have our eye on the serviced apartments at Sonder at Solis for our next trip to Seattle. It’s also worth mentioning the Silver Cloud Hotel. Though it’s not particularly interesting, it is in a great location at a great price.
For more details, head over to our guide to the best places to stay in Seattle, which covers our picks for the best neighborhoods for a variety of travel styles and budgets, complete with pros and cons for each.
A word on parking in Seattle: If you have a car (which you almost certainly do), parking is going to be either a) expensive or b) a nightmare. Sometimes, both. Our strong recommendation is to pay for parking at your hotel and leave the car there for the vast majority of the couple of days in the city. It will be more of a hassle than help if you try to drive everywhere.
What to Add with More Time in Washington State
If you are lucky enough to have more time in Washington State, we have a few suggestions.
Multiple places on the list below – like the San Juan Islands and the Mount Baker Wilderness – are on our list of our favorite places in the state. But, with a shorter trip, they probably are too far out of the way to fit in.
If you’re interested in exploring more in and around Seattle, you could easily fill another 1-3 days eating, drinking, and walking your way through the city (not to mention the great areas just outside of the city).
It’s also worth noting that you could easily add a day or two to each national park, and still not run out of things to do and see.
That’s another way to spend your extra time, and we’d recommend reading our more detailed guides to each of those parks for more details on what to do with extra time.
Anyway, here are three more amazing places in Washington to consider adding to your road trip itinerary.
The San Juan Islands (1-3 Days)
The island chain to the northwest of Seattle, this is one of our favorite summer getaways from Seattle.
The weather is slightly cooler, and it’s a great time to get out on a kayak and explore the islands (though, the waters are treacherous and you’ll need to do a guided trip because it’s too dangerous for 99% of people to do solo).
Plus, orca whales!
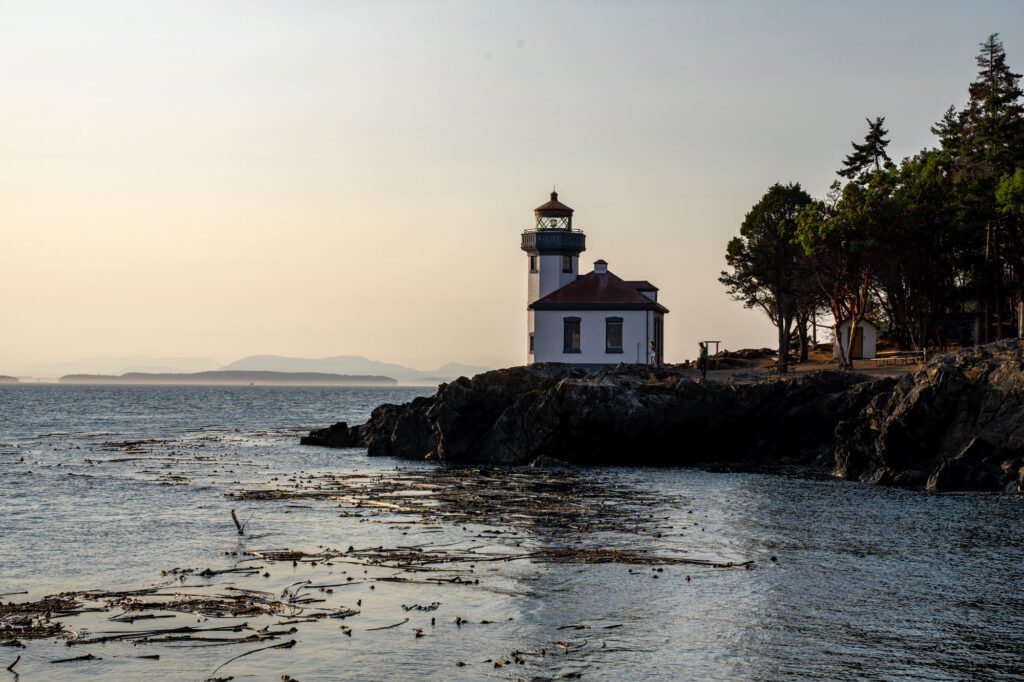
The two main islands are San Juan Island, home to Friday Harbor and the Lime Kiln Lighthouse (where to go to see orcas from shore), and Orcas Island, home to Mount Constitution and some good hiking.
One island can be done in one day / one night, both will take three days / two nights. Obviously, you could easily spend more time (we spent a full week between San Juan Island and Orcas Island last summer).
As you might have guessed, we have guides to the best things to do on San Juan Island, where Matt used to spend a week every summer growing up, and guides to Orcas Island.
Mount Baker (1-3 Days)
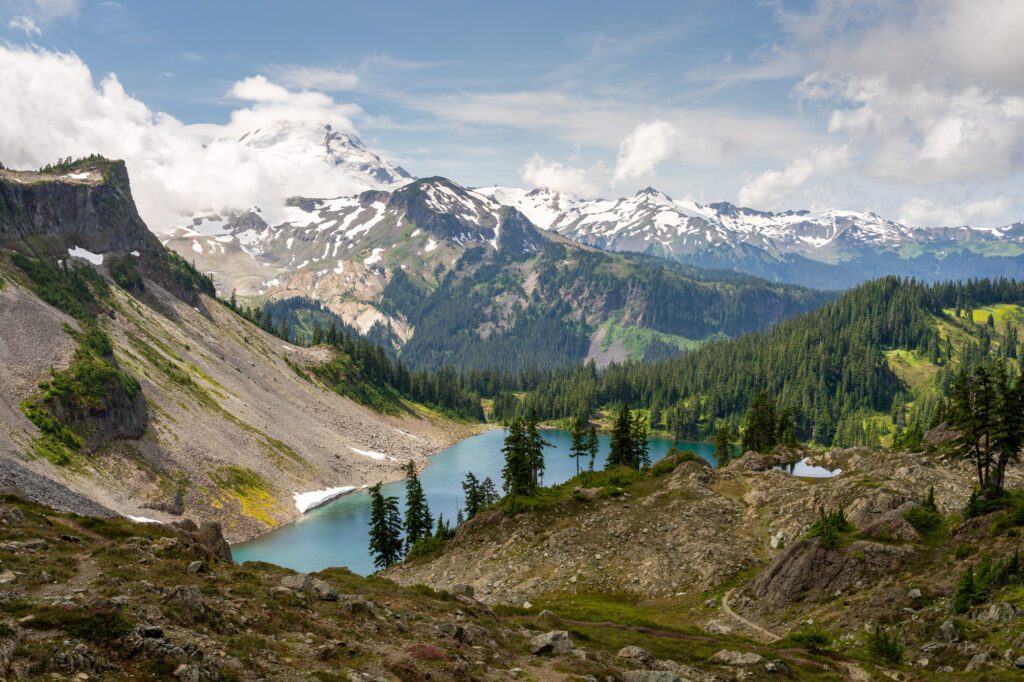
Mount Baker, specifically the north side along highway 542, is the most underrated hiking destination in the Pacific Northwest, we think.
It’s hard to get to, with higher elevation trails covered in snow into August some years, and the snow creeping back in by early October, but those two months are pure bliss for lovers of alpine landscapes.
Plus, there are far fewer people on the trails than in any of the national parks, even the North Cascades which is relatively undiscovered when compared to Rainier and Olympic.
Definitely tackle the Chain Lakes Loop and Yellow Aster Butte, and head to Picture Lake (here on Google Maps) and Artist Point (here on Google Maps) for amazing views
Here’s our guide to hiking near Mount Baker.
Spend Time in Seattle (1-3 Days)
You might have noticed that, if you were to follow the Washington itinerary above exactly as written, you basically will spend a day and a half in Seattle. Which is probably enough to see the highlights, but not enough to actually get into what makes the city special.
We love Seattle, and it’s well worth an extra day or two at the end of your trip to unwind after days spent hiking and exploring.
3 days in Seattle is usually our recommendation for first timers (though we have guides to both one day in Seattle and two days in Seattle, which you can use to plan a shorter trip).
It’s also worth taking a ferry ride across the water to do a day trip to Bainbridge Island, which is anywhere from a half day trip to a full day, depending on how much time you want to spend out there.
See all of our Seattle guides here, including day trips, things to do, hikes, and more.
What to Do with Less Time in Washington State
If you have less than 14 days, you can still absolutely plan an amazing trip, and you’ll have plenty of places left to see on a return trip!
For each of these alternatives, we’ll give you an overview of how we’d think about your time, along with a sample shorter itinerary. Then, you can use the relevant sections above to get the details you need to plan your time.
With 10 Days
As we mentioned at the top, with 10 days in Washington State, we’d cut the North Cascades and Bellingham and focus on Rainier, Olympic, and Seattle. Here’s what that looks like.
- Day 1: Arrive in Seattle, Drive to Olympic National Park via Bainbridge Island
- Day 2: Olympic National Park
- Day 3: Olympic National Park
- Day 4: Olympic National Park
- Day 5: Mount Rainier National Park (Paradise)
- Day 6: Mount Rainier National Park (Paradise)
- Day 7: Mount Rainier National Park (Sunrise)
- Day 8: Leavenworth
- Day 9: Seattle
- Day 10: Seattle & Fly Home
With 7 Days
With 7 days in Washington State, we feel pretty strongly that you should essentially cut the North Cascades from the main itinerary above and focus your entire trip on Olympic National Park and Mount Rainier National Park.
Depending on what you’re into, you might cut a day at Rainier to spend in Seattle.
Here’s what that looks like.
- Day 1: Arrive in Seattle, Drive to Olympic National Park (Port Angeles)
- Day 2: Olympic National Park – Lake Crescent & Hurricane Ridge
- Day 3: Olympic National Park – Rainforest & Pacific Beaches
- Day 4: Olympic National Park & Drive to Mount Rainier National Park
- Day 5: Mount Rainier National Park (Paradise)
- Day 6: Mount Rainier National Park (Sunrise) & Drive to Seattle
- Day 7: Seattle & Fly Home
With 5 Days
If you really rush it, you can fit both Rainier and Olympic into 5 days. But you’ll have to cut certain sections of both parks to make it happen.
Here’s how we’d organize that trip.
- Day 1: Arrive in Seattle, Drive to Olympic National Park (Port Angeles) & Hurricane Ridge
- Day 2: Olympic National Park – Day Trip to Pacific Coast & Hoh Rainforest
- Day 3: Drive to Mount Rainier National Park (Paradise)
- Day 4: Mount Rainier National Park (Paradise & Ohanapecosh) & Drive to Seattle
- Day 5: Seattle & Fly Home
With 3 Days
With 3 days in Washington, you really only have enough time to do one national park. We’d pick one and follow the itinerary in the main section above for that single park, spending any additional time you end up with in Seattle.
For example, here is an idea focusing on Olympic National Park.
- Day 1: Arrive in Seattle, Drive to Olympic National Park (Forks)
- Day 2: Olympic National Park – Rainforest & Pacific Beaches
- Day 3: Olympic National Park – Lake Crescent & Hurricane Ridge & Drive to Seattle
Hello! First of all, thanks so much for this awesome itinerary ! I used it exclusively to help plan our trip coming up in August. It’s great :). We’re doing the 14 day trek! I was wondering if you could offer any guidance on how many of your hike recommendations, roughly, involve a long non-paved road to access. We tried to rent a 4WD vehicle, but the prices right now are absolutely insane :(. So we had to go with an economy. We loooove hiking, particularly long hikes, but don’t want to risk damaging the vehicle! I’ve been trying to do my research and look at Forumns on TripAdvisor, but frankly the replies are usually pretty aggressive toward non-locals. You seem so nice and kind! Thank you!!!
Almost none in this itinerary – the areas in Olympic and Rainier are super well developed (with the exception of Mowich Lake at Rainier, which is not on the itinerary because it’s 18 miles of washboard road). For reference, we did everything here in our super heavy Honda Odyssey that we live in, so a regular car should do the trick!
This is a wonderful itinerary, which we intend to follow pretty much as is. My husband and I, both seniors, are heading to Washington from Boston mid-September and currently plan to stay two weeks. I am wondering what temperatures to plan for in the parks. I was kinda freaked to learn there was snow on the ground in June!
Mid-September will be great. It’ll be relatively warm (the snow returns in mid-to-late October, most years). The weather is a little more unpredictable as you get into late September, so you might get a little rain, but you never know.
We love your complete two week itinerary! Hope to do it in August 2022. Thank you. If we were to drop any time in Seattle and instead spend the days in San Juan Islands, where in the itinerary would you fit in the San Juan’s?
You’d probably want to do it in between Olympic and the North Cascades. You can take a ferry to San Juan Island from Anacortes, which is roughly an hour north of Seattle.