The Best Hikes in Washington State: Our 25 Favorite Trails
Looking for some inspiration for hiking in Washington State? You’re in the right place! This guide to the best hikes in Washington has been compiled over the course of the years and years we’ve spent exploring the trails in Washington State, and we are constantly adding (and subtracting) as we explore more of the state’s hiking trails.
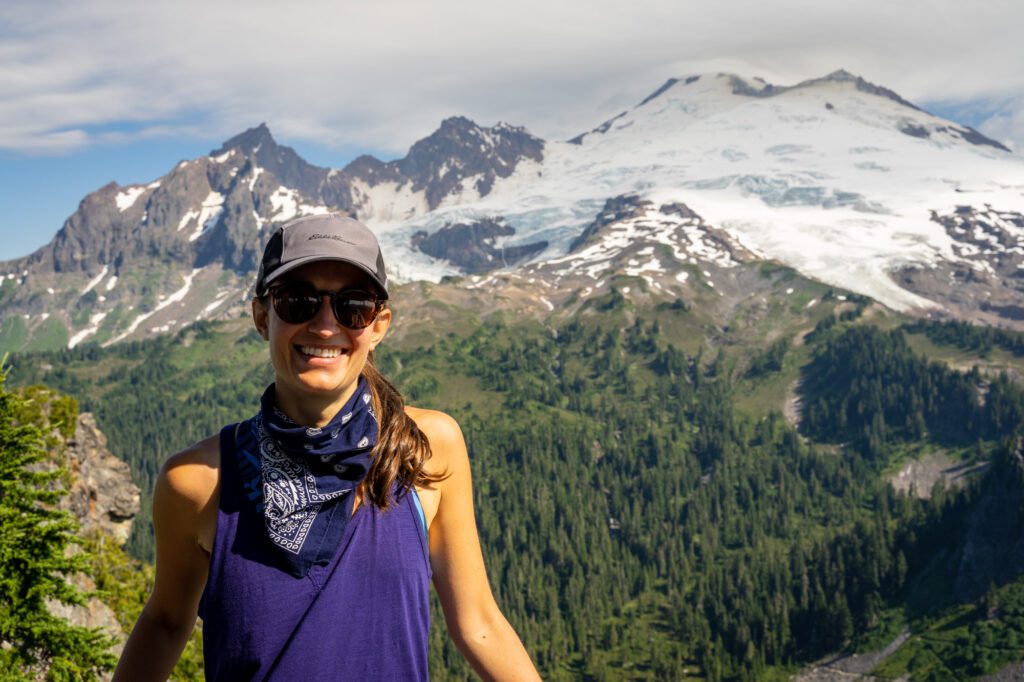
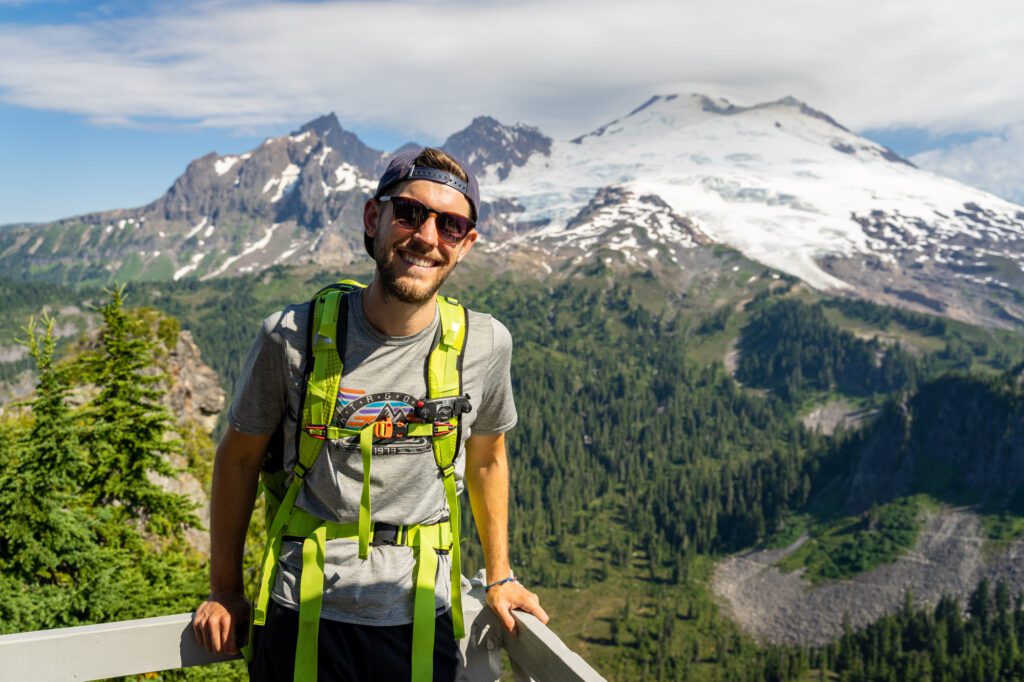
Despite growing up in the Seattle area, I (Matt here!) had never really explored the hiking trails in Washington State until relatively recently.
By the time I was into hiking, which is all thanks to Alysha who was essentially born with a backpack on, I had moved down to California with an eye on making a triumphant return to the Pacific Northwest at some point.
Which finally happened recently when we (FINALLY) settled down in Portland, Oregon, which has surprisingly good access to many of our favorite Washington hikes, like the ones around Mount Rainier and Mount St. Helens.
In this guide, we’ll take you through our favorite Washington State hikes.
We’ll give you trail details, the payoff, plenty of photos, and important things to know, and if we have a more detailed trail guide for you, we’ll link to it so you can plan your trip.
Here’s what we think is the best part – we’ve done every single one of the hikes on this list. Which we think counts for something.
Over time, we’ll be adding to this as we’re able to tackle more of them (every summer we seem to discover one or two more trails to add to the list!).
Sound good to you? Let’s get into it!

Disclaimer: Some of the links in this post, like hotel links, are affiliate links, meaning at no additional cost to you, we make a little bit of money if you click through and book. That being said, we would never recommend something to you that we don’t stand behind 100%.
25 Incredible Washington State Hikes to Add to Your Hiking Bucket List
Here are our favorite hikes, in order of our preference.
Yes, that means we’ve done every. single. one. Of these Washington hikes, and this guide is based on our own experiences on the trail up and down Washington State.
This is by no means a guide to every single one of the amazing hikes in this beautiful state.
It would take a lifetime to explore all of the trails in Washington – which we fully intend to do – and as we make it to more of them, we will update this list with our finds.
It’s also worth noting that this guide doesn’t include some of the more tame (but still spectacular) hikes in the state, like the Hall of Mosses in the Hoh Rainforest, or Tipsoo Lake near Mount Rainier.
We love hikes that combine a great workout with an incredible reward – we like to work for the views. The hikes in this guide are thigh-burners (to various degrees) with a payoff that will make it all worth it in the end.
There are also hikes that should be on this list – like the Cascade Pass / Sahale Arm – one of the best hikes in the North Cascades – and the Skyline Divide near Mount Baker – but aren’t because we didn’t have the type of car required to navigate the long and bumpy forest road that takes you to the trailhead.
Who knew a Honda Odyssey isn’t made for off-roading?
If you have any hikes that you love that you think we should add to our agenda, please please please contact us and let us know, or leave a comment below!
Think of this as a guide from two hiking enthusiasts who love the Pacific Northwest. We hope you discover AT LEAST one amazing hike that you didn’t know about before (hopefully more than one).
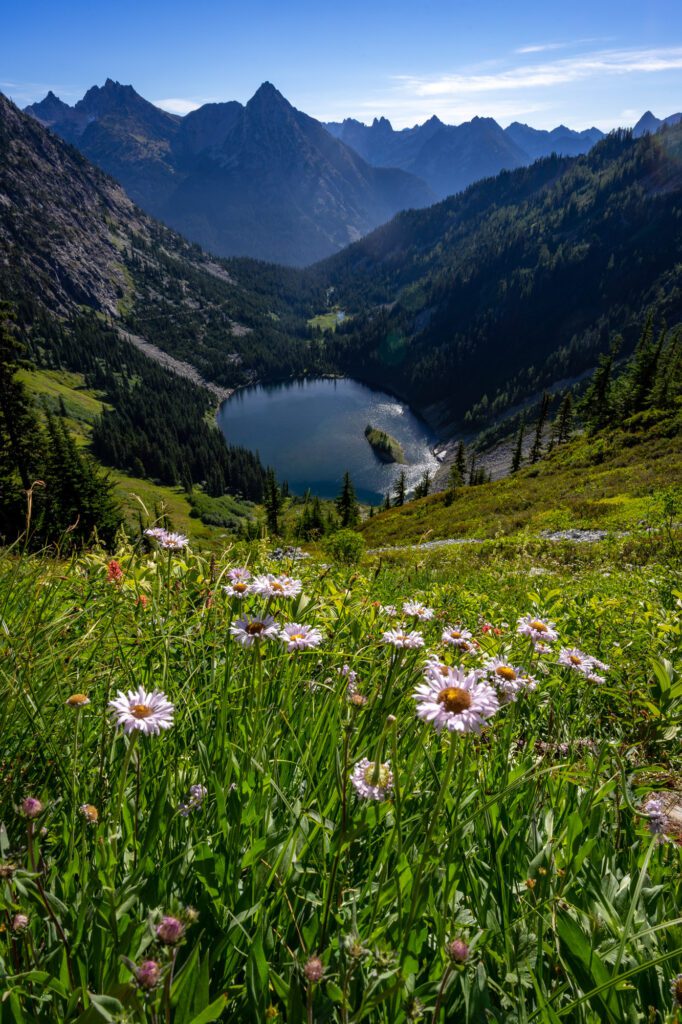
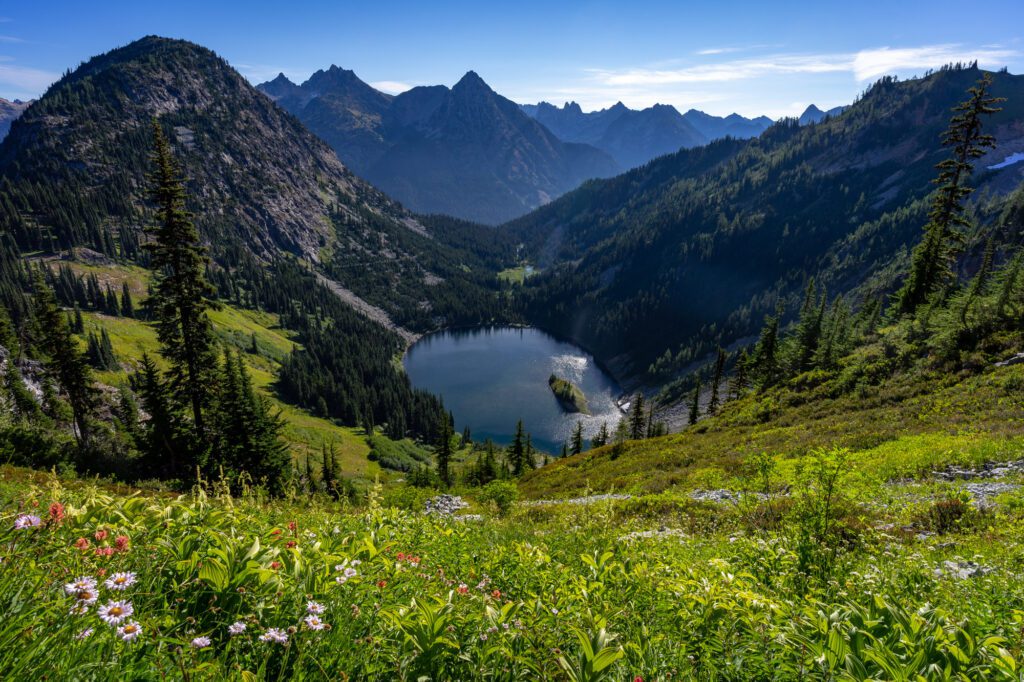
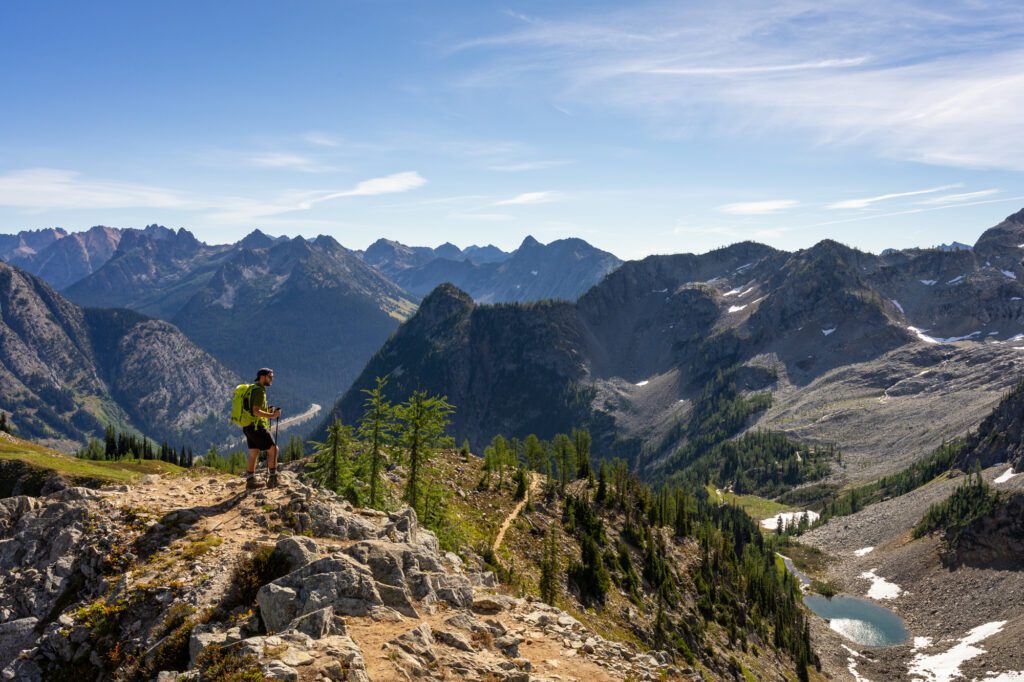
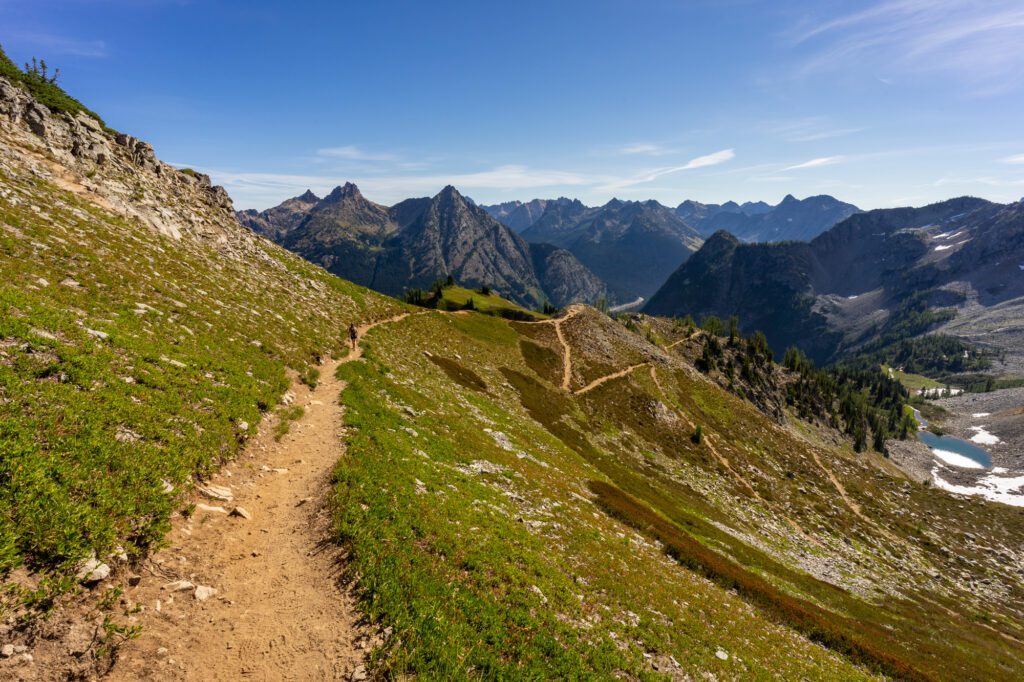
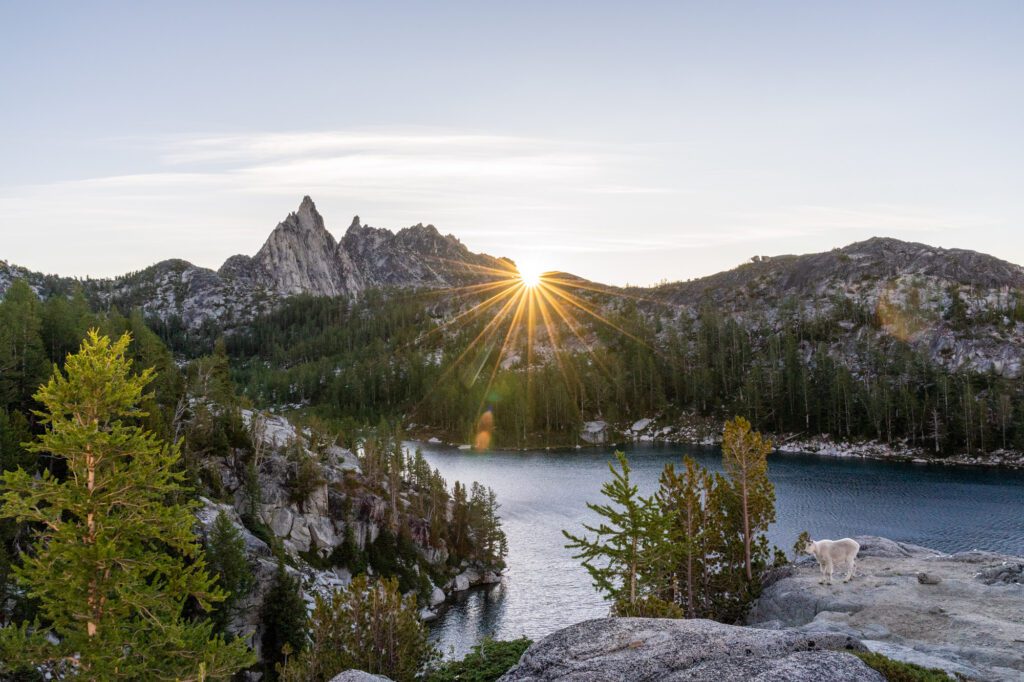
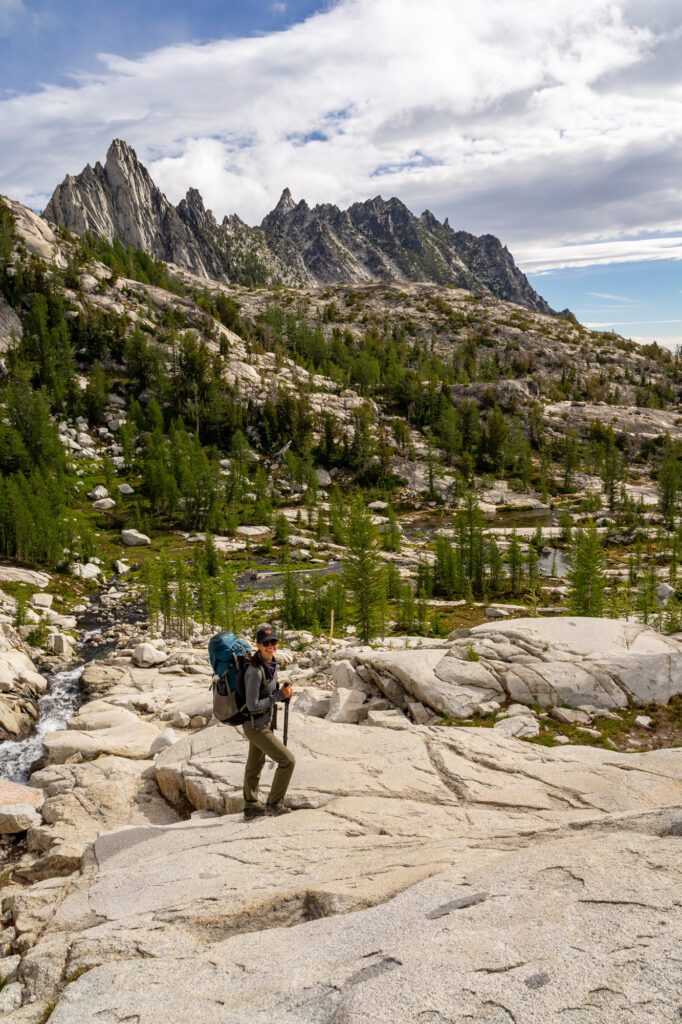
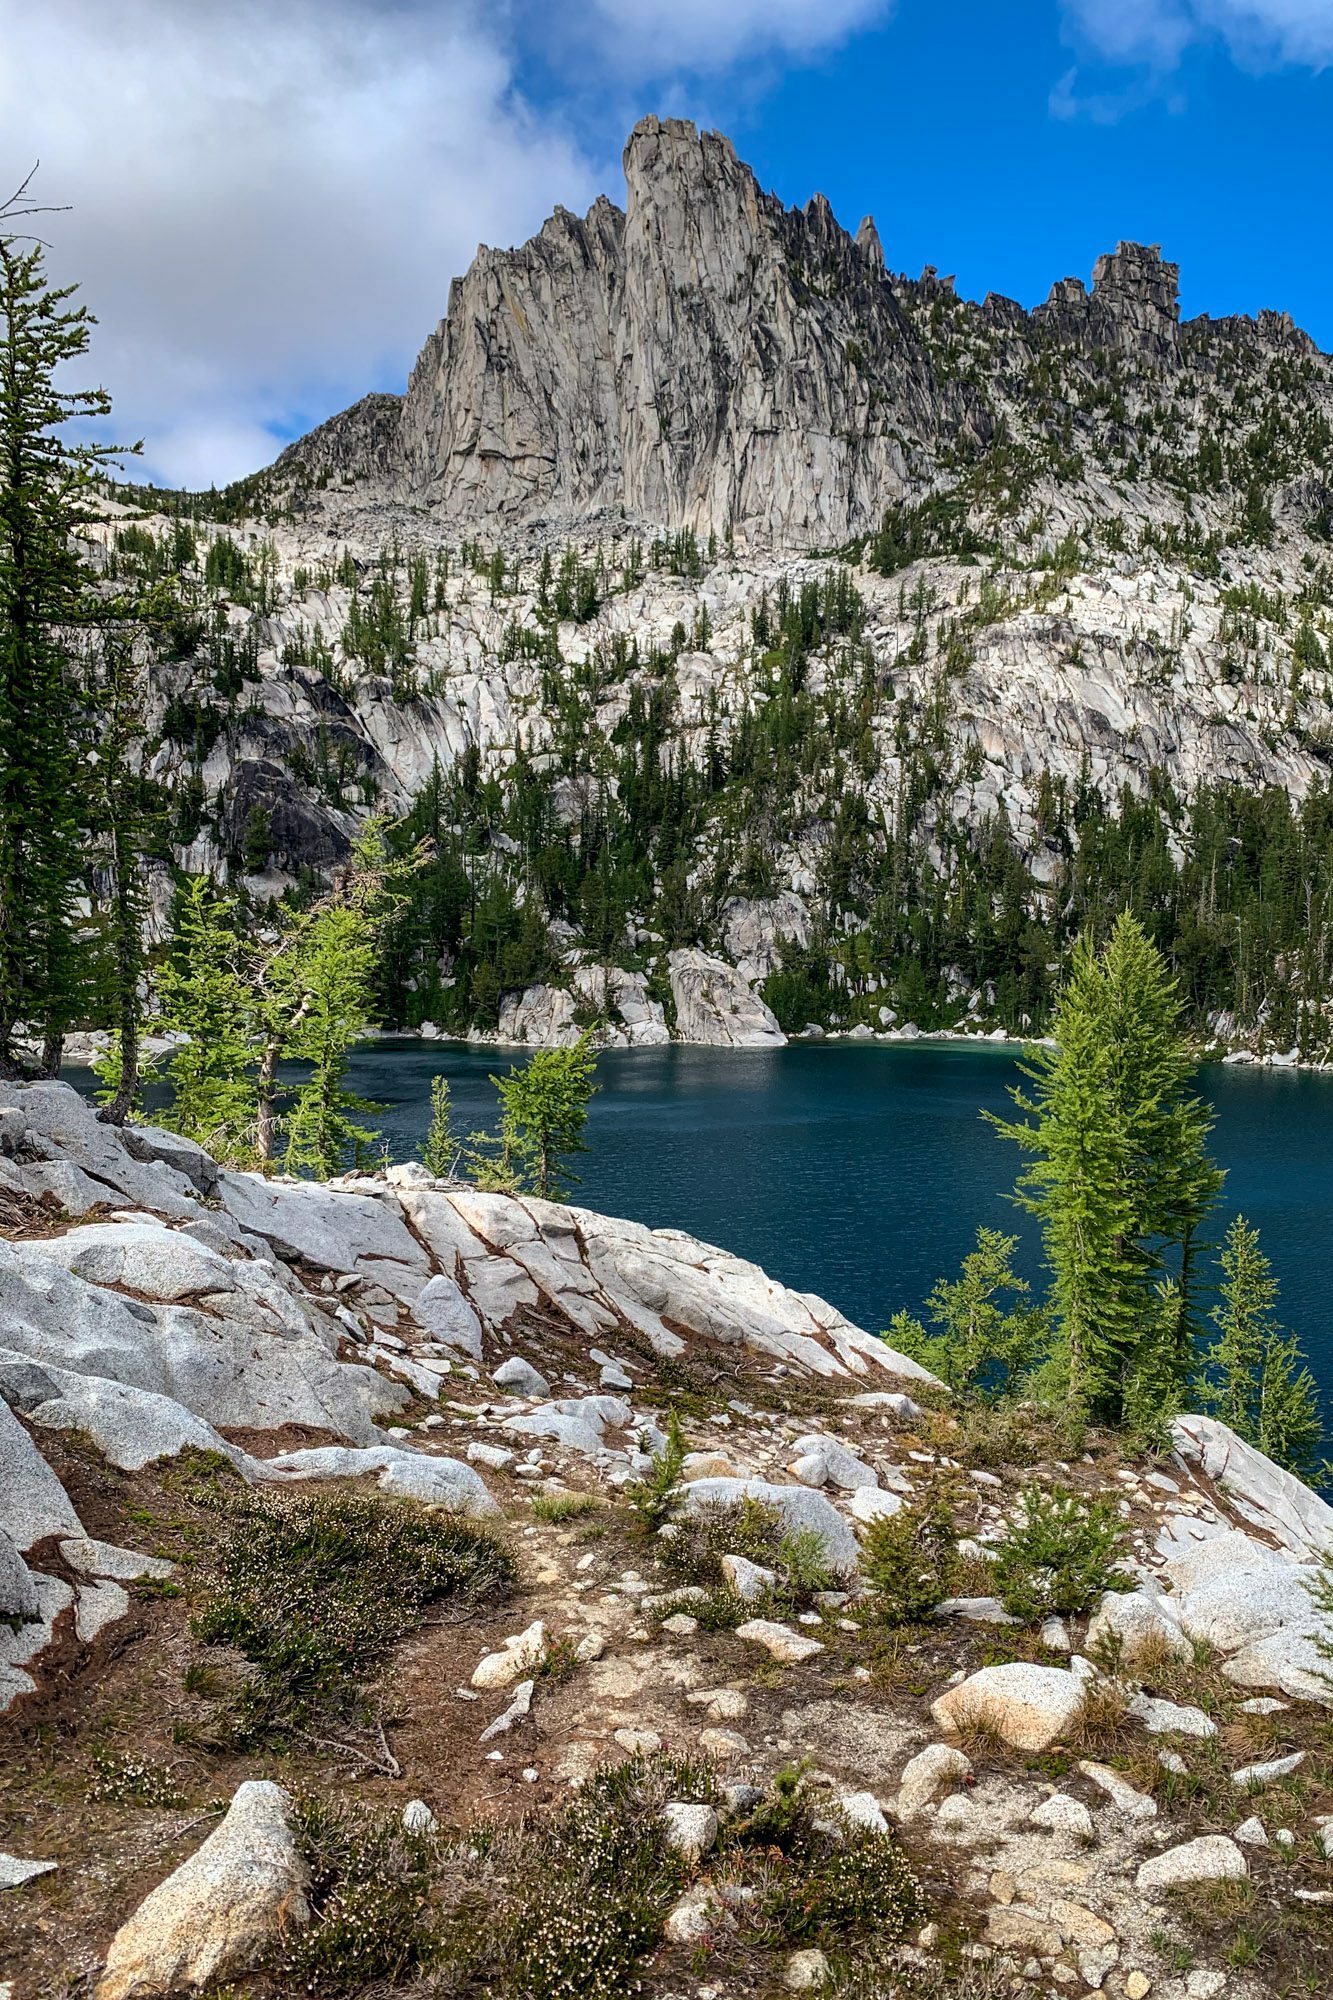
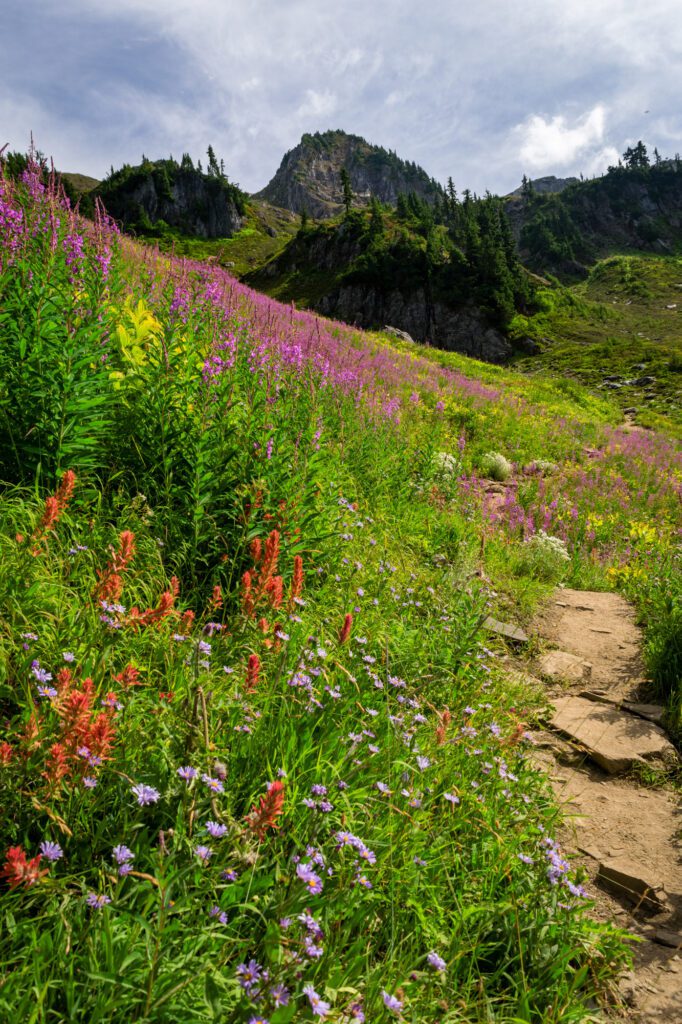
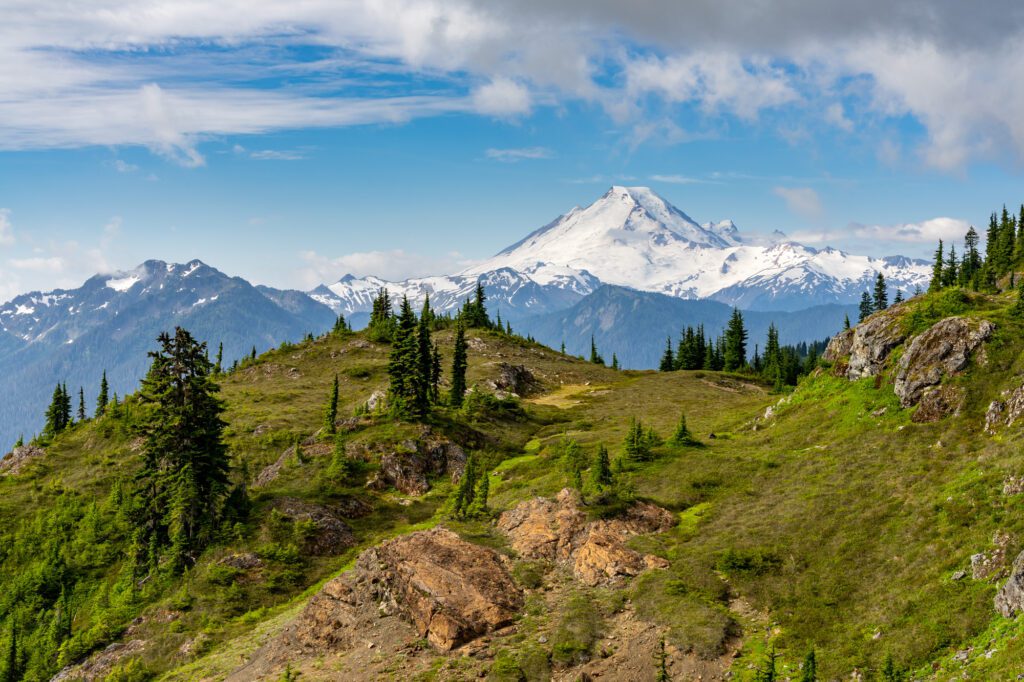
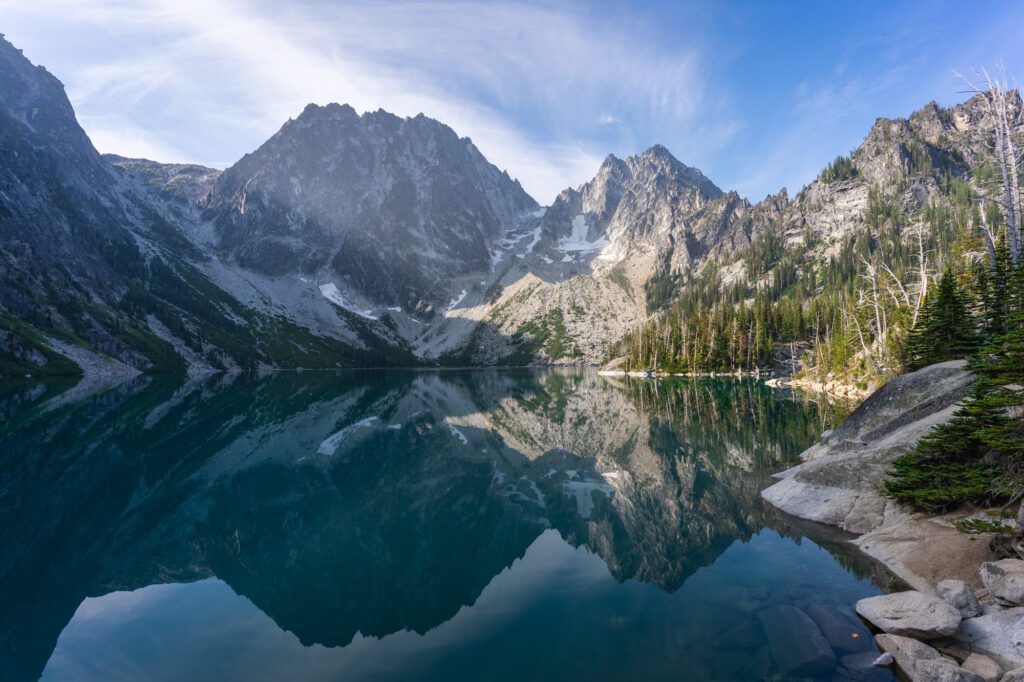
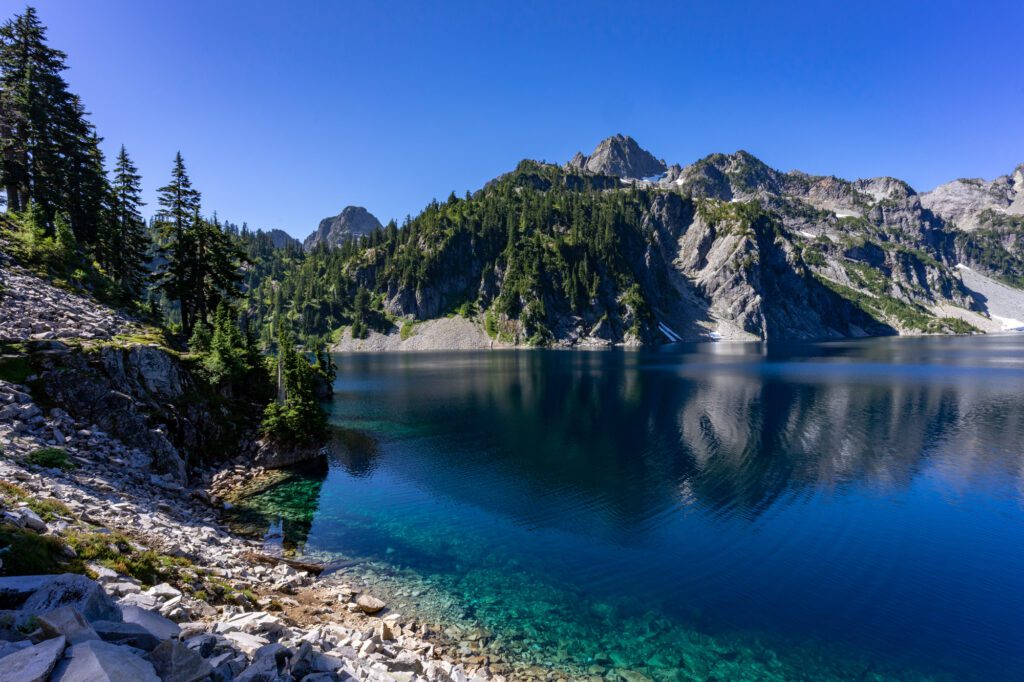
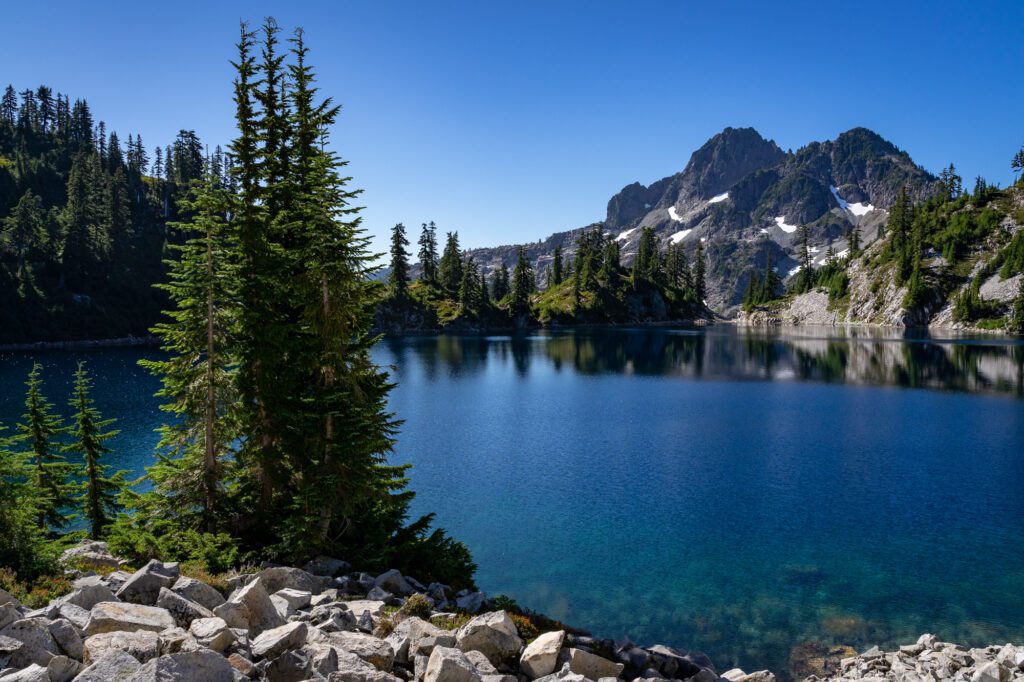
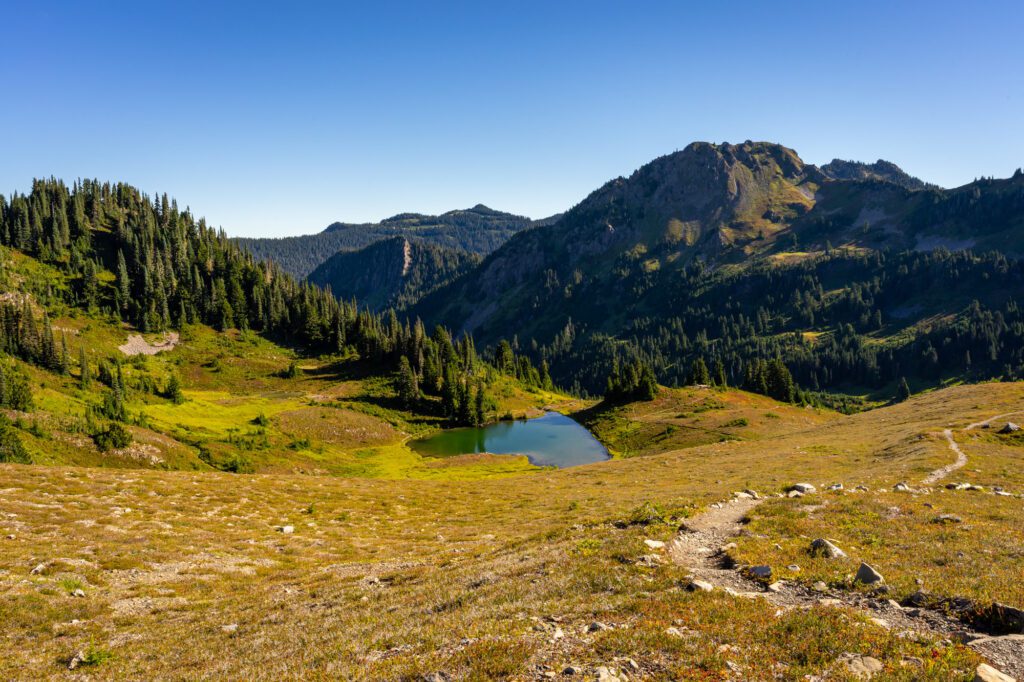
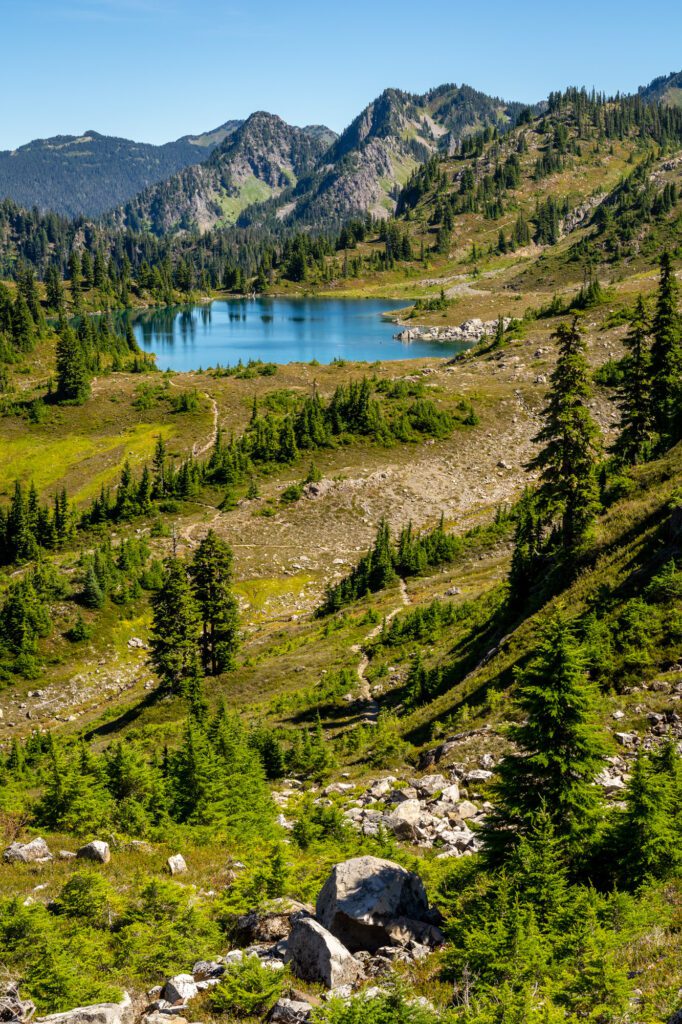
The Heather – Maple Pass Loop (North Cascades National Park)
- Length: 7 miles
- Elevation Gain: 2,000 ft.
- Trail Type: Loop
- Difficulty: Moderate
- Dog Friendly? Yes, on a leash
- Pass Required: Northwest Forest Pass
- Trailhead Location
We think this is the best hike in the state in terms of bang for your buck. We’ve done it twice, and would do it again in a heartbeat.
You’ll get the picturesque rocky peaks that are quintessential North Cascades, a gorgeous lake framed by said rocky peaks, and panoramic views of the surrounding area from the top of the pass. Plus, marmots.
We recommend tackling this hike counter-clockwise for a couple of reasons.
First, if you choose to do it counter-clockwise, the views will be in front of you as you descend from the high point in the hike.
Second, the trail is more gradual along the north side of the lake, which means you’ll have a more gradual climb and a steeper descent. If you have knee problems, you might want to go the other direction to save your knees.
If you choose to go the same direction we did, you’ll start with a series of switchbacks, climbing away from the parking lot. It’s a gradual climb to the top of the pass, and you’ll gain about 2,000 feet of elevation in 3.5 miles – just over 500 ft per mile.
Not too hard, but plenty of climbing to get a good workout in.
About a mile and a half in, take the fork in the trail to the left to make a quick detour to Lake Ann. It adds a mile to your trip, but is worth seeing the lake from the shoreline before you climb the pass and see it from above.
At the top of the pass, you’ll have panoramic views over Lake Ann and the surrounding peaks. The views to the east are particularly impressive from the summit, with the trail winding its way through the landscape, with the Cascade Range in the distance.
This trail is amazing in the summer and fall. In the summer, which is mid-July for the North Cascades due to late snowmelt, wildflowers are everywhere. In the fall, the larches turn gold, and fall color illuminates the landscape with beautiful hues of red, orange, and yellow.
Remember that the scenic North Cascades Highway is closed seasonally, often between November and May. But you’ll still find tons of snow on the trails through mid-July, which is the earliest you should consider visiting if you plan on doing some hiking.
Read More: A Complete Guide to Hiking the Heather-Maple Pass Loop in the North Cascades
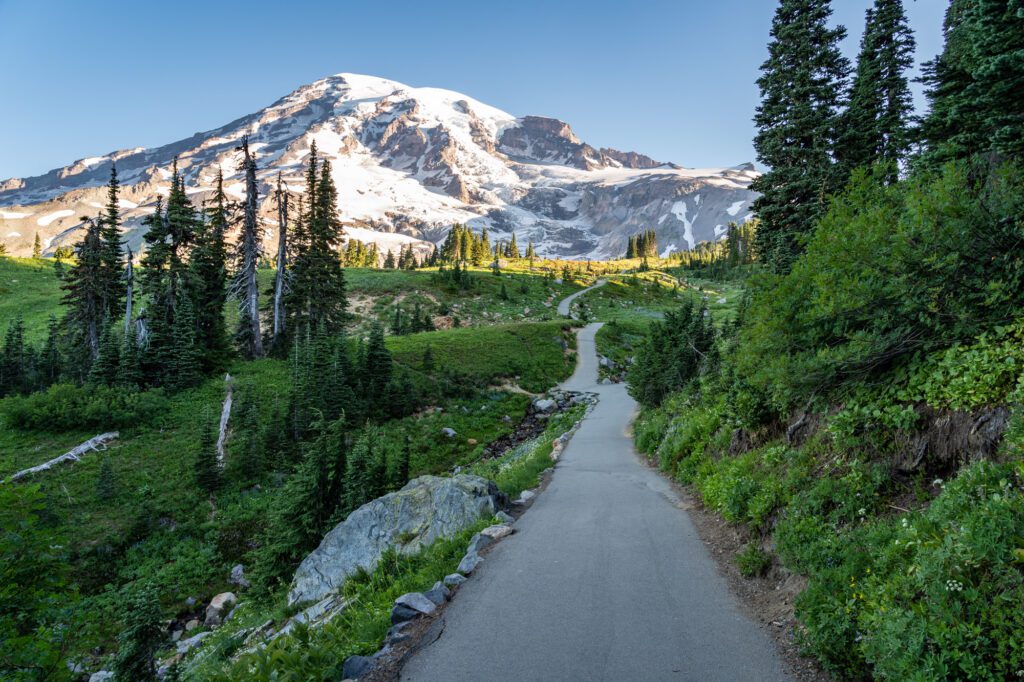
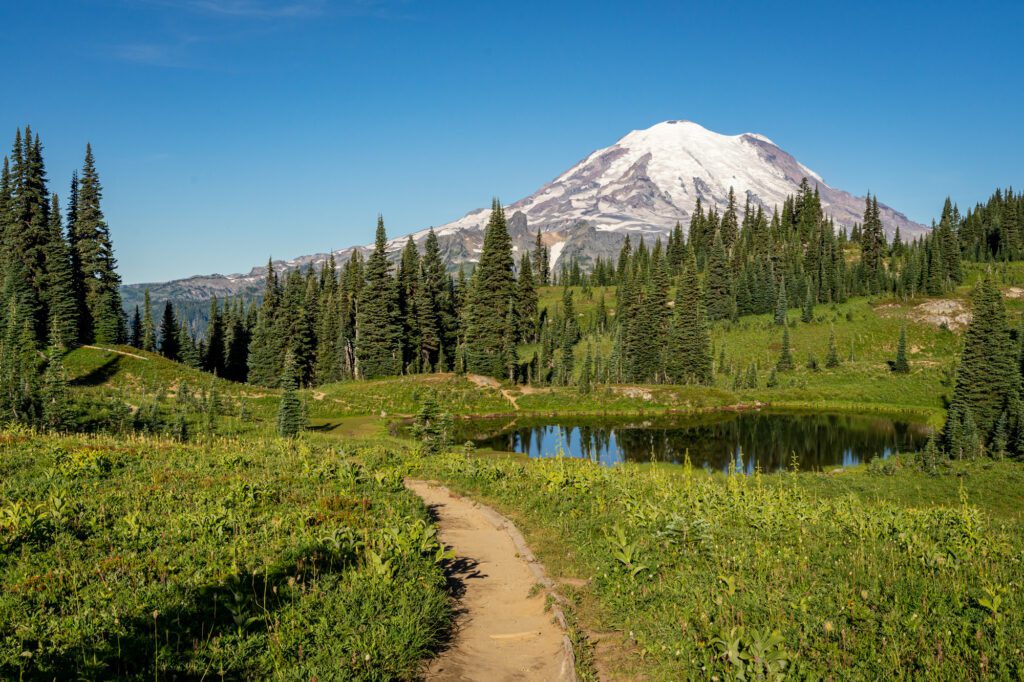
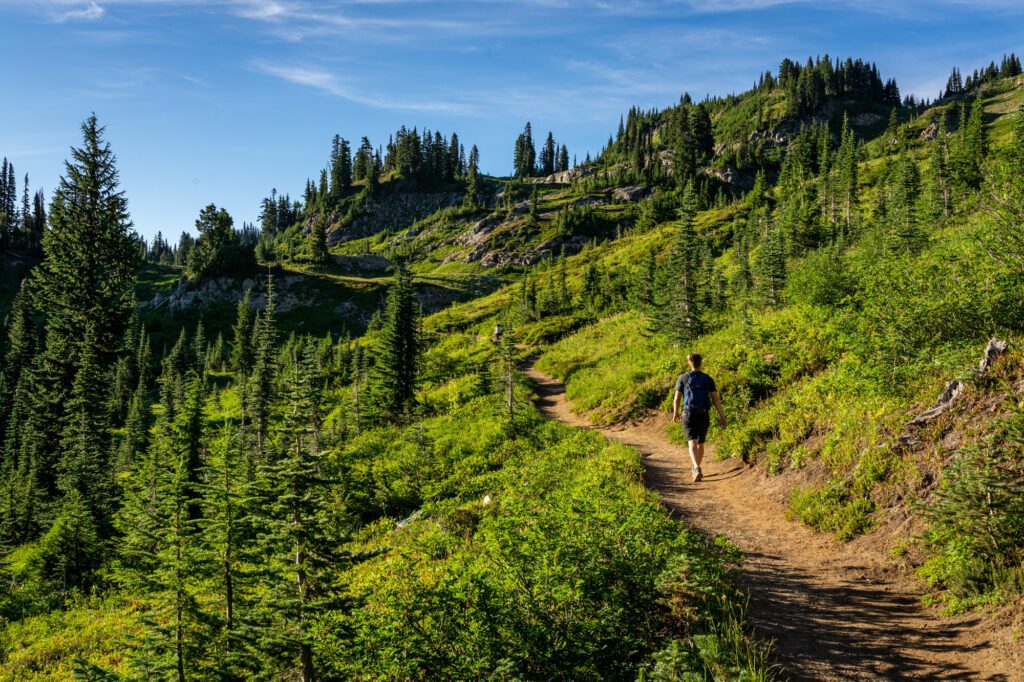
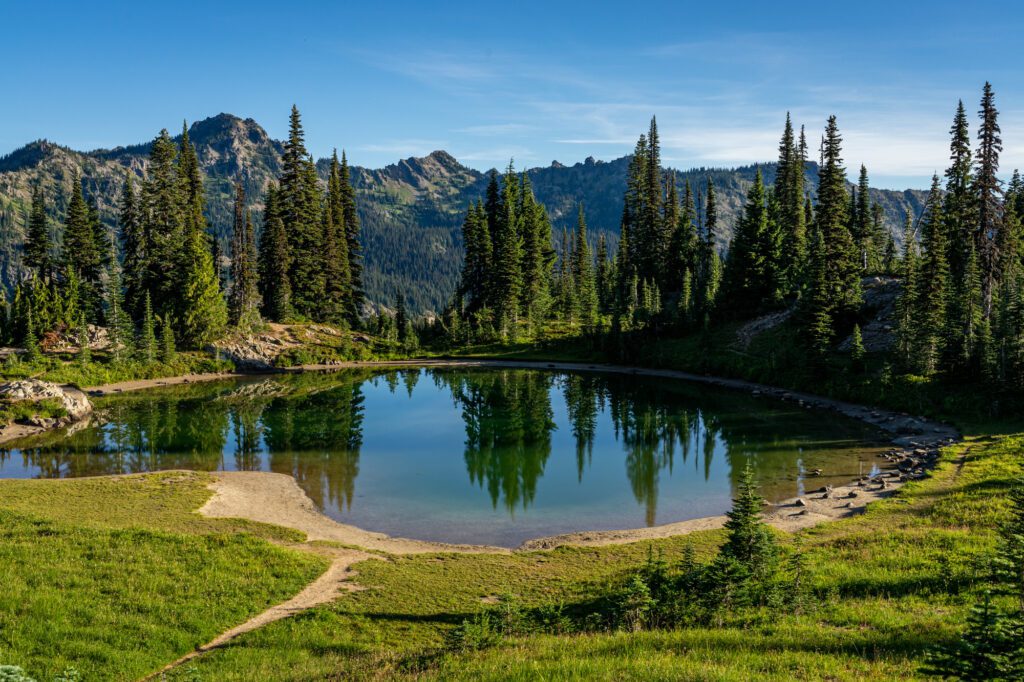
The Skyline Trail (Mount Rainier National Park)

- Length: 6 miles
- Elevation Gain: 1,800 ft.
- Trail Type: Loop
- Difficulty: Moderate
- Dog Friendly? No
- Pass Required: America the Beautiful Pass
- Trailhead Location
The epic Skyline Trail is at the top of our list of best hikes at Mount Rainier, and also the best hikes near Seattle, which means it HAS to be on this list.
The hike leaves from the Henry Jackson Visitors Center on the Paradise side of the mountain, which is the most popular area for visitors.
That means that the trail will be packed, but the up-close-and-personal views of the mountain are well worth braving the crowds for.

We’ve now done this hike in both directions, and the decision on which one we’d opt for is complicated (you can read more about it in the trail guide we’ve linked below).
Basically, if it’s early (like, 7am ish), go clockwise, where you’ll have the best meadow and mountain views in front of you on the way up. If it’s later and already crowded, go the opposite direction (counterclockwise) for the solitude on the eastern half of the loop.
The ascent up the eastern half of the trail is much more gradual, which makes it a bit more pleasant. We strolled along the path (which was eventually covered in snow… in late July), passing babbling brooks and fuzzy marmots on our way to Panorama Point.
If you do hike counterclockwise you’re going against the flow of traffic, which given the crowds means you might be waiting for people going the other way to pass a lot.
But, on the other hand, you might just be waiting behind them to pass them if you were going the other way, so it’s probably a wash.
The views from Panorama Point are incredible – you can see the face of Mount Rainier so close it seems like you can basically reach out and touch it, and to the other direction you’ve got panoramic views of the Tatoosh Range, Mount Adams, and Mount St. Helens.
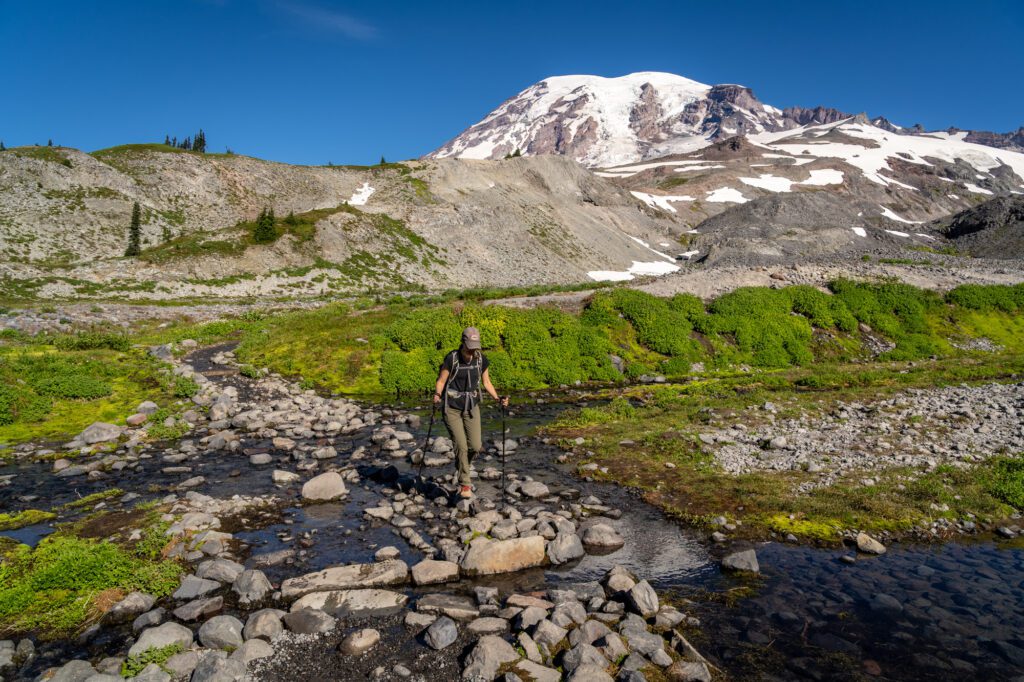
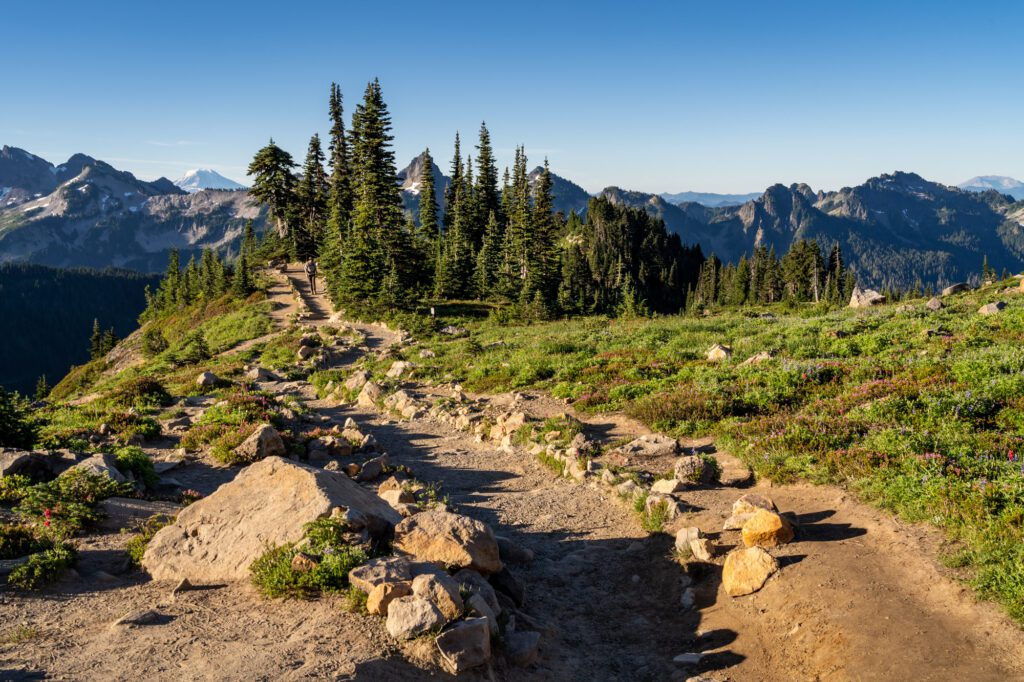
It’s truly spectacular, and we think it’s one of the best views in all of Washington.
Read More: Hiking the Skyline Trail at Mount Rainier – A Complete Trail Guide
The Enchantments (Near Leavenworth)
- Length: 18+ miles
- Elevation Gain: 4,500 ft. (plus 6000 ft elevation lost)
- Trail Type: Thru-hike
- Difficulty: Very Hard
- Dog Friendly? No
- Pass Required: Northwest Forest Pass
- Trailhead Location
We were lucky to snag some last minute permits to backpack the Enchantments in 2020, and it was an experience we won’t soon forget.
We were harassed by an aggressive male mountain goat (toxic masculinity is the worst) who headbutted our tent at one point, and 50 mph winds made us pack up camp as sunset was approaching and move to find a more protected place to set up camp – which, by the way, doesn’t seem to exist in the Enchantments.
While that might sound like complaining, the natural beauty we got to experience for three days and two nights made it all worth it.
Sunrises and sunsets over some of the most gorgeous alpine lakes in the world. Mountain goat babies frolicking on the rocky terrain. It’s spectacular.
This hike leaves from the same trailhead as the Colchuck Lake trail, which you’ll find below, but takes you up Aasgard Pass, through the Enchantments Basin with ALL of the alpine lakes, and down past Snow Lakes.
You’ll end your jaunt through the Alpine Lakes Wilderness at the Snow Lakes Trailhead.
To do this as a thru hike, which is what we’d recommend so that you don’t have to go up AND down Aasgard Pass, you need two cars OR to pre-book a shuttle between trailheads.
And you need to start early – this hike will take most people AT LEAST 12 hours, no matter how in-shape you think you are.
In the summer months, that’s less of an issue, with the sun sticking around well past 9pm, but in the fall you’ll want to make sure you’ve finished your descent before it gets dark between 5pm and 6pm. That means you need to start between 5am and 6am.
Now, in normal times, permits to backpack the Enchantments are nearly impossible to get. Thousands apply for just a handful of permits a day.
You can read more about that process here.
If you are one of the lucky few, lucky you! If not, you can still experience the beauty of the Enchantments as a brutal day hike, but it is not a hike that you should take lightly.
It’s 18 miles long, starting from Colchuck Lake Trailhead and climbing past Colchuck Lake and up Aasgard Pass, which gains a smidge under 2,000 feet in ¾ OF A MILE.
It was easily the slowest we’ve ever hiked, and we had 30 pound packs on. There’s no clearly defined trail either – you mostly scramble your way to the top across loose rocks and boulders.
Under no circumstances should you do this hike if it is raining, or it has rained recently. It’s slippery and dangerous.
That all being said, once you reach the top of the pass, you’re golden. It’s quite literally all downhill from there.
You’ll descend past a series of pristine alpine lakes – our favorites were Perfection Lake, which is where we slept the first night, and Lake Viviane, which is where we tried to sleep the second night.
Then, continue the descent past Snow Lake and out to the Snow Lake Trailhead, where you’ll pick up your second car and drive back to the Colchuck Trailhead to retrieve the other car.
Read More: Hiking through the Enchantments in the Alpine Lakes Wilderness
The Hidden Lake Lookout Trail (North Cascades National Park)
- Length: 8 miles
- Elevation Gain: 3,300 ft.
- Trail Type: Out and Back
- Difficulty: Hard
- Dog Friendly? No
- Pass Required: Northwest Forest Pass
- Trailhead Location
First, it’s worth noting that the road to get to the trailhead is a disaster. It’s uphill the whole way, unpaved, and more than a little bumpy.
We definitely recommend both a 4WD vehicle and high clearance, though somehow we saw a Prius at the parking lot? Not sure how that happened.
Take it slow, and you’ll be fine. We borrowed my mom’s SUV because we weren’t sure that our minivan was going to make it.
This hike was our first foray into the North Cascades, and it set the bar REALLY high for everything else to come.
It’s a tough hike climbing steadily and gaining over 800 feet per mile – with several false summits where you’ll think you’ve made it and SURPRISE MORE CLIMBING!
The climb is beautiful though, with views back towards Mount Baker in the distance, and wildflowers galore in July.
Over the course of the climb, you’ll progress from dense forest and babbling brooks to granite slabs and rocky terrain.
Eventually, you’ll reach the star of the show – a gorgeous perched lake with the backdrop of the Cascade Range. AKA nature’s best imitation of an infinity pool.
The lookout is a bit further, and you’ll have to do some scrambling to get there.
The views from the lookout are great, and you can spend the night there. It’s first-come-first-served, which means you’ll need to start the hike at sunrise in the summer because demand is so high.
You’ll also need a backcountry permit.
This hike is truly spectacular, but it’s not for the faint of heart. Bring plenty of water, food, and sun protection for the climb.
Read Next: The Best Hikes in North Cascades National Park
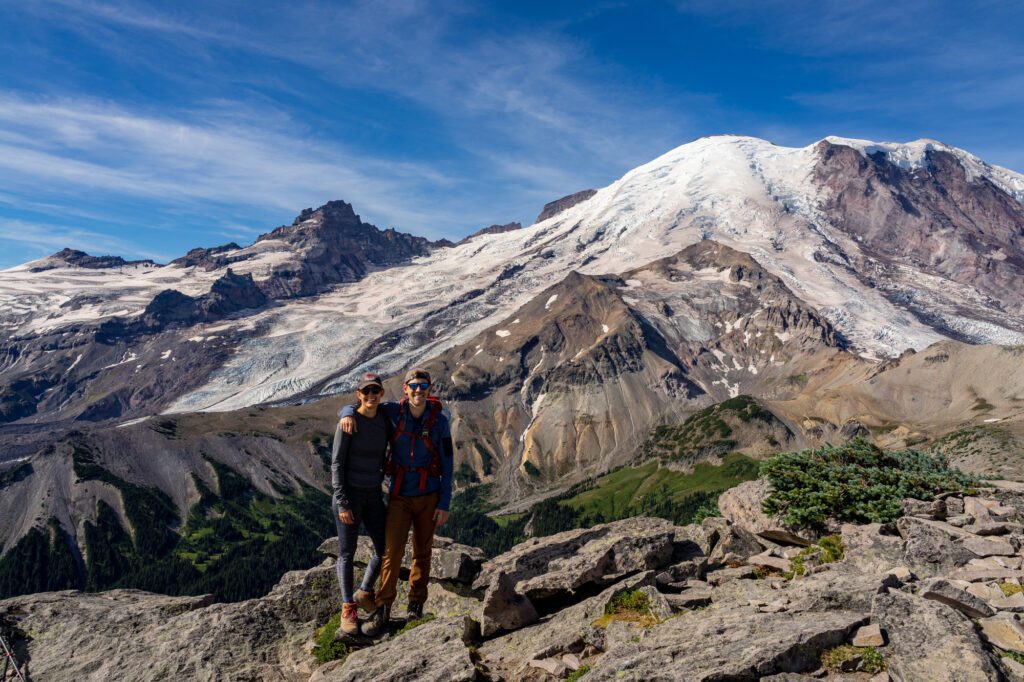
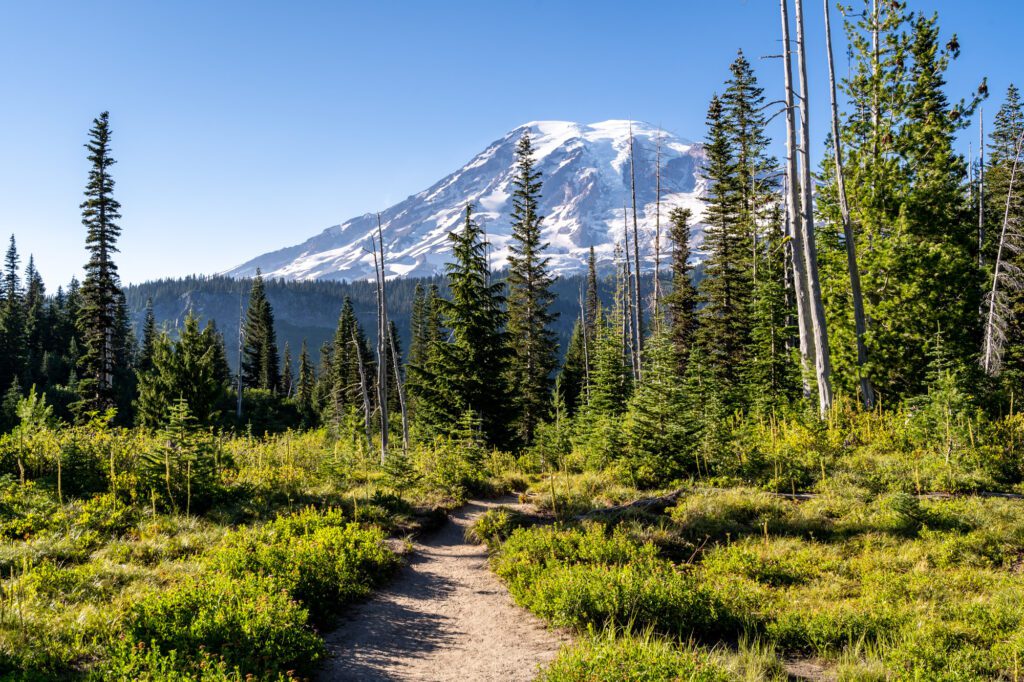
The Burroughs Mountain Trail (Mount Rainier National Park)
- Length: 9 miles
- Elevation Gain: 2,500 ft.
- Trail Type: Lollipop
- Difficulty: Moderate
- Dog Friendly? No
- Pass Required: America the Beautiful Pass
- Trailhead Location
First of all, if you’ve got gas in the tank, definitely make it all the way to the third borough. It’s worth it. We were a bit confused by the information in the national park brochure, which seemed to show the trail ending at the second borough.
It doesn’t. Go to the third one, you won’t regret it.
The hike up Burroughs Mountain is the best of the many hikes on the Sunrise side of Mount Rainier, which is less visited but is the highest point you can drive to in the park.
Not that the elevation of the parking lot really matters that much, since you’ll be climbing several thousand feet above it on this hike. Go counter-clockwise.
That will have you climbing Sourdough Ridge, doing the out and back to the three burroughs, and returning via the sunrise trail, which is a nice stroll through the woods.
You’ll start the climb up to Sourdough Ridge from the parking lot, and follow that until you reach a three-way junction in the trail at Frozen Lake.
To the right is the trail up the ridge to Mount Fremont, which is also among the best day hikes at Mount Rainier.
Straight ahead is Berkeley Park, which is wildflower central during the peak summer months. And to the left is what you came for – the climb up to the three burroughs.
As you ascend to the three vistas, you’ll probably encounter marmots and mountain goats, and maybe even a black bear if you’re lucky (though that would probably be in the meadows on the way down).
Read More: Hiking the Amazing Burroughs Mountain Trail in Mount Rainier National Park
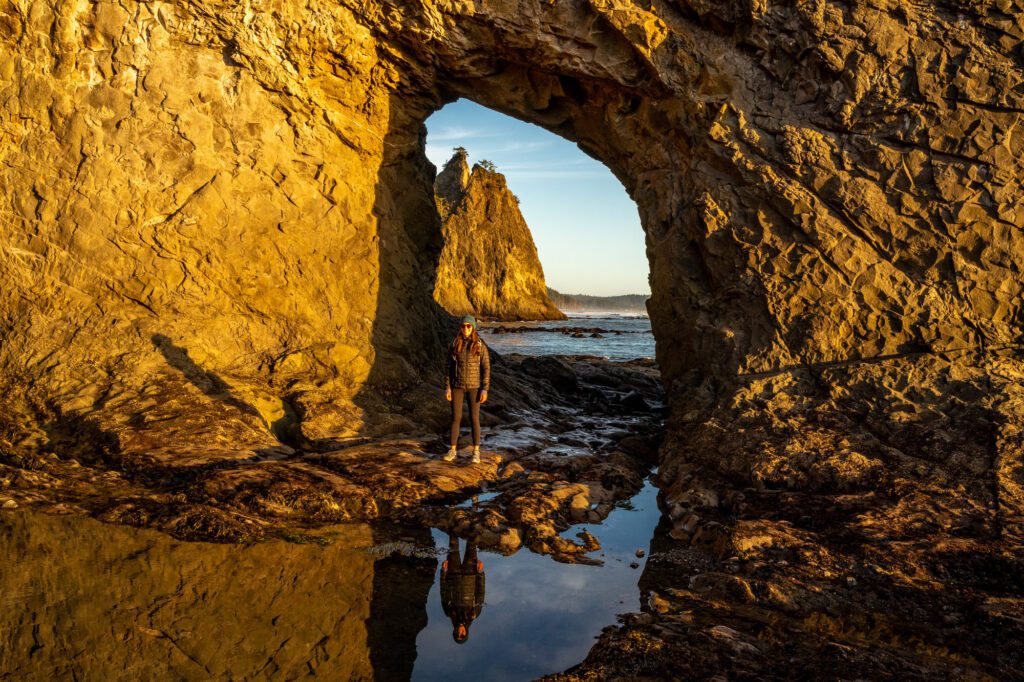
Hole in the Wall at Rialto Beach (Olympic National Park)
- Length: 4 miles
- Elevation gain: None
- Difficulty: Easy
- Trail Type: Out and Back
- Dog Friendly? No (technically yes, but only for a small portion of the beach)
- Pass Required: America the Beautiful Pass
- Trailhead Location
We did this hike at sunset, and it was one of our favorite experiences on our Washington Road Trip a few years ago.
It’s more of a stroll along a sandy beach, with the Pacific Ocean lapping at your hiking boots as you make your way north along the Washington coastline.
You’ll pass photogenic rocks and driftwood, and just before you arrive at Hole in the Wall are a couple of extremely photogenic sea stacks that make a great subject for sunset photos.
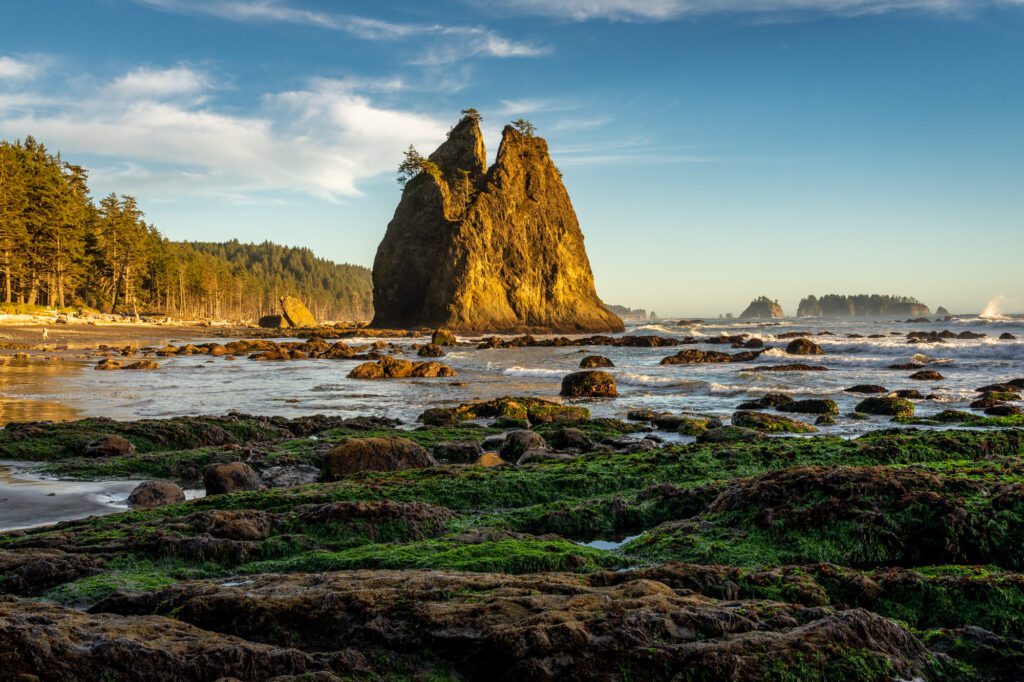
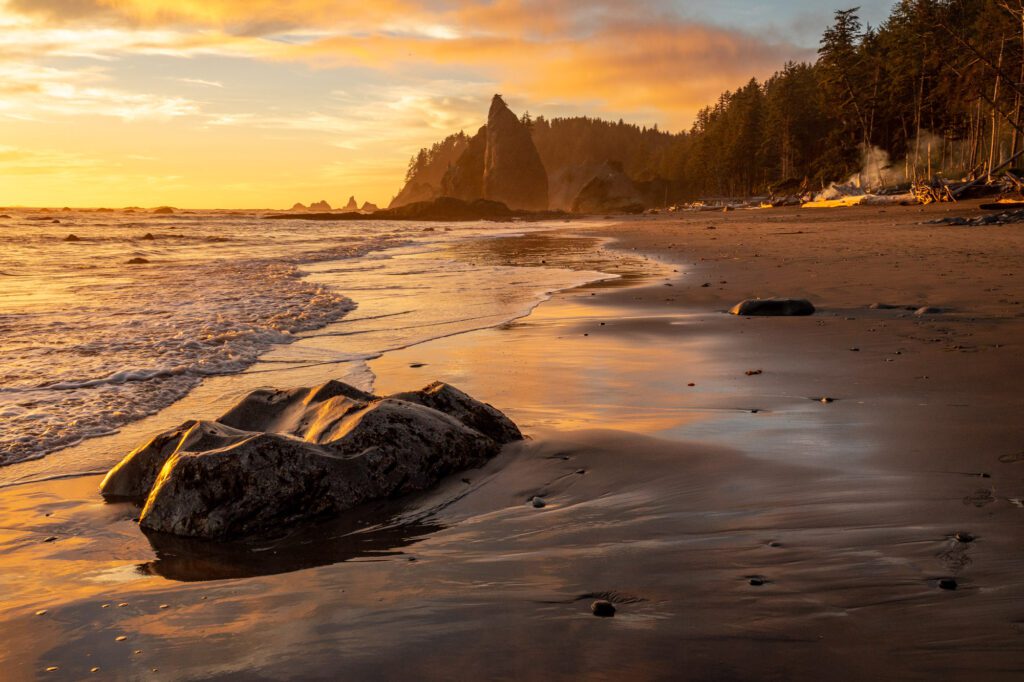
Just under two miles from the parking lot for Rialto Beach, you’ll arrive at Hole in the Wall, which is an arch formed by years and years of erosion.
The best picture here is from the far side of the hole, where you can get a perfectly-framed picture of the sea stack, framed by the hole in the wall. There are also some great tide pools on either side.
Make sure to look up as you walk! We saw two bald eagles – I saw one hanging out high in a tree above us, and as Alysha was scanning the treetops looking for it, she spotted another one just a few trees over. Bald eagle family!
A note: You need to do this hike at low tide. Check the tide charts before you go to plan out your hike.
The Naches Peak Loop (Mount Rainier National Park)
- Length: 3.5 miles
- Elevation Gain: 600 ft.
- Trail Type: Loop
- Difficulty: Easy
- Dog Friendly? No
- Pass Required: America the Beautiful Pass
- Trailhead Location
The Naches Peak Loop might be the best bang-for-your-buck hike in Washington State.
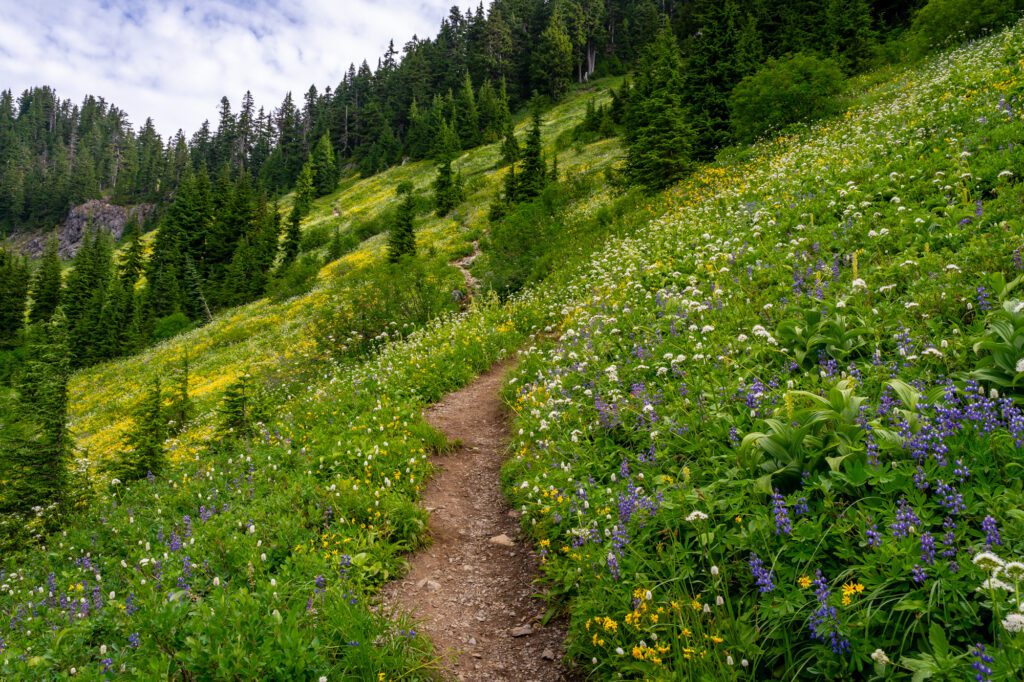
It has everything you’re probably looking for – a picturesque lake (with stunning views of the Mountain), wildflower-laden meadows bursting with all sorts of color in the early summer, and great views of Mount Rainier. All for a relatively easy 3.5 miles!
One thing you should definitely know before you hit the trail – do this hike clockwise starting from the Tipsoo Lake parking lot (or from one of the other parking lots nearby – it doesn’t matter, just do it clockwise!).
The reason? For the second half of this hike, you’ll be walking straight towards Rainier, and there are a couple of places where the views rival any view of Rainier in the park.
The trail starts with a slight uphill climb through the forest, where there are usually nice blankets of wildflowers on the ground. You’ll cross a bridge across the highway, and immediately the trail leaves the national park and becomes the Pacific Crest Trail (PCT).
Follow the PCT, which meanders its way along a ridgeline with great views to your left, as it gradually climbs.
Right before the summit, you’ll reach a particularly picturesque tarn.
When you get to the highest point in the hike – which happens at around 1.8 miles in, just after the PCT cuts to the left down to Dewey Lake, you’re in for a treat.
First, another tarn. But this one has the snow capped peak of Mount Rainier as its backdrop.
Next, an unobstructed view of the Mountain from a ridge, where we saw a wedding photoshoot happening and spent the rest of the hike marveling at the fact that the bride made it up there in her dress.
The last part of the hike is straight downhill (which is why you should do it clockwise), and you’ll come out at the south end of Tipsoo Lake.
P.S. Tipsoo Lake is an amazing sunrise location – the sun rises behind you as you look west towards Rainier’s face, and lights up the peak with a golden orange light.
Read More: Hiking the Naches Peak Loop in Mount Rainier National Park
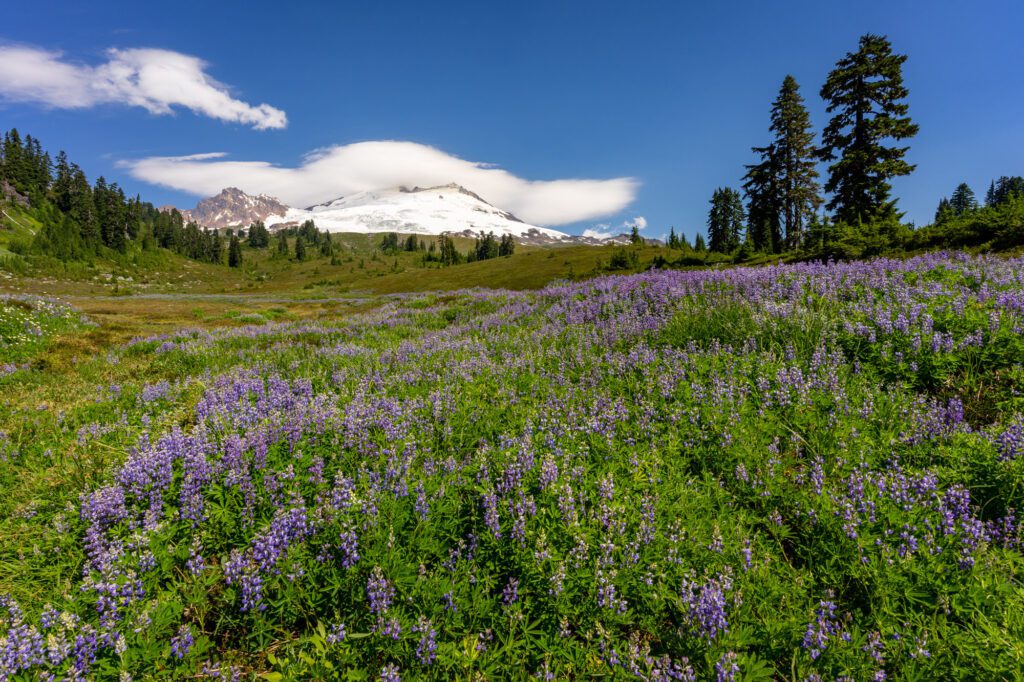
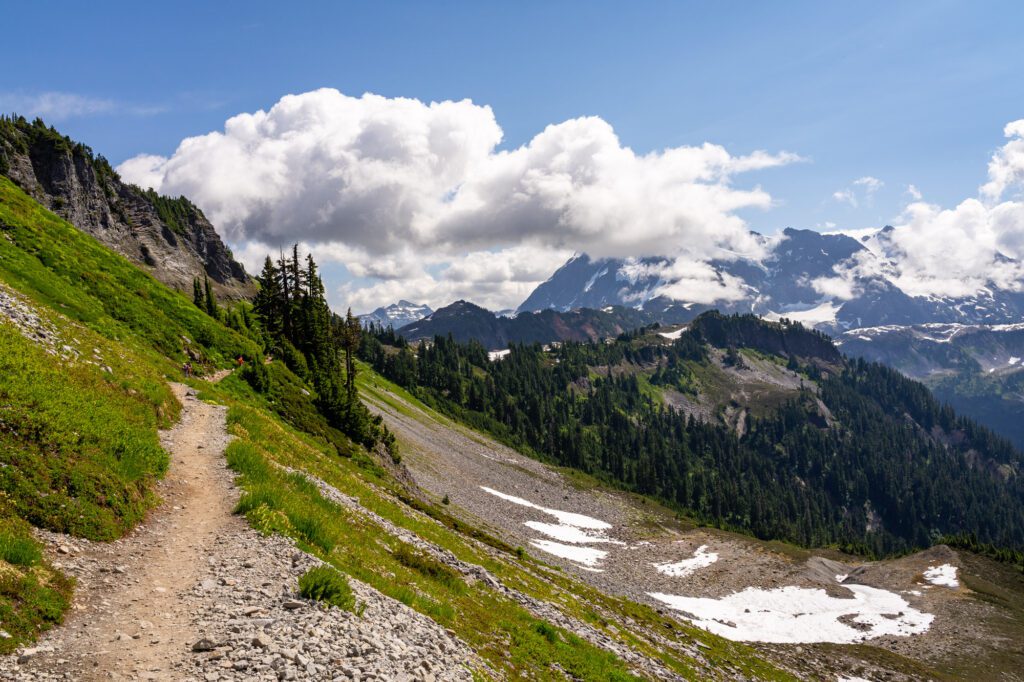
The Yellow Aster Butte Trail (Mount Baker)
- Length: 7.5 miles
- Elevation Gain: 2,600 ft.
- Trail Type: Out and Back
- Difficulty: Moderate / Hard
- Dog-Friendly? Yes, on a leash
- Pass Required: Northwest Forest Pass
- Trailhead Location
The Yellow Aster Butte Trail is our pick for the best hike near Mount Baker. It has literally everything you could possibly want in a hike in the Pacific Northwest, with the exception of a pristine alpine lake with picture-perfect reflections, I suppose.
Wildflowers. Panoramic views. Plenty of climbing to have you waddling around in pain for a few days afterward.
This hike is equally good in the summer and fall.
In the summer, which really starts in August for the whole area around Mount Baker, you’ll get wildflowers lining the trail for miles.
In the fall, the landscape lights up with brilliant reds, oranges, and yellows.
The main downside of this trail, along with the other hiking trails around Mount Baker, is that it’s only reliably accessible two months out of the year – August and September, with October being a little bit sketchy due to snow.
The snow lingers on the trail through July, and then returns quickly in October most years.
This is another hike that requires some tricky driving, at least if you have a low-clearance car, to access. The trailhead is up a narrow forest road with questionable maintenance.
But once you get there and park, the stress changes to an “oh man, this hike is going to be tough” kind of stress instead of an “is my car going to survive this?” kind of stress.
The climb begins with switchbacks right off the bat before turning into a gradual climb through dense forest. Eventually, you’ll get your first glimpse of Baker as you emerge into a wildflower meadow and curve around to the left, following the valley.
You’ll emerge onto a ridge, with Mount Baker views galore, before starting the final ascent up to the butte, which is a steep one.
From the top, you can continue on to another summit, which requires climbing along a narrow ridge with steep drop offs on either side.
We decided to skip it, mostly because I’m not a huge fan of heights, but saw two hikers do it while we were at the summit.
Read More: Hiking the Jaw-Dropping Yellow Aster Butte Trail near Mount Baker
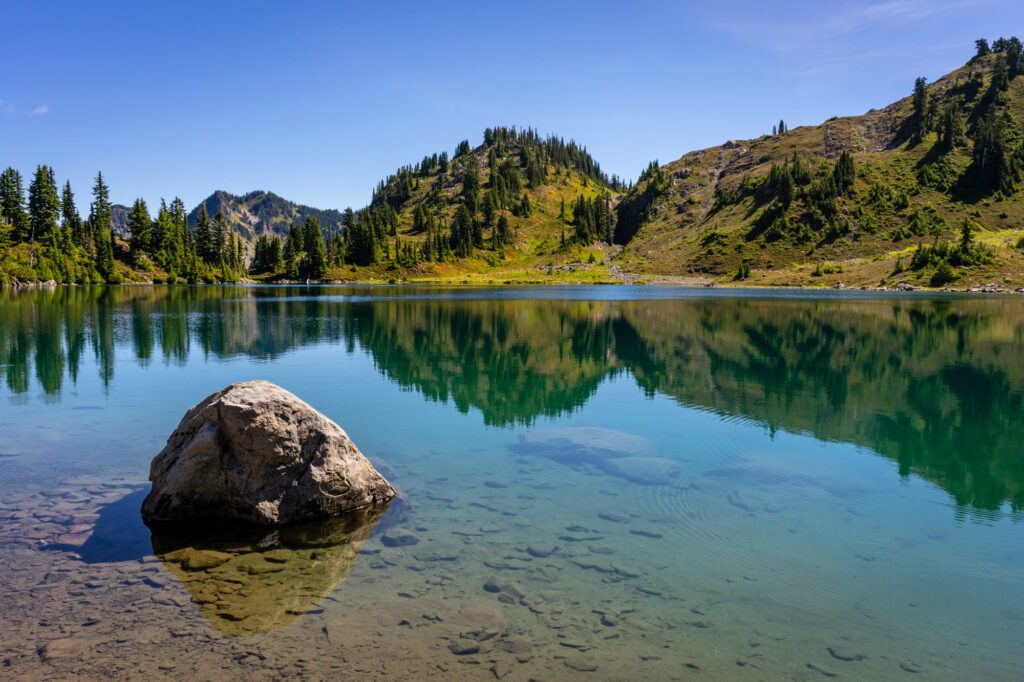
The Colchuck Lake Trail (Enchantments Basin / Leavenworth)
- Length: 8 miles
- Elevation Gain: 2,300 ft.
- Trail Type: Out and Back
- Difficulty: Moderate
- Dog-Friendly? No
- Pass Required: Northwest Forest Pass
- Trailhead Location
If the 18 mile hike through the Enchantments Basin seems a little too aggressive, then the hike to Colchuck Lake is going to be for you.
Colchuck is probably the most accessible of the lakes in the area, but that certainly doesn’t mean it’s not incredibly beautiful. Before the sun rises above the nearby peaks, the water is still, with perfect reflections. When the sun is at its highest point, the water turns an unbelievable shade of blue-green.
The hike itself isn’t too bad – at 8 miles and 2,300 feet of elevation gain. It’s a fairly gradual climb through the forest, but as you approach the lake it definitely gets a little bit rockier and steeper, making it harder as you go.
The views from where you emerge onto the lake are great, but you should definitely explore along the shoreline to the left and right. The left, in particular, has great views of Dragontail Peak and Aasgard Pass across the lake.
The trailhead gets super crowded, especially in the summer and fall, so we’d recommend getting there before 6:30am, which is when we got there and snagged one of the last parking spots.
The road up to the trailhead is a bit bumpy, but if Homer (that’s our Honda Odyssey) can make it, so can you! Take it slow and you’ll be fine.
Read More: How to Hike the Stunning Colchuck Lake Trail
The Enchanted Valley (Olympic Peninsula)
- Length: 27 miles
- Elevation Gain: 3,700 ft.
- Trail Type: Out and Back
- Difficulty: Moderate
- Dog-Friendly? No
- Pass Required: America the Beautiful Pass
- Trailhead Location
We finally made it out to the Enchanted Valley, and it did not disappoint.
First thing’s first – this is DEFINITELY an overnight backpacking trip. The trail isn’t particularly hard. There’s some up and down, but climbing 3,000 (ish) feet over 13.5 miles is really a walk in the park when you’re talking about hiking in Washington.
Round trip, it’s 27 miles long, which means AT LEAST one night in the backcountry. Overnight permit information is here.
The trail itself is gorgeous, particularly after the first two miles of the trail, which take you up, then down to Pony Bridge, which is where you meet the East Fork of the Quinault River.
As you start the descent down to Pony Bridge, you’ll hear the roar of the river, which will continue all the way through the rest of the hike, which follows the river closely up into the Enchanted Valley.
The lush rainforest here is second to none in terms of scenery, with dense ferny forests with plenty of hanging moss basically the entire way through.
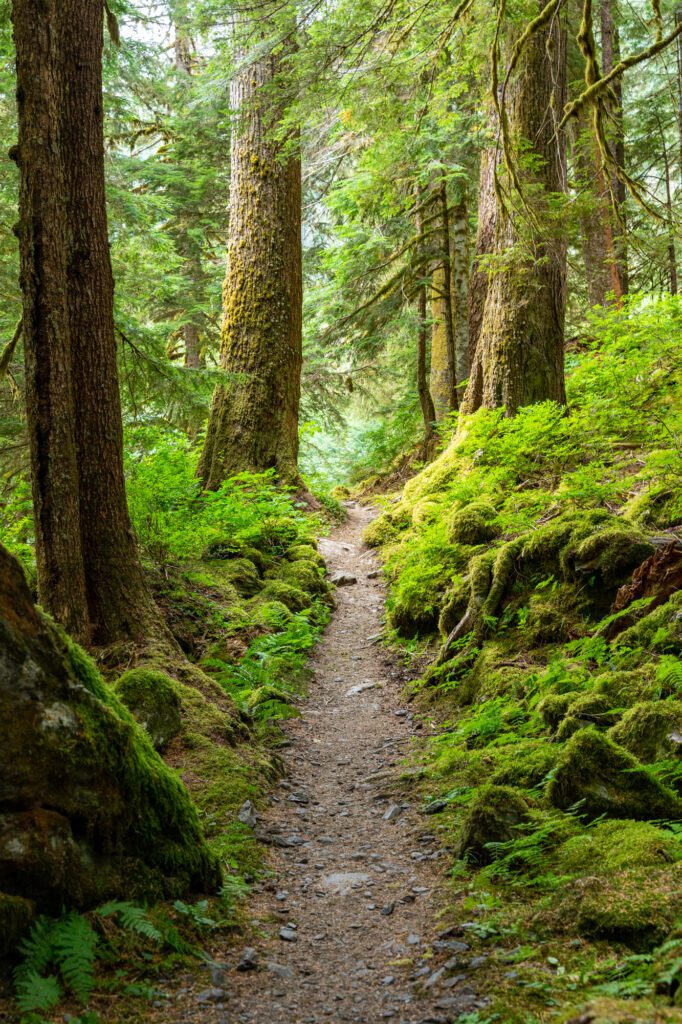
Alysha and I were joking about how we were so jaded by the end of it. “Oh, ANOTHER gorgeous stretch of trail with ferns covering the ground, mossy trees towering above us, and sunlight streaming through the rainforest canopy? BORING.”
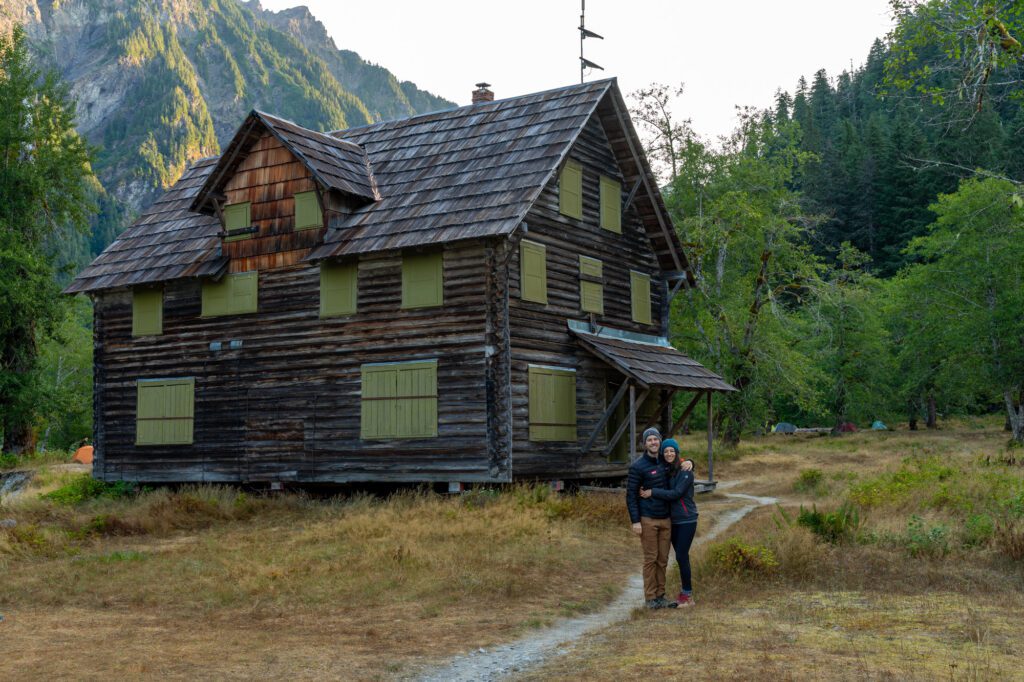
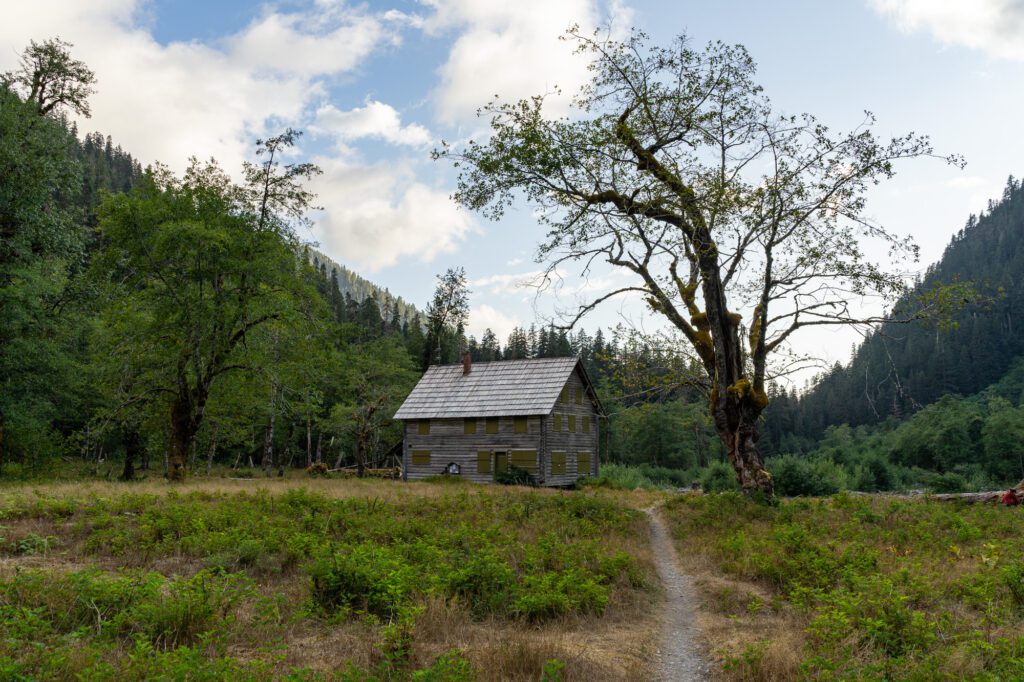
Eventually, you reach the Enchanted Valley, which is most famous for the 1930’s chalet that sits in the middle of it. Unfortunately, you can’t actually go inside these days, but it used to be a place where you could spend the night.
We think this is best done as a three day / two night trip, spending one night at Pyrites Creek on the way up, one night in the valley, and the final day doing the whole 13.5 mile hike out.
The river provides plenty of water access along the trail, which is always nice.
Read More: Backpacking the Enchanted Valley Trail in Olympic National Park
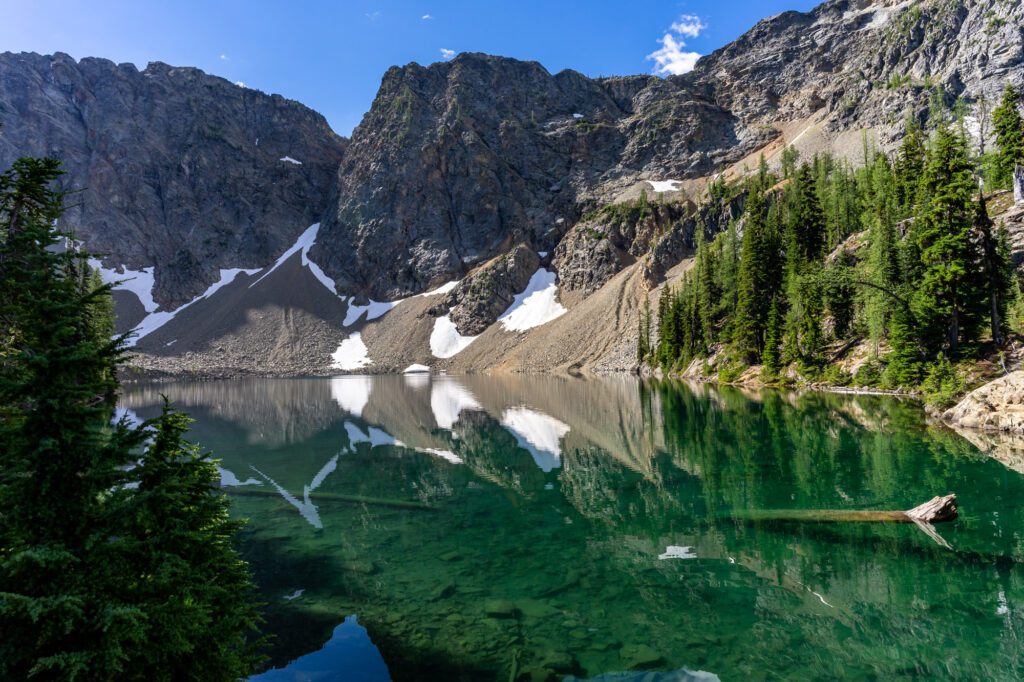
The Blue Lake Trail (North Cascades National Park)
- Length: 4.5 miles
- Elevation Gain: 1,000 ft.
- Trail Type: Out and Back
- Difficulty: Easy
- Dog-Friendly? No
- Pass Required: Northwest Forest Pass
- Trailhead Location
Another gem in North Cascades National Park. Unlike the others on this list, this one is relatively short with great views awaiting you after minimal climbing, making it one of the best easy hikes in Washington.
We did this hike on a beautiful summer morning, and got to the lake before the crowds. We’d recommend you do the same, because the parking lot is small, and by the time we were on our way back down, the crowds had shown up.
Blue Lake is, you guessed it, a blue lake. It’s crystal clear – so clear that you can see the fishies swimming – and is surrounded by some of the most famous peaks in the North Cascades, including the Liberty Bell.
When you arrive at the lake, take the fork to the right, cross the stream, and walk along the lake. This is where you’ll see all the other hikers who made it up that day.
For a more secluded experience, take the trail up the hill to the right, keep left at the fork, and make your way down to the lakefront, where we found exactly zero people.
This is also a good place to see mountain goats, who sometimes make their way down that gravel slope at the far end of the lake.
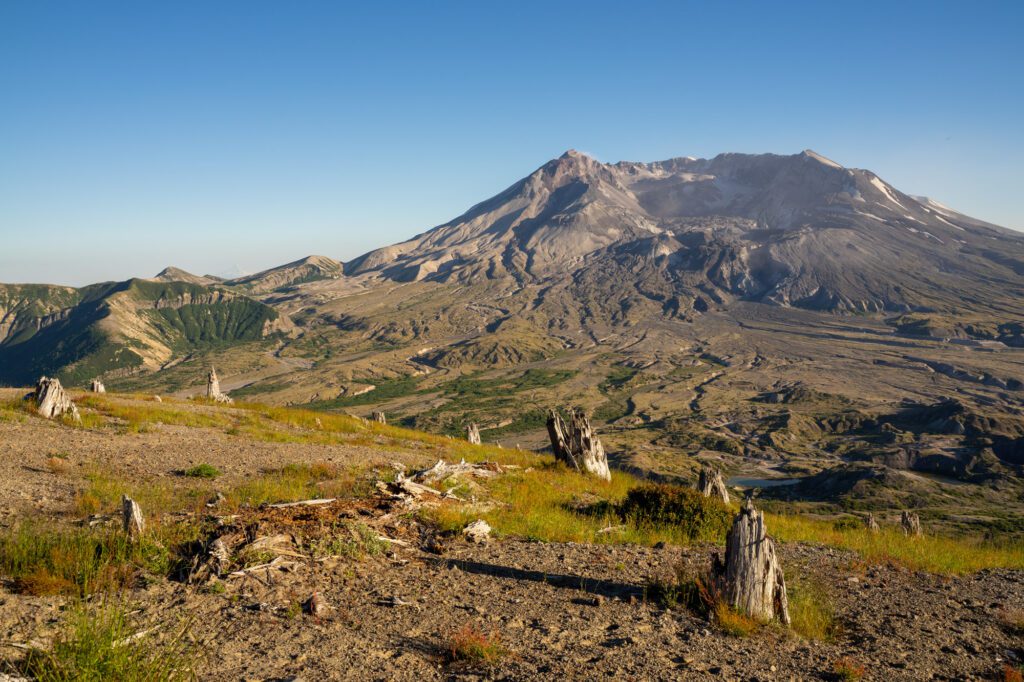
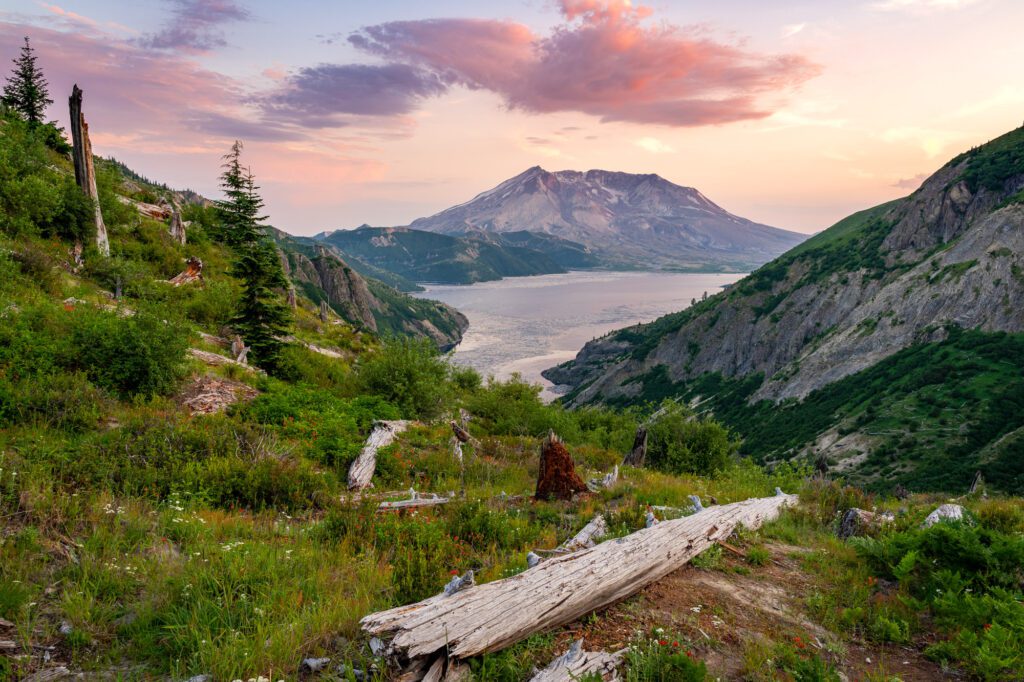
Harry’s Ridge (Mount St. Helens)
- Length: 8.2 miles
- Elevation Gain: 1,000 ft.
- Trail Type: Out and Back
- Difficulty: Easy / Moderate
- Dog-Friendly? No
- Pass Required: America the Beautiful Pass
- Trailhead Location
The best part about this hike is the continuous views of Mount St. Helens’ north face throughout the entire hike. It’s a pretty easy hike that climbs over rolling hills that are dotted with wildflowers in the summer (June is the best time here).
The only thing that puts it in the moderate category is the distance at a hair over 8 miles. Bring plenty of water and snacks.
The hike starts from the Johnston Ridge Observatory, which is worth a stop to learn all about the active volcano and the eruption that covered the entire Pacific Northwest in ash just a few decades back.
From there, you’ll traverse the surprisingly barren terrain east with minimal elevation gain and loss.
You’ll reach a couple of forks along the way – stay left at the first two to continue northeast, then take the marked turnoff to Harry’s Ridge to start the short and sweet climb to the top of the ridge that overlooks Spirit Lake to the left, and Mount. St. Helens to the right.
From here, you can see the thousands and thousands of logs that are in Spirit Lake to this day from the eruption 40 years ago. The devastation is mind boggling.
Enjoy a snack, taking in the views, and return the way you came.
Park Butte (Mount Baker)
- Length: 7.5 miles
- Elevation Gain: 2,200 ft.
- Trail Type: Out and Back
- Difficulty: Moderate
- Dog-Friendly? Yes, on a leash
- Pass Required: Northwest Forest Pass
- Trailhead Location
Another hike to another one of Washington’s Insta-famous fire lookouts? BORING.
Just kidding. We loved this hike, and think you will too.
This hike was one of our favorites near Mount Baker, though it’s on the south side of the mountain along Highway 20, which is the gateway to the North Cascades, rather than along Highway 542 (the Mount Baker Highway).
The trailhead is along the western edge of Baker Lake, about eight miles up a treacherous forest road that we barely squeaked through with white knuckles and Alysha at the wheel (she doesn’t like me driving the bumpy roads very much).
Take it slow. But if you happen to have a high-clearance vehicle, definitely drive that.
This hike starts with roughly a mile of meandering through meadows before crossing a bridge over rip-roaring creek (at least when we were there) and you start the climb in earnest.
You’ll climb a series of switchbacks before emerging into some of the most spectacular meadows you’ll encounter anywhere north of Rainier (which has the best meadows in the world, we think).
One after another, you’ll stroll through meadows exploding with wildflowers and amazing views of snow capped Mount Baker before, once again, starting to climb.
This is the final ascent up to the fire lookout, which has jaw dropping views of the surrounding area and Mount Baker.
Norway Pass Trail (Mount St. Helens)
- Length: 4.5 miles
- Elevation Gain: 850 ft.
- Trail Type: Out and Back
- Difficulty: Moderate
- Dog-Friendly? No
- Pass Required: America the Beautiful Pass
- Trailhead Location
This hike is accessed from the east side of Mount St. Helens along NF-99 and NF-26, which is partially paved and generally fine for cars of all shapes and sizes.
We did it as a sunset hike, arriving at the pass about 45 minutes before sunset, and doing the descent in the dark. We definitely recommend it, but make sure to bring a headlamp. It gets dark FAST.
The climb is fairly unremarkable. The view of Mount St. Helens is blocked, and the views behind you of the valley are nothing particularly exciting or interesting. BUT, the views from Norway Pass itself are pretty stunning, so the climb is well worth the effort.
You’ll have Mount St. Helens in the distance, with the log-filled water of Spirit Lake in the foreground.
In the early summer, you’ll have wildflowers in the foreground, which creates a scene that seriously looks like it’s a painting.
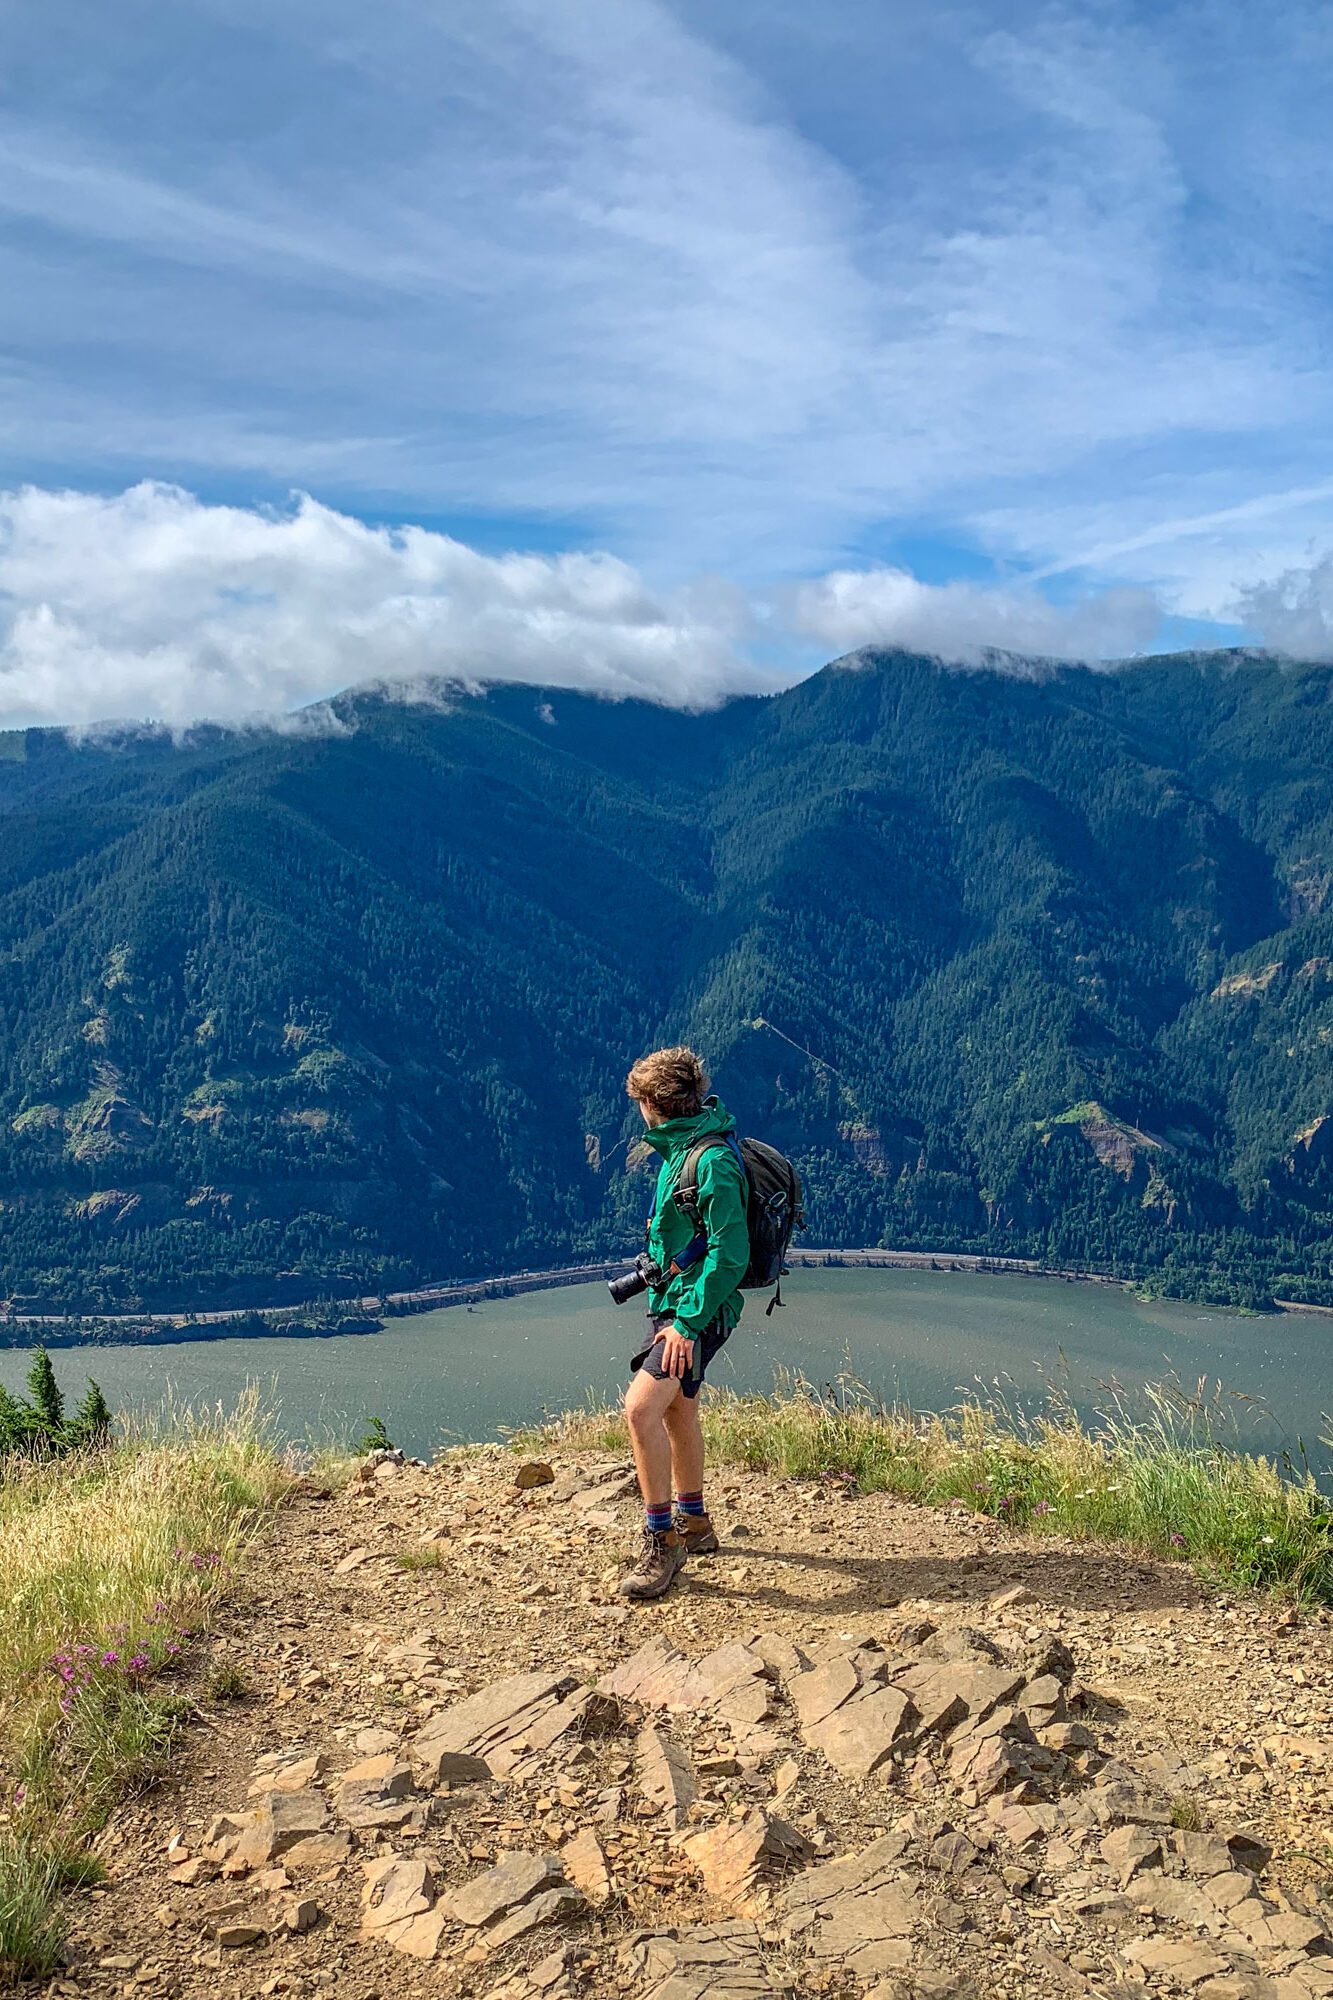
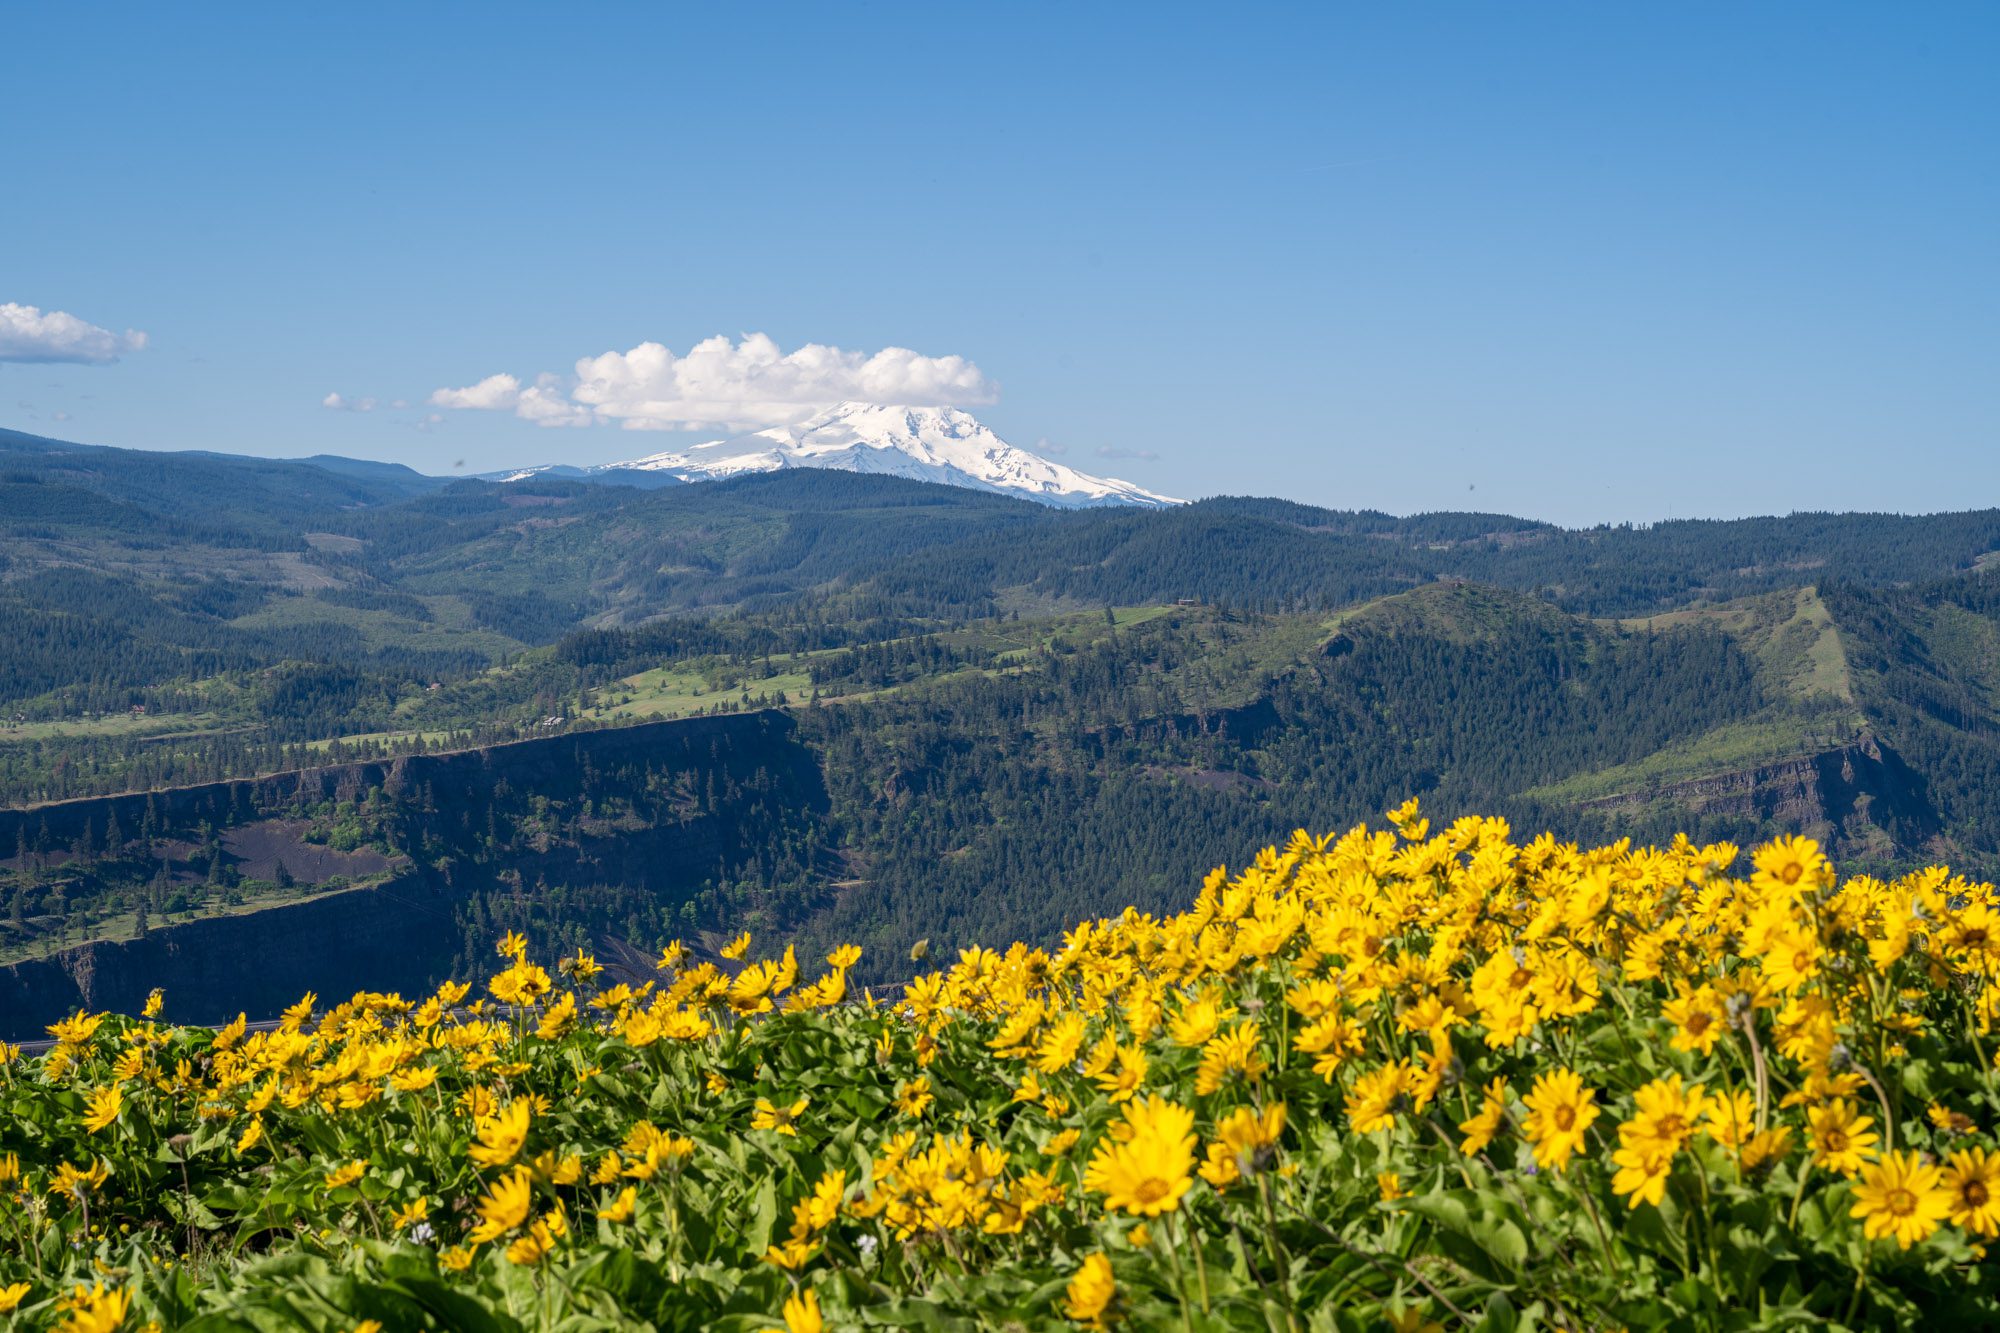
The Dog Mountain Trail (Columbia River Gorge)

- Length: 6.8 miles
- Elevation Gain: 2,800 ft.
- Trail Type: Lollipop
- Difficulty: Moderate / Hard
- Dog-Friendly? Yes
- Pass Required: Northwest Forest Pass
- Trailhead Location
Most people associate the Columbia River Gorge with Oregon for obvious reasons, but there are a couple of great hikes on the north side of the Gorge that make the Washington list.
The most exciting one, we think, is Dog Mountain. Particularly in the spring, when the wildflowers are in full bloom.
Note that during wildflower season, which is generally late May to mid June, you will need a permit. They limit the number of people on the trails on the weekend in early summer to protect the fragile wildflowers.
This hike starts with switchbacks in the forest. About two thirds of a mile in, you’ll reach a fork in the trail which is the starting point for the loop.
We went up and down the trail to the right, which is apparently the harder option, but I don’t think we knew that at the time. Make sure to stop at the two viewpoints on the way up, both of which have great views of the Columbia River Gorge.
We made it to the top and it was… completely shrouded in fog. Despite being sunny a few minutes earlier.
We waited for about fifteen minutes at the top in the frigid wind and mist before deciding we were over it and retreating back to the sunny slopes just below the summit.
Be prepared for fog and wind with plenty of layers.
The Hurricane Hill Trail (Olympic National Park)
- Length: 3.2 miles
- Elevation Gain: 650 ft.
- Trail Type: Out and Back
- Difficulty: Easy / Moderate
- Dog-Friendly? No
- Pass Required: America the Beautiful Pass
- Trailhead Location
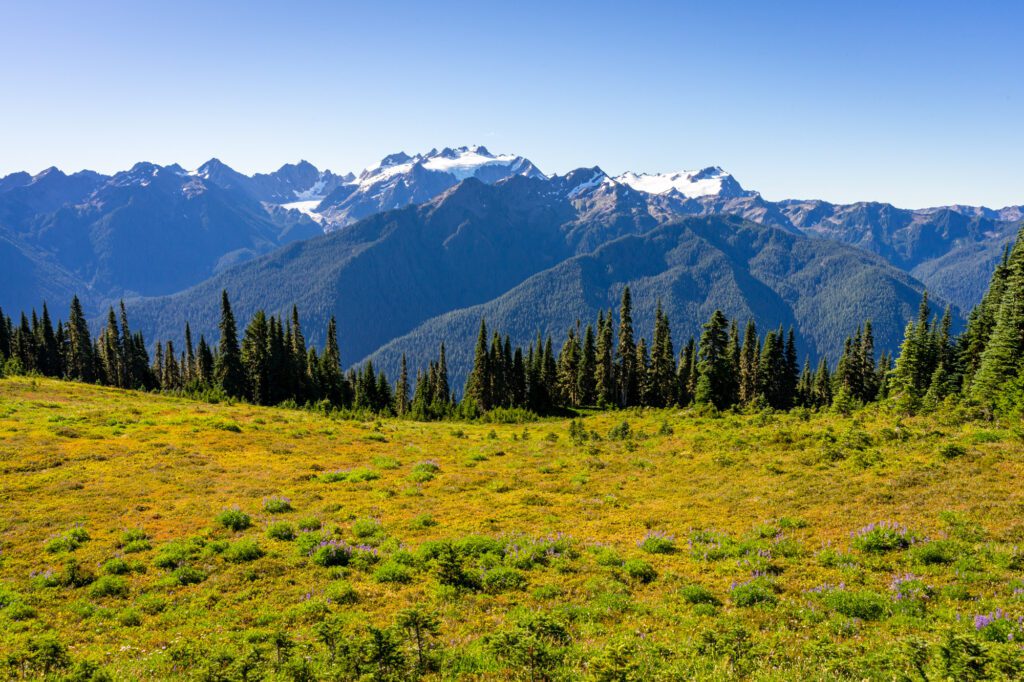
This is one of the best hikes in Olympic National Park, and is a great family-friendly option with spectacular panoramic views of Mount Olympus, the highest peak in Olympic National Park to the southwest, Victoria, B.C. to the north, and Mount Baker to the east.
It’s a wide, paved trail basically the whole way, and is super accessible for most hikers of all experience and fitness levels.
It’s a must-do when you’re exploring Hurricane Ridge in Olympic National Park.
The Coyote Wall Trail (Columbia River Gorge)
- Length: 6.8 miles
- Elevation Gain: 1,624 ft.
- Trail Type: Loop
- Difficulty: Moderate
- Dog Friendly? Yes, on a leash
- Pass Required: None
- Trailhead Location
We now live in Portland, Oregon, which means we have great access to hikes in southern Washington (like Mount St. Helens and Mount Adams, for example).
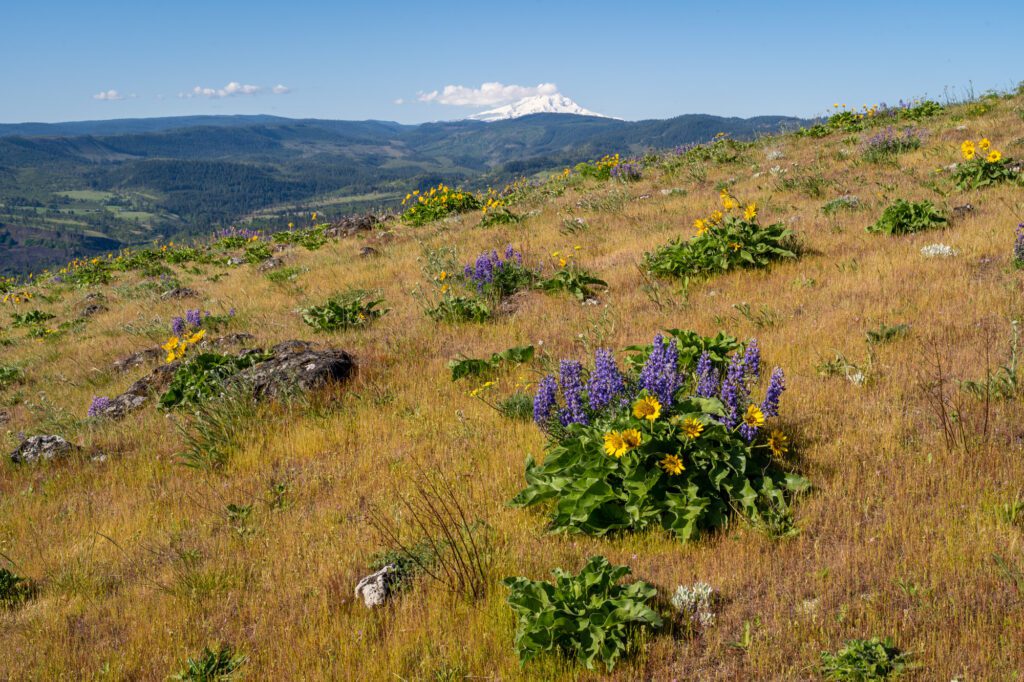
It also means that the hikes in the Columbia River Gorge, which marks the border between Oregon and Washington State, is basically our backyard. We hike in the Gorge all the time, and we tackled Coyote Wall one spring morning in May.
Coyote Wall is a massive basalt rock formation that we have seen from across the Gorge, but had never ventured far enough east to see up close and personal until that recent trip.
We were the first ones in the parking lot – which is on the Washington side of the Gorge a few miles past the town of White Salmon and the Hood River Bridge – and were greeted by a spectacular display of wildflowers once we made the ascent up to the ridge, about two miles into the hike.
It was early spring, and the trail was COVERED in balsamroot and lupine as far as the eye could see, with Mount Hood’s snowy peak in the distance. Magical.
There are two routes here – the Little Maui trail, which is longer and more gradual, and the Little Moab trail, which is rockier, steeper, and more exposed.
You can do a nice little reverse lollipop, going up Little Moab and coming down Little Maui before following the Coyote Wall trail along the ridgeline.
Watch out for ticks and rattlesnakes on this one, especially in the summer.
The Bench and Snow Lakes Trail (Mount Rainier National Park)

- Length: 2.4 miles
- Elevation Gain: 600 ft.
- Trail Type: Out and Back
- Difficulty: Moderate
- Dog Friendly? No
- Pass Required: America the Beautiful Pass
- Trailhead Location
We did the Bench and Snow Lakes Trail as an afterthought on a recent trip up to Rainier, and immediately realized that this hike should not be treated as a mere afterthought, but as a destination in its own right.
We had done the Skyline Trail that morning, and were looking for a nice, easy hike to tackle in the afternoon. The 2.4 miles and minimal elevation gain brought us to this hike.
The parking lot is along Stevens Canyon Road, and has no bathroom and room for 10-15 cars. The trail is surprisingly up and down, which makes you think it’s more elevation gain than it really is.
There are three main highlights to this hike – the two lakes, obviously, and the meadow in between them. From that meadow, which is between the two lakes, you’ll have great views of Rainier’s peak.
Bench Lake, the first lake you’ll encounter, has a stunning reflection of Rainier’s peak from the south shore (which is where the trail drops you).
No views of Rainier to be had at Snow Lake, the further one, but it’s backed by a spine of rocky peaks, which is spectacular in its own right. Go left at the junction near Snow Lake for the best views of the lake and peaks beyond.
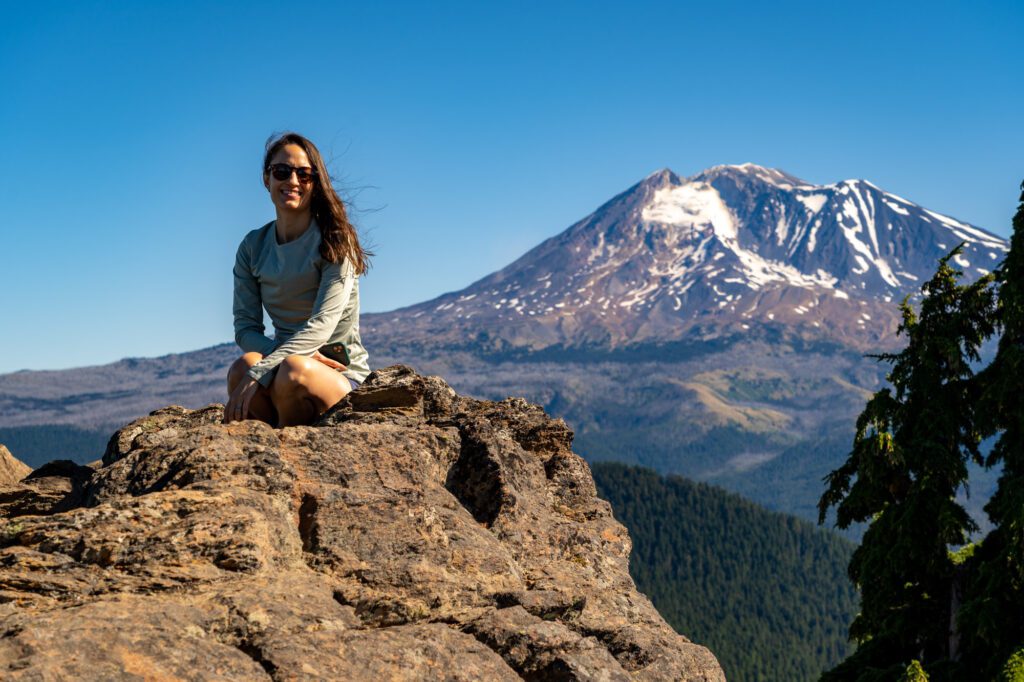
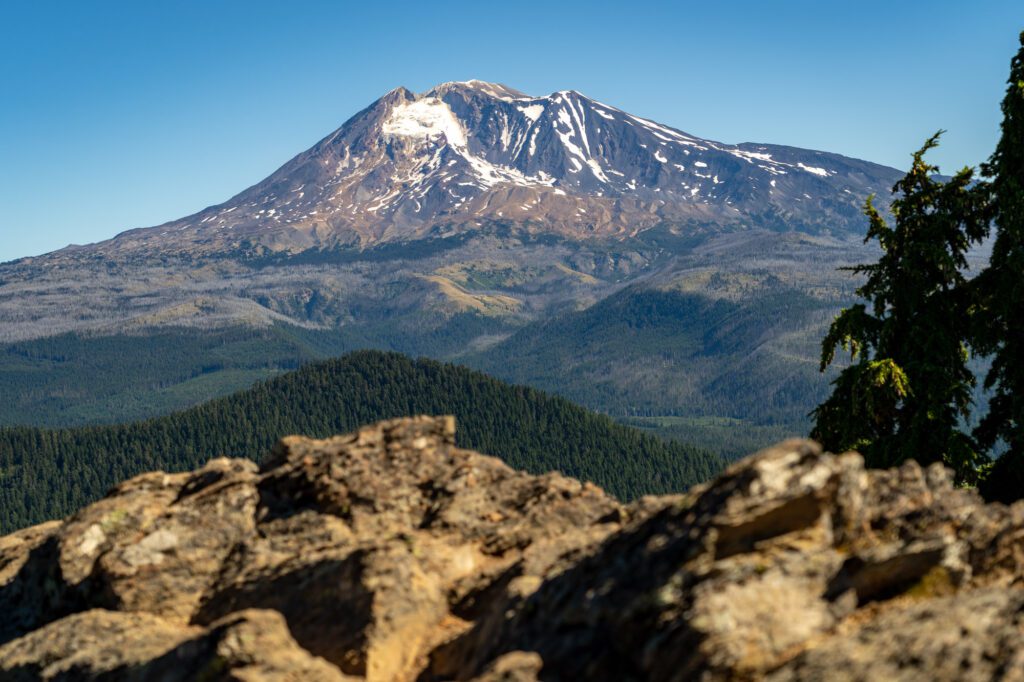
The Sleeping Beauty Trail (Mount Adams)
- Length: 2.4 miles
- Elevation Gain: 1,350 feet
- Trail Type: Out and Back
- Difficulty: Difficult
- Dog Friendly? Yes, on a leash
- Pass Required: NW Forest Pass (or America the Beautiful Pass)
- Trailhead Location
Living in Portland means that the Columbia River Gorge is one of our preferred getaway destinations, whether it’s for a day or a weekend. Mount Adams is just north of the Gorge, which puts it in a little bit of an awkward place to visit from either Seattle or Portland because you have to go alllll the way around to get there.
During our first fall living in Portland, we took a nice getaway out to the Gorge for a few nights and stayed past White Salmon on the Washington side (which, for the record, has become our favorite side of the Gorge to stay on).
We stayed at a little B&B called the Ruby June Inn (which we loved), and we were talking with the friendly owners about hikes in the area, and mentioned that we were thinking about doing something near Adams, which is a little far from our house to be done as a day trip.
“Sleeping Beauty is great!” was the first response, and off we went to tackle this short but intense hike.
Climbing 1,350 feet in a little over a mile is no joke, but it goes by quickly and waiting for you at the end of the hike is what has to be one of the best views in the entire state.
You’ll tackle some tight switchbacks that put you atop a rocky outcropping that used to be home to a fire lookout – you can still see the structure – which has unobstructed views of Mount Adams’ southwestern face.
We did this early, and we saw exactly one group on the way up. We had the summit to ourselves, and sat up there for a solid 15-20 minutes picking our jaws up off the rocks before making the descent back down to the car.
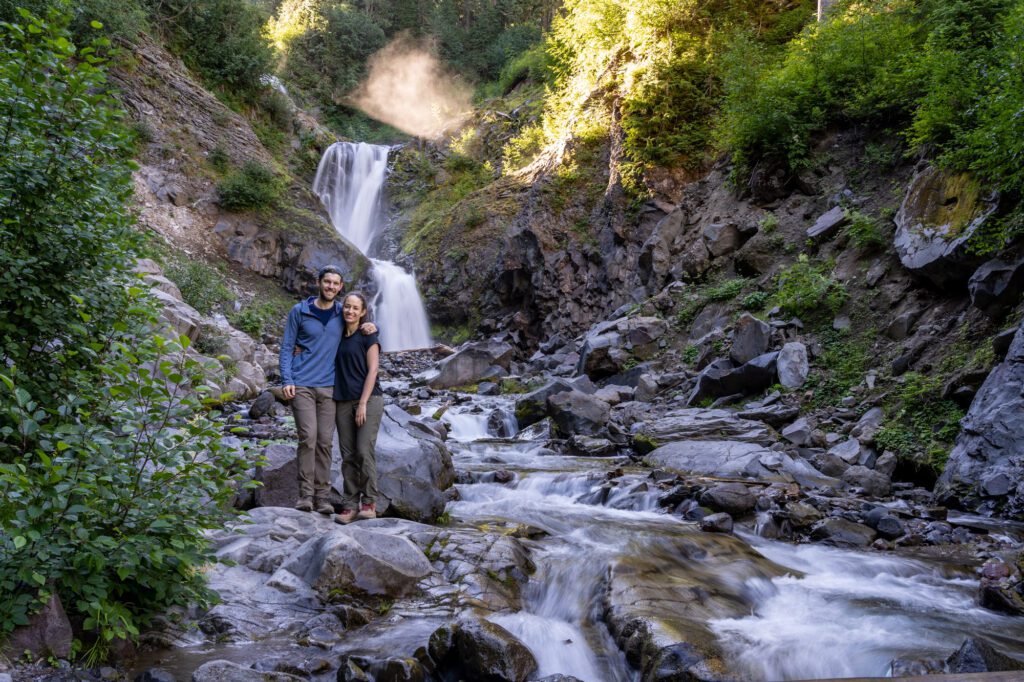
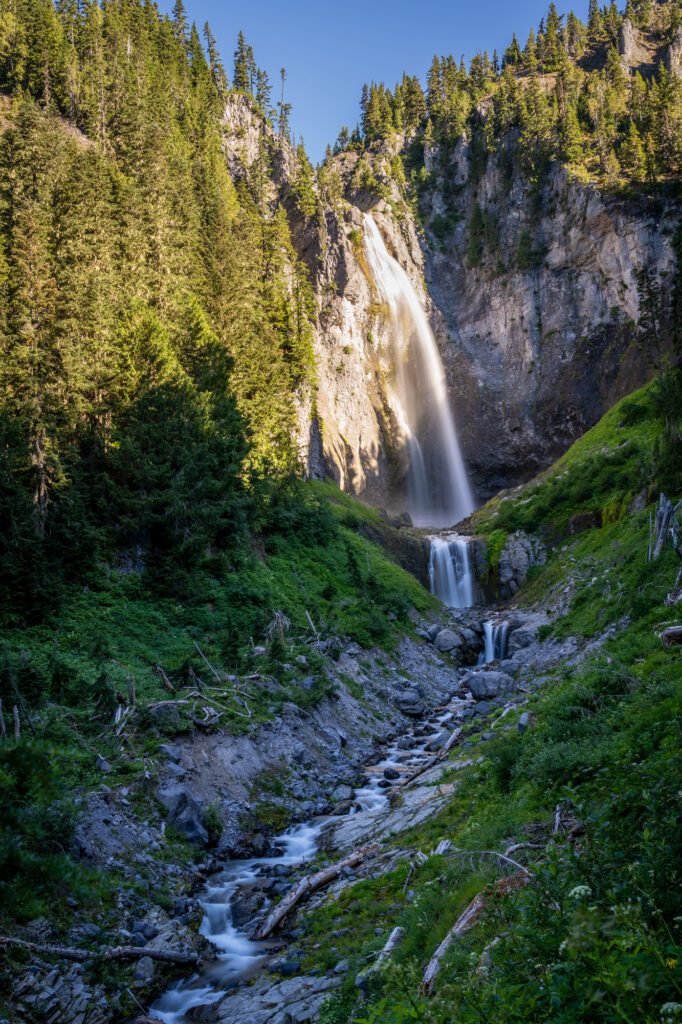
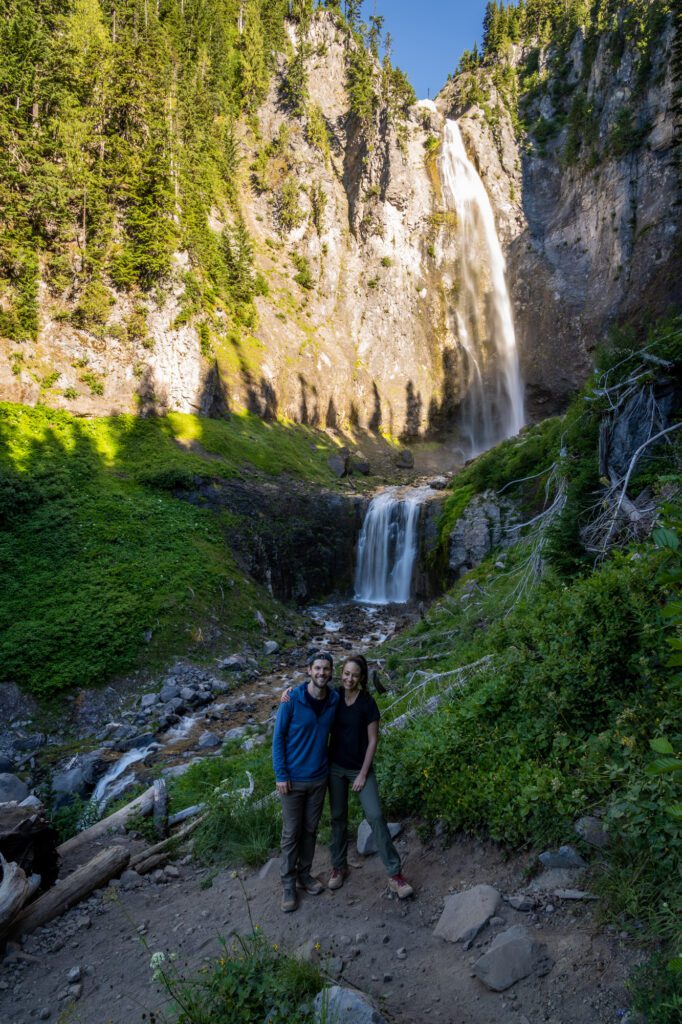
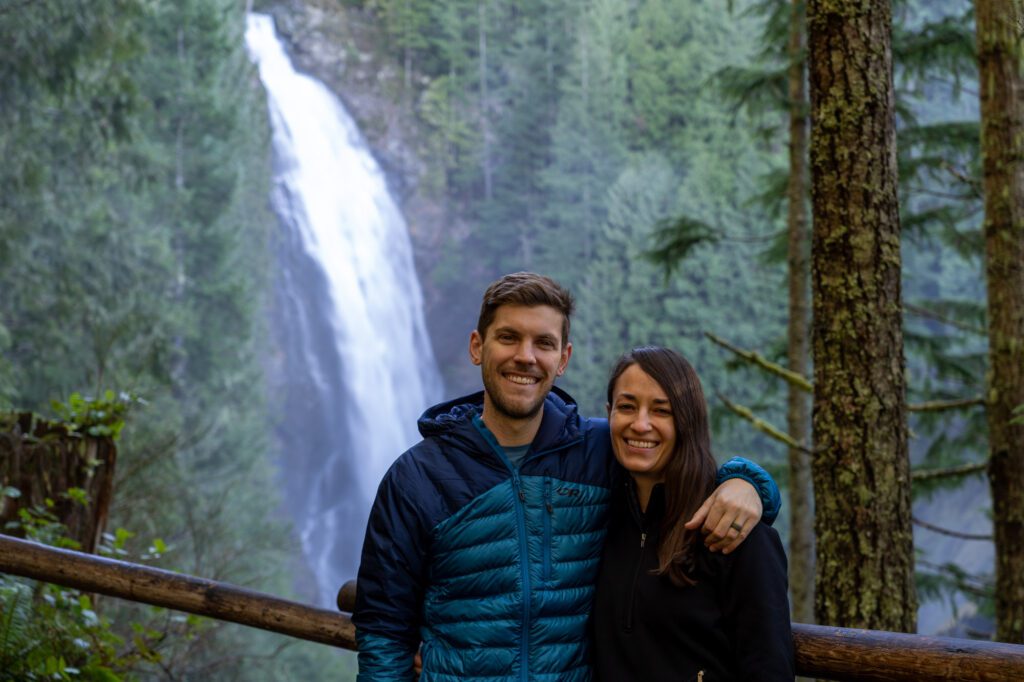
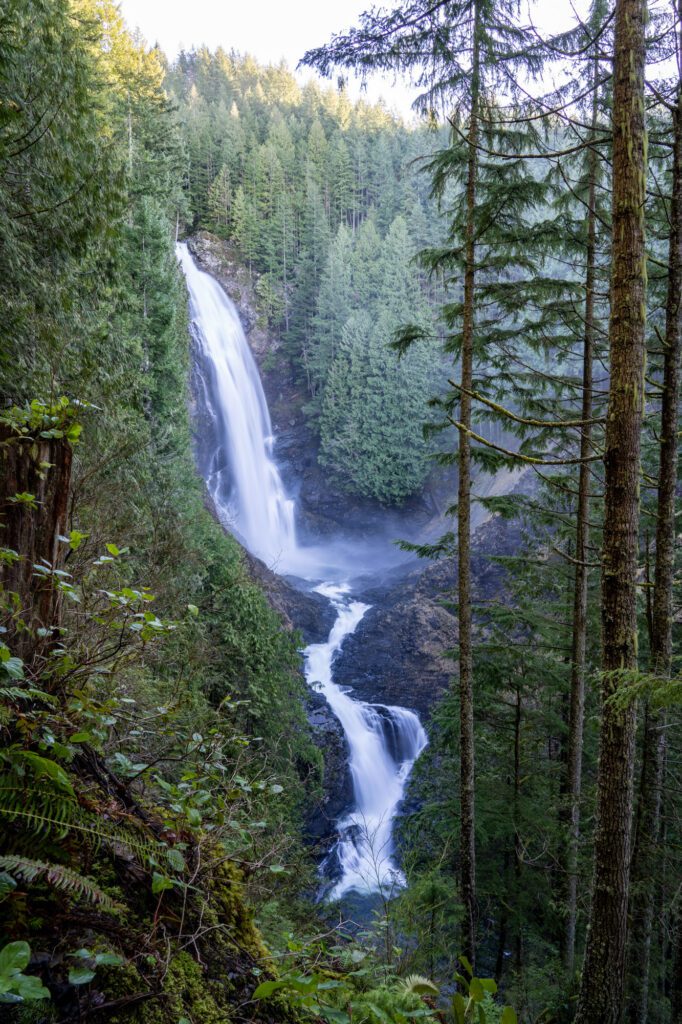
Comet Falls + Van Trump Park (Mount Rainier National Park)
- Length: 3.6 miles (~8 miles to Van Trump Park)
- Elevation Gain: 1,250 ft. (~4,000 ft. to Van Trump Park)
- Trail Type: Out and Back
- Difficulty: Moderate (Difficult to Van Trump Park)
- Dog Friendly? No
- Pass Required: America the Beautiful Pass
- Trailhead Location
Full disclosure here – we’ve only done the stretch of the trail up to Comet Falls because we did it on a morning on our way out of Mount Rainier National Park.
However, Van Trump Park is on our list for our next excursion up to Rainier.
However, we think that stretch of trail up to Comet Falls is 100% worth the effort, and makes a nice complement to one of the longer hikes at Paradise (like the aforementioned Skyline Trail).
Not only do you get to see what we would argue is the most impressive waterfall at Paradise (and there are several good ones here!), you get a second BONUS waterfall that we didn’t even know about until we were standing at its base (pictured above).
The hike starts from a tiny parking lot right along the road up to Paradise, which is perpetually full most summer days between 9am and 6pm or so.
You’ll immediately cross a bridge over Christine Falls (though there’s a significantly better view from the nearby pullout up the road), and start a forested ascent.
It’s not a particularly difficult hike, just a steady climb until you reach Bloucher Falls, the bonus waterfall, at the 1.5 mile mark. Just around the corner is Comet Falls, and the trail continues to a nice viewpoint where you can see the entire falls.
Optional Continuation to Van Trump Park: Van Trump Park is a meadow that sits several thousand feet higher than Comet Falls, and the ascent to reach it is no joke. However, this is paradise for wildflower lovers in the summer. You’ll continue past Comet Falls up a steep set of switchbacks, and the good news here is that once you’ve gone an additional mile (and climbed 800 feet or so), the hike is fairly adjustable to your fitness level. You can continue all the way to the end of the trail (reflected in the numbers above), or cut it short and save your legs for a different hike.
Read More: Hiking the Comet Falls Trail in Mount Rainier National Park: A Helpful Guide
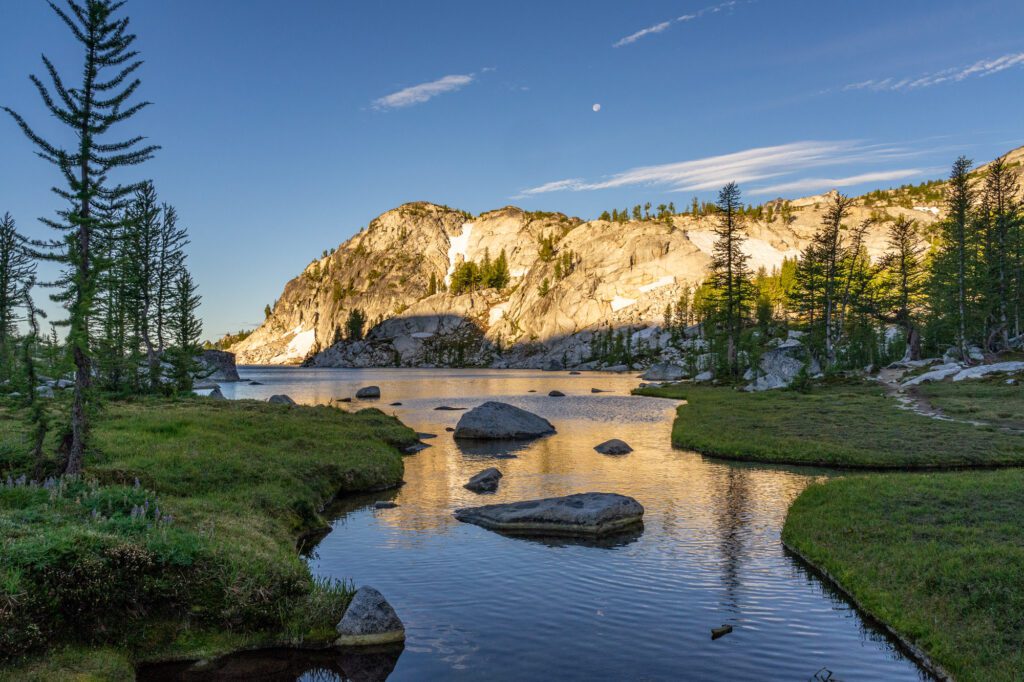
The Lake Ann Trail (Mount Baker)
- Length: 8.8 miles
- Elevation Gain: 2,100 ft.
- Trail Type: Out and Back
- Difficulty: Moderate / Difficult
- Dog Friendly? Yes, on a leash
- Pass Required: Northwest Forest Pass OR America the Beautiful Pass
- Trailhead Location
We consider Lake Ann to be in the top tier of hikes at Mount Baker, sharing the top spot with Yellow Aster Butte (above) and the Chain Lakes Loop (below).
This hike has everything you want in an alpine adventure – an alpine lake, great views of Mount Baker, and the squeaking of pikas greeting you as you traverse rock fields.
The best part? It’s a fairly moderate hike when it comes to hikes that have all of those things. Plus, there’s no crazy forest road that you have to navigate to get to the trailhead (looking at you Yellow Aster Butte). It’s a parking lot off of a perfectly paved road (mostly, anyway).
We parked at the Chain Lakes Trailhead and added a little bit to our hike so that we could use the bathroom there before starting the hike. There is also a decent-sized parking lot right at the trailhead with room for 15-20 cars.
The hike is a bit of a weird one in terms of the route. Usually, hikes in the Pacific Northwest start at a low point and ascend to a point (a nice view, a pass, a ridgeline, etc).
The trailhead for this hike is at the same elevation, roughly, as Lake Ann, but you descend from the trailhead into a valley, and then climb back up to Lake Ann from there.
This means that the last part of your hike is straight uphill back to the parking lot, which is the worst.
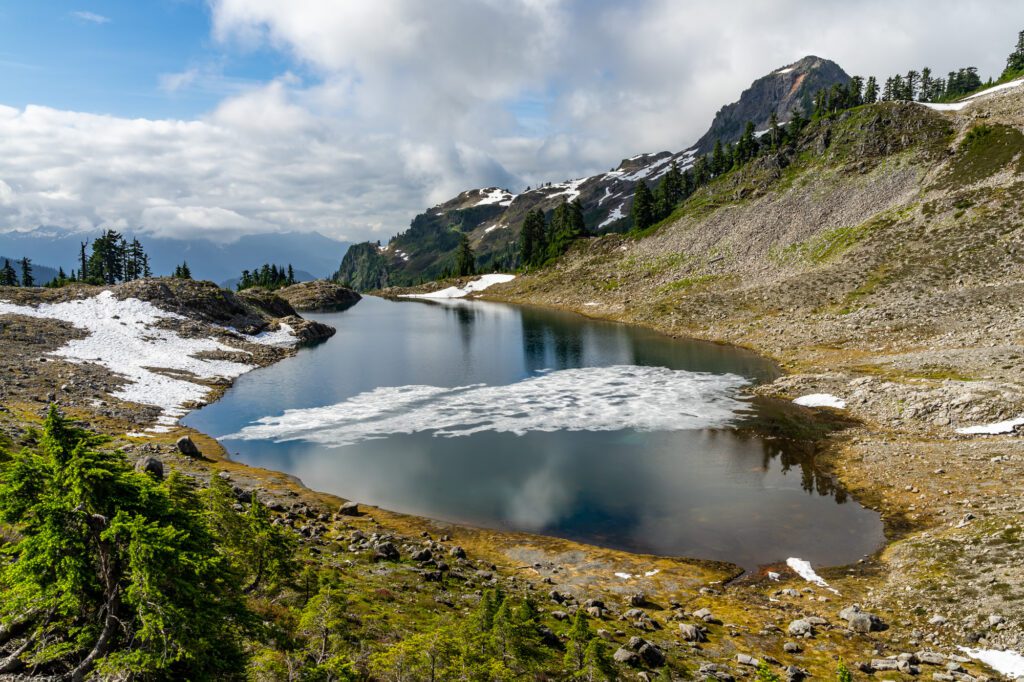
Still, the payoff is worth it. Lake Ann is a perched lake, and you come up to it from the northern edge, looking straight ahead past the lake at the snowy peaks of North Cascades National Park.
It’s also worth noting that this would be an excellent backpacking destination for a 1-2 night trip, though there aren’t really any side trips to take, so I’m not sure what you’d do with a second day (other than admire the view and hang out in the backcountry, of course).
Snow Lake + Gem Lake (Snoqualmie Pass)
- Length: 6.7 miles (11 miles to Gem Lake)
- Elevation Gain: 1,700 ft. (2,700 ft.to Gem Lake)
- Trail Type: Out and Back
- Difficulty: Moderate (Difficult to Gem Lake)
- Dog Friendly? Yes, on a leash
- Pass Required: Northwest Forest Pass OR America the Beautiful Pass
- Trailhead Location
Ask any avid hiker in the Seattle area to name their top three trails within an hour of the city, and you’re likely going to see Snow Lake on multiple lists.
My mom lives in the burbs to the east of Seattle, which means it’s another 10-15 minutes closer to Snoqualmie Pass (where you’ll find this hike), and we love this hike.
Most people stay on the trail to Snow Lake, take a dip in the lake, and head back to their car.
If you continue on the trail past Snow Lake for a couple of miles, you’ll find yourself at equally beautiful and far less crowded Gem Lake. And we think the proverbial juice here is well worth the squeeze.
This hike leaves from the parking lot at Alpental, one of the closest ski resorts to Seattle, where you’ll find a big parking lot with bathrooms.
The hike begins with a forested ascent, and then turns into a set of switchbacks that bring you into the Alpine Lakes Wilderness. From there, you descend down to Snow Lake (which means you have a slight climb on the way out).
If you’re just doing Snow Lake, the trail continues around the eastern edge of the lake for a bit, and there are plenty of places to get down to the shore.
Keep in mind that the 6.7 miles reflects the trail to the eastern edge of the lake, and if you continue around the lake it can add a half mile or more to your journey.
If you’re continuing on to Gem Lake, follow the trail as it turns northwest, and it’s about a mile from the northern shore of Snow Lake to Gem Lake. Gem Lake is far less visited, but is equally beautiful.
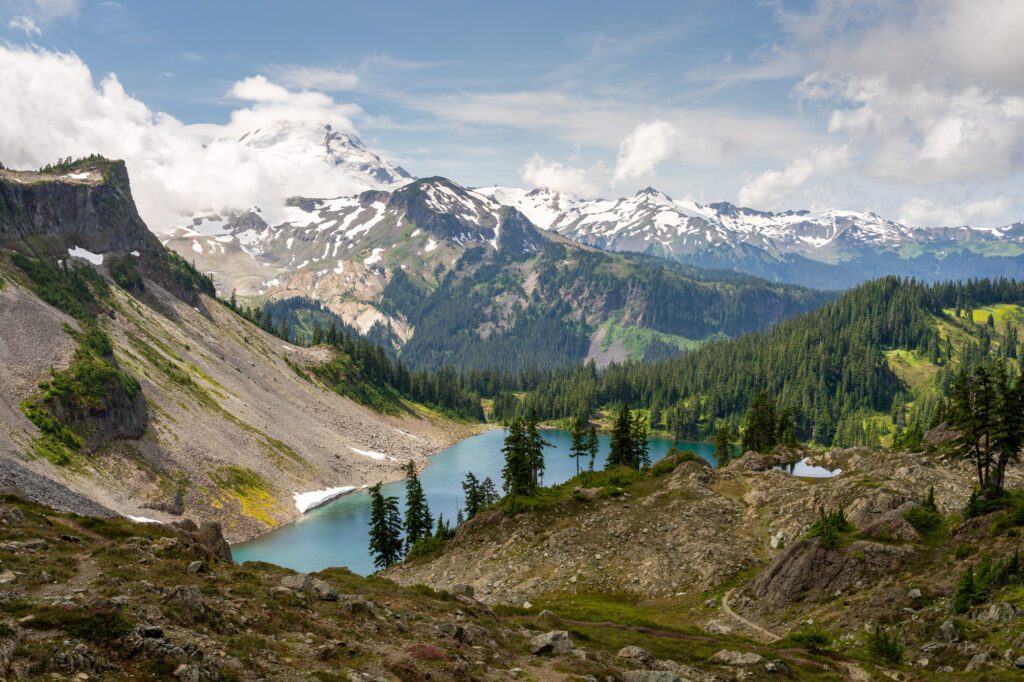
The Chain Lakes Loop (Mount Baker)
- Length: 7 miles
- Elevation Gain: 1,900 ft.
- Trail Type: Loop
- Difficulty: Moderate
- Dog Friendly? Yes, on a leash
- Pass Required: Northwest Forest Pass OR America the Beautiful Pass
- Trailhead Location
The third of the trio of excellent hikes at Mount Baker, the Chain Lakes Loop is also the most accessible of the three.
It’s still seven miles and 1,900 feet of elevation, which is nothing to sneeze at, but it’s significantly easier than Lake Ann or Yellow Aster Butte.
And the payoff – a series of pristine alpine lakes and views of Baker’s snowy peak – are about as good as you could possibly hope for.
The Chain Lakes Loop starts from the Chain Lakes Trailhead, which is the same as the parking lot for Artist Point at the end of the road at Mount Baker (Artist Point is also worth a look while you’re there).
We’d tackle this hike clockwise, heading west from the parking lot along a ridge with great views of Baker. The first mile and a half or so of the hike are roughly flat, with the trail hugging a hillside facing Baker.
You’ll pass the junction for the Ptarmigan Ridge Trail – yet another great hike up here – and then turn right and descend down into the valley where you’ll pass five lakes on your way back to the trailhead.
Iceberg Lake is the biggest of the bunch, and it’s worth taking the short detour along the Hayes Lake trail to see two of the five lakes up close.
The hike ends with a climb back out of the valley up to Bagley Lake. Don’t forget to turn around and look behind you, where you’ll have an excellent view of Iceberg Lake with Table Mountain and Mount Baker in the background.
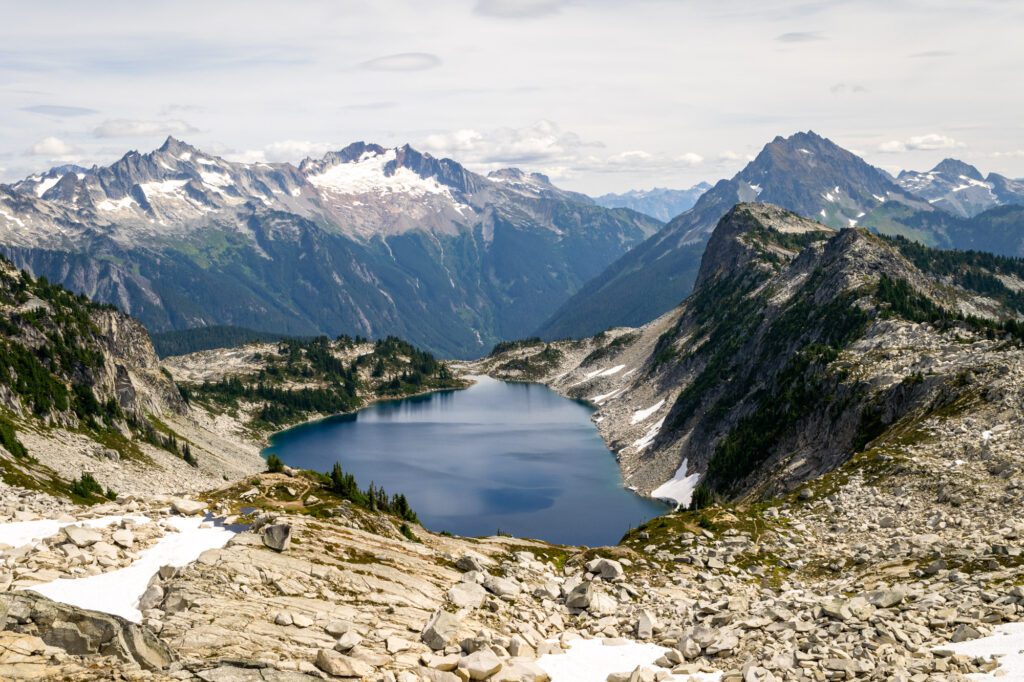
The High Divide / Seven Lakes Basin (Olympic National Park)
- Length: 19 miles
- Elevation Gain: 5,000 – 6,000 ft.
- Trail Type: Loop
- Difficulty: Difficult
- Dog Friendly? No
- Pass Required: America the Beautiful Pass
- Trailhead Location
The same summer we got permits to do the Enchantments, we also were lucky enough to get permits to do a second of Washington’s best backpacking trips – the High Divide Trail through the Seven Lakes Basin in Olympic National Park.
It’s a loop that takes you through the dense forest up to a ridge where on one side you have a string of seven gorgeous alpine lakes, and on the other you have the Hoh River Valley and Mount Olympus.
It’s quite an effort to get there, but standing atop that ridgeline makes all the sweat worth it.
It’s best done with at least two nights (which is what we did). You need to reserve campsites in advance, and that’s going to be your limiting factor here.
If you can snag a night or two at Lunch Lake, which is up on the Divide in the heart of the best alpine lakes, do it! If not, we’d stay at Heart Lake and Deer Lake on either side of the Divide.
Read More: Hiking the High Divide Trail Through the Seven Lakes Basin in Olympic National Park
Wallace Falls (Highway 2 / Gold Bar)
- Length: 5 miles
- Elevation Gain: 1,500 ft.
- Trail Type: Out and Back
- Difficulty: Moderate
- Dog Friendly? Yes, on a leash
- Pass Required: Discover Pass
- Trailhead Location
Is Wallace Falls the best waterfall hike in Washington State? If we’re talking about waterfalls that ACTUALLY involve hiking to reach (so Palouse and Snoqualmie are out), we’d say it’s right up there with Comet Falls near the top of our list.
This is the only hike on this list that is in a Washington State Park, which means you’ll need a Discover Pass to park at the trailhead (that’s Washington’s State Parks Pass).
It’s at the western end of Highway 2 near Monroe, which makes it an easy day trip from Seattle, at about an hour and a half away from downtown (without traffic).
This is a fairly moderate hike that follows the Wallace River for most of the way, with three main attractions along the way.
First is the view of the Lower Falls, which is cool, but isn’t the best view you’ll have.
A bit of climbing later brings you to the highlight, the Middle Falls, which is the best view of the entire hike.
From there, a set of switchbacks separates you from a commanding view out over the valley all the way to the Olympics (and the upper falls, which is barely even worth mentioning).
Read More: Hiking the Wallace Falls Trail to THREE Waterfalls (Complete Trail Guide)
Passes and Permits You Might Need for Hiking in Washington State
Let’s talk about the passes you might need to go hit the hiking trails in Washington.
For the hikes that are inside a Washington State Park, like Wallace Falls, you’ll need a Discover Pass.
It costs $10 for a one-time entry that covers your entire vehicle (and the people in it), or $30 for an annual pass. Buy it at REI here, or find it at a machine at these parks (bottom of the page).
For hikes in one of Washington’s many areas that are run by the US Forest Service, like Mount Baker-Snoqualmie National Forest or Olympic National Forest, you’ll need a Northwest Forest Pass.
We found that this is the pass we used most often in Washington (and Oregon, too).
It will cost you $5 for a day use permit, which I’d recommend buying online in advance since you can’t reliably find them at trailheads (I’d suggest buying multiple and filling them out as you use them), or $30 for an annual Northwest Forest Pass that covers all US Forest Service land in both Oregon and Washington.
Last, but certainly not least, is the America the Beautiful Pass. This one is useful if you’re planning on hiking in any of Washington’s National Parks – Mount Rainier, Olympic, or the North Cascades (though the latter technically doesn’t require it for entry).
A seven day pass costs $30 per car, and the America the Beautiful Pass, which actually includes US Forest Service lands covered by the Northwest Forest Pass, costs $80 for a year.
Basically, if you’re planning on going to more than two US National Parks within a year, buy the annual America the Beautiful Pass.
The Best Time to Go Hiking in Washington State
Summer brings blue skies and warmer days, making it the best time to visit, especially if you’re planning to go hiking in Washington.
July to September is the ideal time to visit Washington State for the most consistently nice hiking weather, but it is also peak tourist season – expect accommodations and flights to be the most expensive if you’re coming from out of town. During the peak summer months of July and August, most if not all trails will be snow-free.
If you want to avoid premium prices and crowds, September and October are generally fairly nice, but there will definitely be a higher chance of gray and drizzly days. Plus, the larches in the Cascades light up the hills with their brilliant golden shine during the middle of October, which is quite a sight.
Spring, fall, and winter are rainy and gray, but as long as you pack a rain jacket and waterproof boots, you will be fine. The rain in Washington is mostly a light mist rather than heavy rain, which is annoying, but shouldn’t stop you from getting out and hiking if you’re set on it.
The biggest problem with hiking outside of the summer season (and early fall) is the strong likelihood of snow on the trails.
For the most part, trails at higher elevations – this includes Mount Rainier, the North Cascades, Snoqualmie, and Mount Baker – are covered in snow from November to June, sometimes later.
On our first trip together to Washington, we tried to visit North Cascades National Park in mid-June.
I had flown up to Seattle (Alysha was set to follow shortly) before we realized that roads were closed, and the trails were still covered in snow and mostly inaccessible. We ended up re-booking for a mid-August trip, which turned out to be MUCH better.
Even when we were hiking in Mount Rainier National Park a few years back, there was still snow on the famous Skyline Trail during the last week of July! And not just a dusting – a LOT of snow.
The Best Washington State Hikes, Mapped
So you can visualize where these hikes are, here’s a map of these Washington hikes (really, the trailheads for the hikes).
Hello from Saskatchewan…
We are planning a Washington trip next fall.
When you rate the trails as a no for dog friendly…does that mean dogs are not allowed or just the difficulty of the trail?
Hey Treena! Obviously, it depends on your dog and what they’re able to do, but we’re generally referring to whether or not they’re even allowed on the trail. Usually both though – there are only a couple of trails I can think of that would be one but not the other, and they’re both in Oregon. Washington is great for dog hiking buddies, and the only thing you need to keep in mind is that national parks don’t allow dogs (which is different from yours in Canada – we spent two weeks in the Canadian Rockies last summer with our pup hiking our hearts out). Does that make sense?