How to Plan an Incredible Day Trip to Mount Rainier
Want to see the best of Mount Rainier National Park, but only have a day? You’re in the right place. We’ve spent a fair amount of time exploring Mount Rainier National Park over the past several years from our home base in Portland, and we’re going to help you figure out how to best spend your limited time.
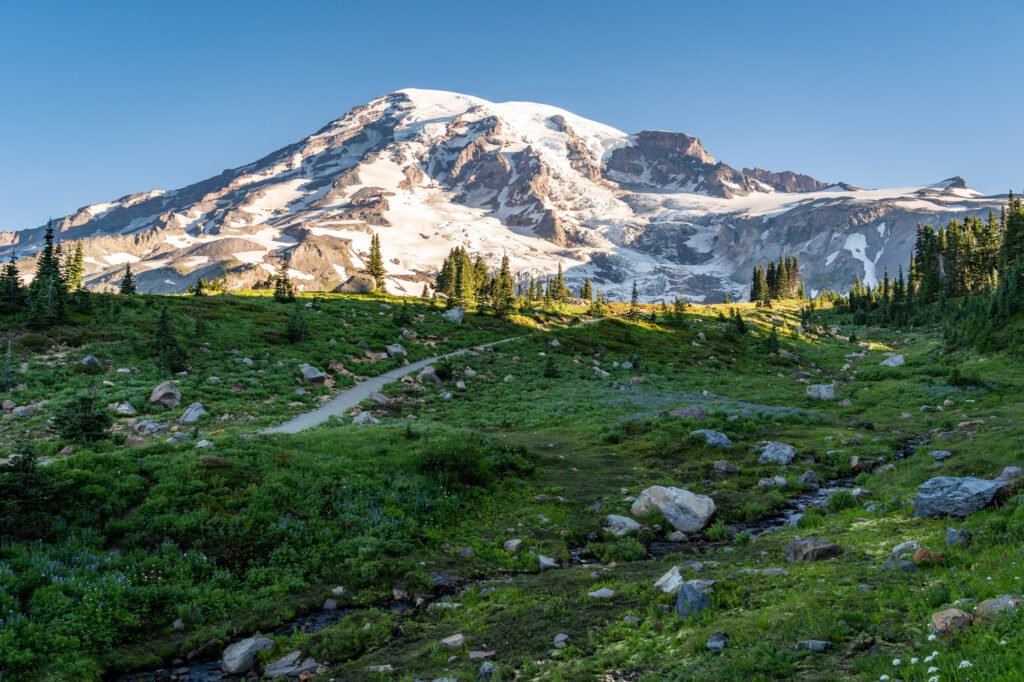
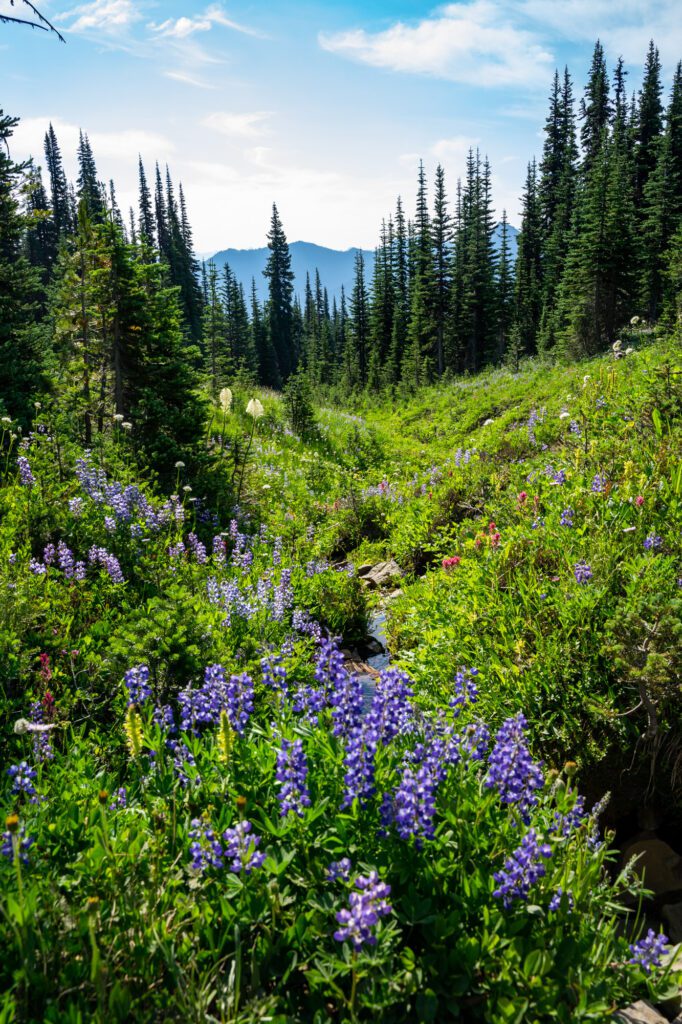
Lush meadows, an abundance of wildflowers, and multiple picturesque waterfalls await you on your day trip to Mount Rainier.
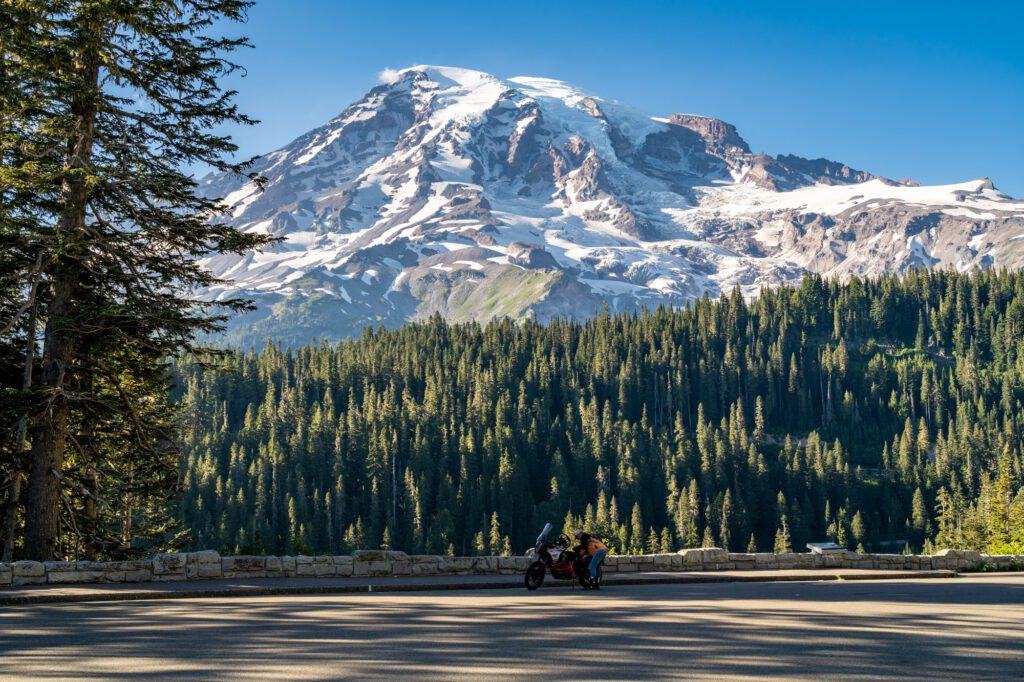
In the Seattle area, a “nice day” is often defined by whether or not you can see Rainier’s snow capped peak from the city.
To really understand why Mount Rainier National Park is one of the country’s best national parks, though, you have to get up close and personal.
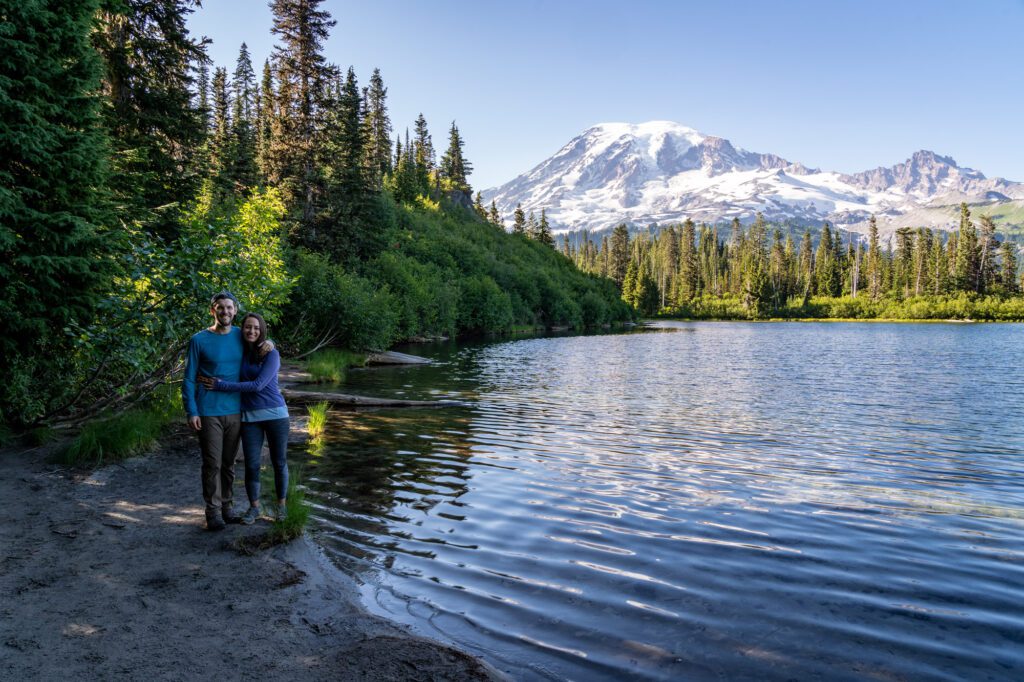
From Seattle, you can’t see towering Narada Falls, the incredible views of the surrounding peaks in the Tatoosh Range and Mount Adams from the Skyline Trail, or the perfect reflection of Rainier in Bench Lake.
If you follow the guide below, you’ll experience all of those things and more, and hopefully come away with a deeper appreciation for Mount Rainier National Park, which is only two and a half hours away from Seattle.
And you’ll see why we have it high on our list of the best day trips from Seattle.
Can you believe that Matt grew up in Washington State (the Seattle area to be more specific), and didn’t make it to Rainier – or any of the other national parks in Washington – until his 30’s? What was he even doing for those first 30 years of his life, you might ask.
In this guide, we’ll give you all the information – the logistics, the things to do and see at Mount Rainier in a day, and some alternative options if you’re not into hiking – to plan an unforgettable day trip to Mount Rainier from Seattle.
All the information in this guide is based on personal experience exploring the park over several trips.
If you have a question that we didn’t cover below, leave us a comment so that we can get back to you (and potentially add it to the guide!).
Important for 2024: To deal with the ever-increasing crowds visiting Rainier each year, the park has instituted a timed entry permit for visitors to the Paradise and Sunrise corridors in 2024. For more information, head to the NPS website (linked above).
Disclaimer: Some of the links in this post, like hotel links, are affiliate links, meaning at no additional cost to you, we make a little bit of money if you click through and book. That being said, we would never recommend something to you that we don’t stand behind 100%.
Can You See All of Mount Rainier National Park in One Day?
We wanted to start with this one, because it’s important. Spoiler alert: we think the answer is a definite “NO.”
Mount Rainier National Park is huge, spanning 369 square miles. There are basically four distinct regions of the park for our purposes here – Paradise, Ohanapecosh, Sunrise, and Mowich Lake (Carbon River, the fifth, is closed indefinitely at the time of writing).
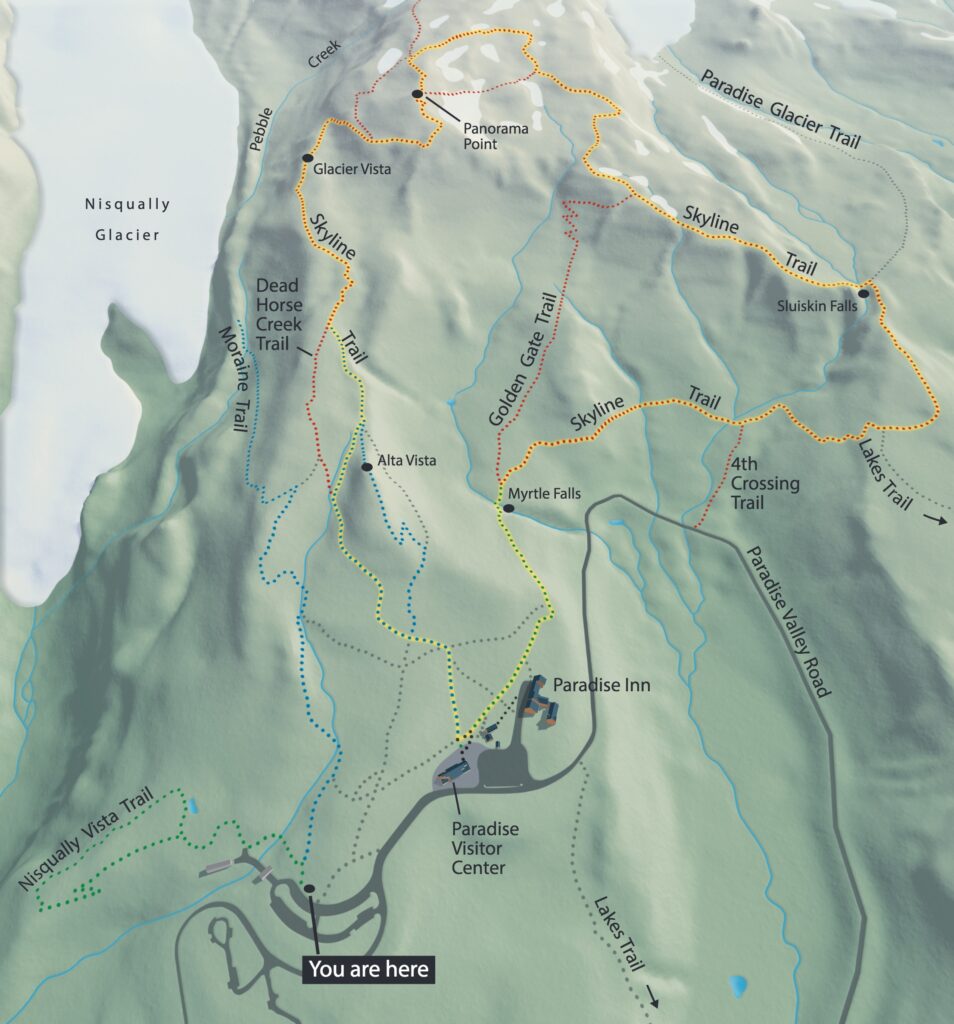
Here’s a map.

To give you an idea as to why this matters, here are the drive times between the different regions. We’re going clockwise from Sunrise, ending with Mowich Lake.
- Sunrise to Ohanapecosh: 32 miles // 1 hour
- Ohanapecosh to Paradise: 25 miles // 45 minutes
- Paradise to Mowich Lake: 96 miles // 2 hours
It’d be pretty easy to rack up more than six hours of driving if you tried to do Sunrise, Ohanapecosh, and Paradise in one day (including driving to and from Seattle).
For that reason, we would strongly encourage you to choose ONE region to focus on for your Mount Rainier day trip from Seattle, as there’s plenty to do and see in each individual area to make it a full day.
And guess what? We have thoughts on which region that should be (surprise!).
Which Region of the Park Should You Focus On for Your Day Trip to Mount Rainier?
If it is your first time in the park, we cannot stress enough that Paradise is the region that you should focus on.
Let’s put it this way – we think it delivers on the name.
Between the waterfalls, alpine lakes, and incredible hikes (including multiple that make our list of the best hikes in Washington State) with jaw dropping views, Paradise is Mount Rainier at its most stunning. Here are a few pictures that are worth many thousands of words.

That’s not to say that the other parts of the park aren’t worth visiting. But we think Paradise is BY FAR the best option for first timers. And it has the most going on, too. Plenty to fill an entire day.
Here’s a quick overview of the different regions, and what makes them special:
- Paradise: Epic wildflowers in the early summer, countless alpine lakes, four of the most stunning waterfalls in Washington State, and the best hike in the park. We’d say the name is accurate.
- Sunrise: The best breadth of different hikes in the park, and the highest elevation that you can drive to in the park (it’s about 1,000 feet higher than Paradise). Outside of hiking, not a whole lot going on.
- Ohanapecosh: Very different from other parts of the park – this is an old growth forest. Some good short hikes (good for kids), but probably only worth about a half day or so.
- Mowich Lake: Two of the best hikes in Mount Rainier National Park are here, but unfortunately it’s at the end of a 20 mile long washboard road that has some potholes and probably shouldn’t be attempted unless it’s late summer and you have a high-clearance vehicle.
Timed Entry Reservations Are Required in 2024 (Paradise and Sunrise)
In 2024, you need to make an entry reservation for Paradise and Sunrise.
This is the most important piece of this entire logistics section, because it’s a new system for 2024 and we can foresee many people missing it and getting turned away at the entrance stations.
Between May 24 and Sept 2, 2024, you need to make a timed entry reservation to enter the Paradise Corridor.
This includes the road between the Nisqually Entrance, up to the Henry M. Jackson Visitor Center, and down to the Stevens Canyon Entrance near Ohanapecosh.
Between July 4 through September 2, you need to make a timed entry reservation to enter the Sunrise Corridor.
This is the road between the White River Entrance, up to the Sunrise Visitor Center.
These permits only apply if you enter the park between 7am and 3pm, meaning that if you enter before 7am or after 3pm, a permit is not required (another reason for an early start!).
It’s also worth noting that a reservation at Cougar Rock Campground (Paradise), the Paradise Inn, or National Park Inn can be used in place of a timed entry permit for the Paradise Corridor.
If you get a first-come, first-served site at White River Campground near Sunrise, that also can be used in lieu of a Sunrise timed entry permit.
However, it is also worth noting that a camping or lodge reservation in Paradise DOES NOT get you access to the Sunrise Corridor, and vice versa.
Permits are released 90 days in advance in blocks.
Here are the release dates for 2024 for the Paradise Corridor Timed Entry Permits:
- February 21, 2024: Reservations available for May 24 – June 30, 2024
- April 1, 2024: Reservations available for July 1 – July 31, 2024
- May 1, 2024: Reservations available for August 1 – September 2, 2024
Here are the release dates for 2024 for the Sunrise Corridor Timed Entry Permits:
- April 1, 2024: Reservations available for July 4 – July 31, 2024
- May 1, 2024: Reservations available for August 1 – September 2, 2024
It’s well worth reading the timed entry reservation page AND the timed entry FAQ for all the information you might need.
Implications of Timed Entry Permits for Your Trip
For what it’s worth, we saw this timed entry reservation process unfold at multiple other national parks across the western United States during our two year road trip a few years back.
During that period, we visited every national park west of the Rockies, and saw multiple parks trying their best to deal with increased visitation numbers.
It’s a complicated situation, because on one hand, the record visitation numbers are putting a huge strain on park resources and ecosystems.
On the other hand, we want to make our national parks accessible (and we want that access to be equitable) because seeing the national parks in person makes everyone want to come together to protect them!
However, putting that all aside, the number one implication that we saw in places like Rocky Mountain National Park and Glacier National Park is that the timed entry permits will force many people to enter the park before that 7am window kicks in.
Parking lots in Rocky Mountain National Park and Glacier National Park were full by 6am or so as people rushed to get into the park before the permits were required.
We’d anticipate that something similar will play out here.
Keep that in mind as you plan your own visit, since parking at Sunrise and Paradise is limited to begin with.
Tips for Visiting Mount Rainier National Park in a Day
Before we get to the meat of this guide, here are some things to know as you’re planning your trip.
Cell Service is Limited at Best – Download Offline Maps Ahead of Time
You’ll find very, very limited cell service in the park. And by very limited, I mean zero cell service unless you’re at the parking lot next to the visitor center.
For navigation, we always download offline maps on Google Maps, which allows you to use navigation even if you don’t have cell service (although it doesn’t give you real time traffic, which doesn’t really matter in this case).
Here’s a guide on how to do that.
You can also find a bunch of different park maps on the NPS website here if you prefer a physical map.
Expect Crowds in July and August
July and August are the busiest months at Rainier. The park sees more than 2 million people visiting the park on an annual basis.
And roughly half of those people visit in July or August (according to this fun table on the NPS site), which means you’re going to encounter crowds in those months.
The two biggest places where that matters are the entrance stations and the parking lots at trailheads.
At the Nisqually entrance station in particular, it is not uncommon for a line to start forming at 9:00am. In fact, on our latest foray into the park, we arrived at about 9:15am, and had to wait about 15 minutes to enter the park.
Between 10:00am and 12:00pm, expect that time to be an hour, if not more. Get an early start! (Note: This is true for the others too, there are just fewer people using those).
The second place that crowds matter is the parking lots at trailheads.
The main parking lot at Paradise – the one that the Skyline trail leaves from – is big. But it still fills up by 10:00am, earlier on weekends.
We were surprised that it was mostly full at 7:00am on a Monday morning on our latest trip.
Other trailheads and parking lots, like Comet Falls and Reflection Lakes, have parking for substantially fewer cars. Be prepared to wait for a spot when you arrive. There’s a lot of turnover, so it shouldn’t be too long.
Try to Visit on a Weekday if You Can
We’ve been to the park on basically every day of the week at this point, and it is noticeably busier on weekends.
If you have the ability and flexibility, we’d definitely try to plan your visit on a weekday. However, know that in July and August parking lots will fill no matter the day of the week.
Check Road Conditions Before You Leave
Road conditions are an important thing to check in the week before your trip.
For example, had we not checked road conditions before we left, we would not have known that as of August 2022, Stevens Canyon Road from Paradise to Ohanapecosh was closed Monday to Thursday for road repairs, which made getting between Paradise and Sunrise / Ohanapecosh nearly impossible.
Between construction, which can only really happen in the summer given the weather and conditions at Rainier, and washouts during the winter, road conditions are constantly in flux.
You can find the NPS report on road conditions here. Definitely check before you leave!
The Last Gas Station near the Nisqually Entrance is in Ashford
There is no gas available in the park. The last gas station where you can fill up is in Ashford, just outside the Nisqually entrance.
Note that there’s basically only one option, and it’s more expensive than the gas stations further outside the park.
If you can fill up on your way in BEFORE arriving in Ashford, we’d suggest that to save some money.
Pack All of Your Meals – There Are Limited Options for Food in the Park
Similar to the gas situation, there are very, very few food options in the park.
You could grab lunch at the Paradise Inn (though a lot of the time, they’re only doing seated lunches and dinners for hotel guests these days) or at the tiny cafeteria there, which has sandwiches and salads.
But it will be expensive, and the food won’t be stellar.
A far, far better option is to pack a picnic lunch to enjoy on the shore of Reflection Lakes! Sandwiches, fruit, snacks, some sparkling water – all at a fraction of the (outrageous) cost of getting lunch at one of the park facilities.
Bring Plenty of Water and Sun Protection
On our last foray into Mount Rainier National Park, we were struck by how intense the sun is once you’re up at 5,000 feet above sea level.
Sunscreen is your friend! Bring plenty of it, and reapply at lunchtime.
Getting from Seattle to Mount Rainier National Park (the Nisqually Entrance)
If you’re heading to Mount Rainier from Seattle, then you’re going to want to enter the park through the Nisqually Entrance, which is in the southwest corner of the park near the town of Ashford.
To get to Mount Rainier from Seattle, you’re looking at somewhere around two and a half hours, and 107 miles of driving (to the Henry M. Jackson Visitor Center at Paradise).
There are a couple of different routes that you could take, and it totally depends on traffic, so check Google Maps before you leave.
However, if you’re leaving early in the morning, then the best route is probably going to be hopping on I-5 South to Highway 167 South.
Then, you’ll make your way onto Highway 161 South, and follow it until it ends. When it ends, take a left on Highway 7 / National Park Road, which turns into Paradise Road and takes you to the Nisqually Entrance.
Keep in mind that, if you don’t pass through the entrance station before around 9:00am, there will likely be a line to get in, which will add anywhere from 15 minutes to an hour to your journey. Which should be all the incentive you need to get an early start!
Getting to Mount Rainier from Portland
Oh hey neighbor! We’re based in Portland, and we’ve done this trip ourselves very recently (I’m writing this on the day we got back).
It’s a bit further if you’re coming from Portland, at 156 miles and around three hours. But if you’re okay with a lot of driving, then it’s worth it.
Really, it makes for a better weekend getaway from Portland, but we understand that not everybody has that kind of time.
You’ll hop on I-5 Northbound, and get off at exit 68 for Highway 12 towards Yakima. Stay on that road for a hair over 30 miles, and turn left at the town of Morton to get on Highway 7 North. Follow that for 16 miles, turn right onto Paradise Road, and you’ll reach the Nisqually entrance a few miles later.
Paradise is also the easiest region to access from Portland – to get to Sunrise, it’s another two hours, which is not nearly as doable.
How to Plan a Picture Perfect Seattle to Mount Rainier Day Trip: A Complete Guide
Now that we’ve gotten the important logistics and tips out of the way, let’s get into the fun part!
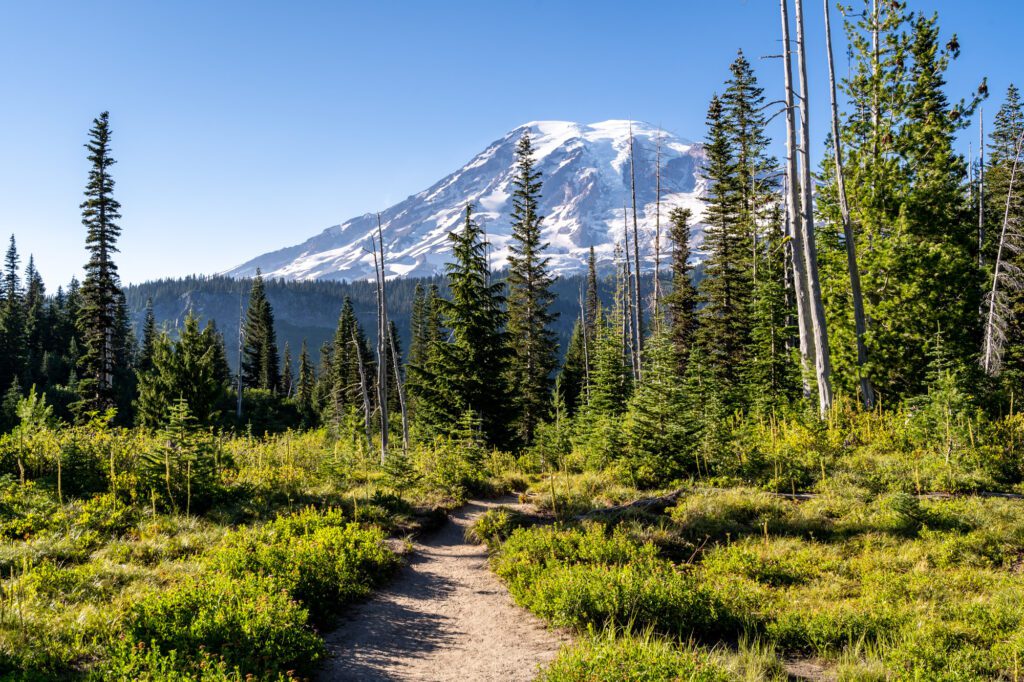
If you follow this guide, you’ll spend your entire day exploring the Paradise region of Mount Rainier National Park, which is on the southern end of The Mountain.
You’ll see waterfalls, incredible mountain views, pristine alpine lakes, and too many picturesque vistas to count.
In terms of structuring your day, we think you should beeline to the Henry M. Jackson Visitor Center to park and get an early start on the Skyline Trail, and then make your way back down Paradise Park Road from there, doing the waterfalls and lakes in the afternoon.
Conveniently, this also takes you in the right direction to get home, which is nice.
We also want to make it clear that this day trip includes a lot of hiking – eight miles if you skip Bench and Snow Lakes, and around 10 miles, if you include that stop.
That’s a LOT of miles in a day for most people, so make sure you have plenty of water, food and snacks, sun protection, and prepare for an epic day of exploring at Mount Rainier.
If you’re not super into hiking (or more likely your kids aren’t up for big mileage), we have a section below the main guide with suggestions on what to do with less of a focus on hiking.
7:30am: Start with the Unforgettable Skyline Trail

The Skyline Trail is our favorite hike in the park, full stop.
We’ve now done it a couple of times, in both directions, and we can’t get enough.
The best part? For the views along the trail, the effort isn’t really that bad. However, it might be the most trafficked hike in the entire state (and potentially the entire Pacific Northwest), which means you’re going to be braving crowds whenever you do it.
By the way, we have an entire detailed guide dedicated to hiking the Skyline Loop Trail, which you should read for more details if you’re interested in tackling our favorite hike in the park (and a top three hike in Washington for us).
Getting to the Trailhead
This hike leaves from the big parking lot right outside the Henry M. Jackson Visitor Center (here on Google Maps), which has a lot of parking spaces, but generally fills up by 9:30am in the summer. Which is exactly why we’re recommending getting an early start.
If you enter through the Nisqually Entrance, you’ll stay on Paradise Road E for a hair under 18 miles, and reach the parking lot after a bunch of climbing and some hairpin turns.
There are bathrooms at the trailhead (the bathrooms inside the Paradise Inn are much nicer), and a water fill station inside the Paradise Inn to fill up water bottles.
The Route
There are a couple of ways to do this trail, and SURPRISE we have thoughts on how you should do it.
First, here’s a map of the trail (courtesy of the NPS) so you can visualize what we’re talking about.
The first thing to think about is whether you’re wanting to do the full loop or the out-and-back to Panorama Point.
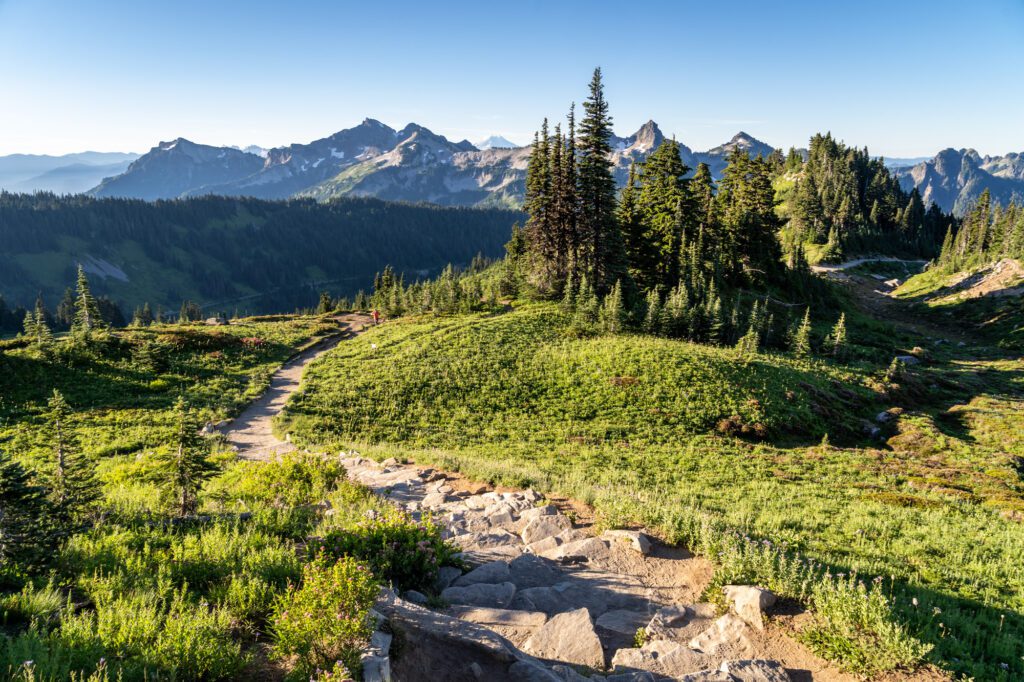
The loop is by far the better way to do it because of the views on the eastern half of the loop (the best view is actually just above Panorama Point, which you’d totally miss if you just did the out-and-back), but it’s a couple of extra trail miles.
The second thing to think about is what direction you want to hike. Clockwise is a steeper ascent, and then a longer, more gradual descent. Counter-clockwise means a more gradual ascent, and a quick, steep descent.
The busiest section of the trail is the western part (the steep part through the meadows), and it’s a zoo anytime after about 10:00am.
Our recommendation is to do it clockwise if you can get a start before 8:00am, which means you’ll be able to do the ascent without a million people on the trail with you.
If you get a later start, we’d do it counter-clockwise to enjoy some solitude on the less traveled eastern half of the loop.
The Hike
Like we mentioned, we have a much more detailed guide to the Skyline Trail, which has all the information you need to tackle the trail safely and have the best experience.
Here’s a brief overview of the hike so you have an idea of what to expect. If you took our advice and arrived at 7:30am, you should go clockwise, which is the direction we’re describing here.
You’ll start from the visitor center, and tackle what might be the most difficult, steep portion of the hike. It’s counter-intuitive, because this section is paved, but it’s no joke.
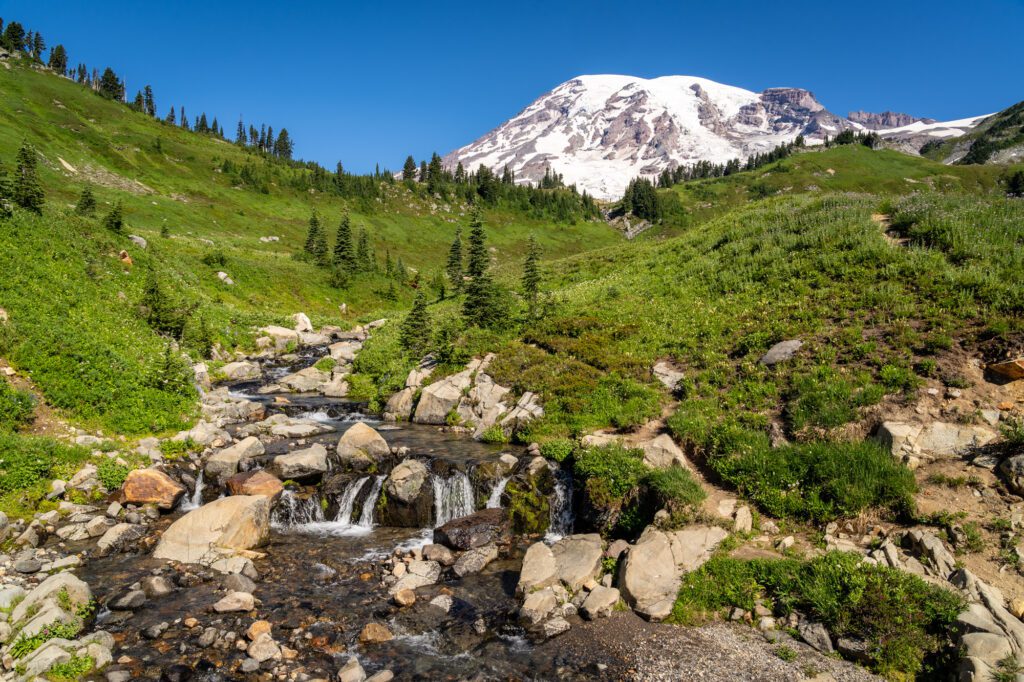
As you climb, you’ll come around a bend and get your first views of the meadows and stunning Rainier views that makes Paradise special.
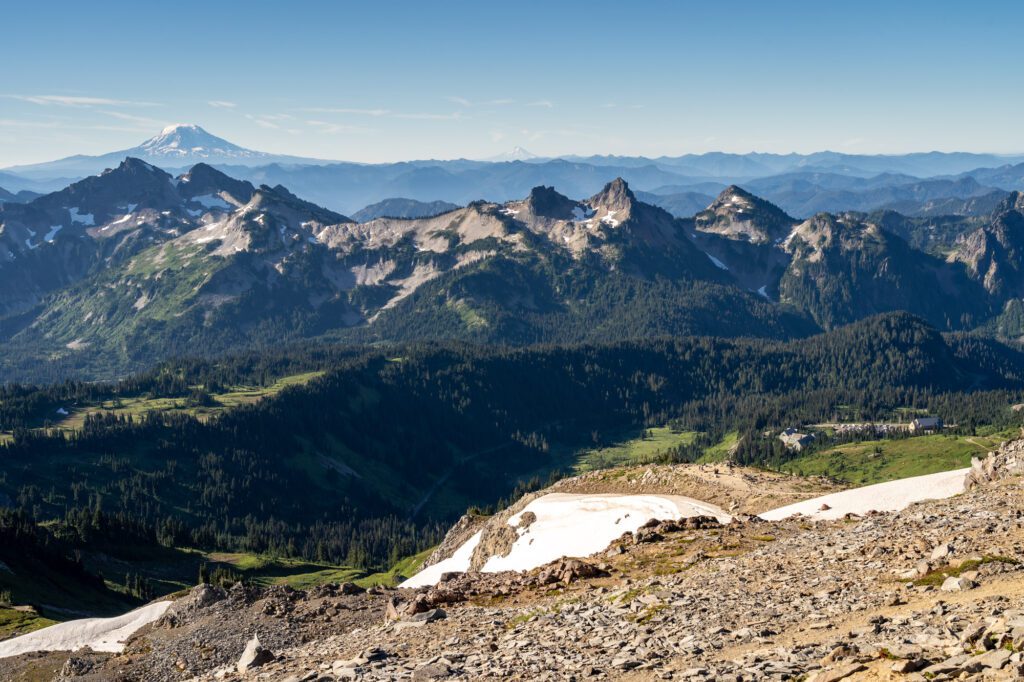
Then comes the long, steep ascent. The views are amazing – make sure to look back behind you for the views of the Tatoosh Range, Mount Adams, Mount St. Helens, and even Mount Hood on a clear day. But make no mistake, climbing 1,700 feet of elevation in about two miles is tough.
Take your time, drink plenty of water, and you’ll make it!
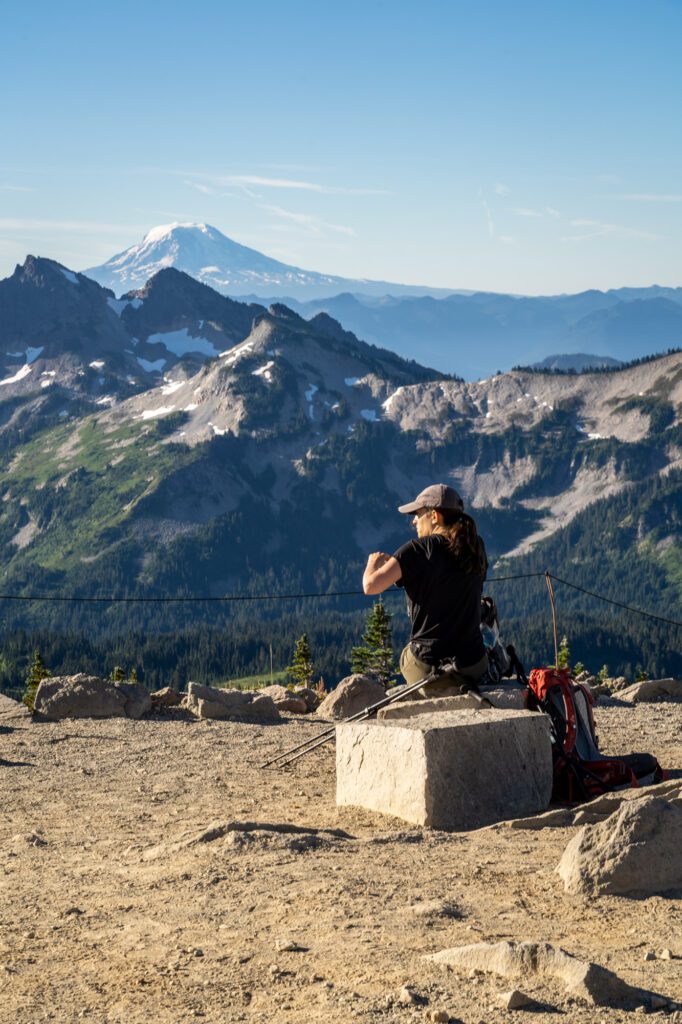
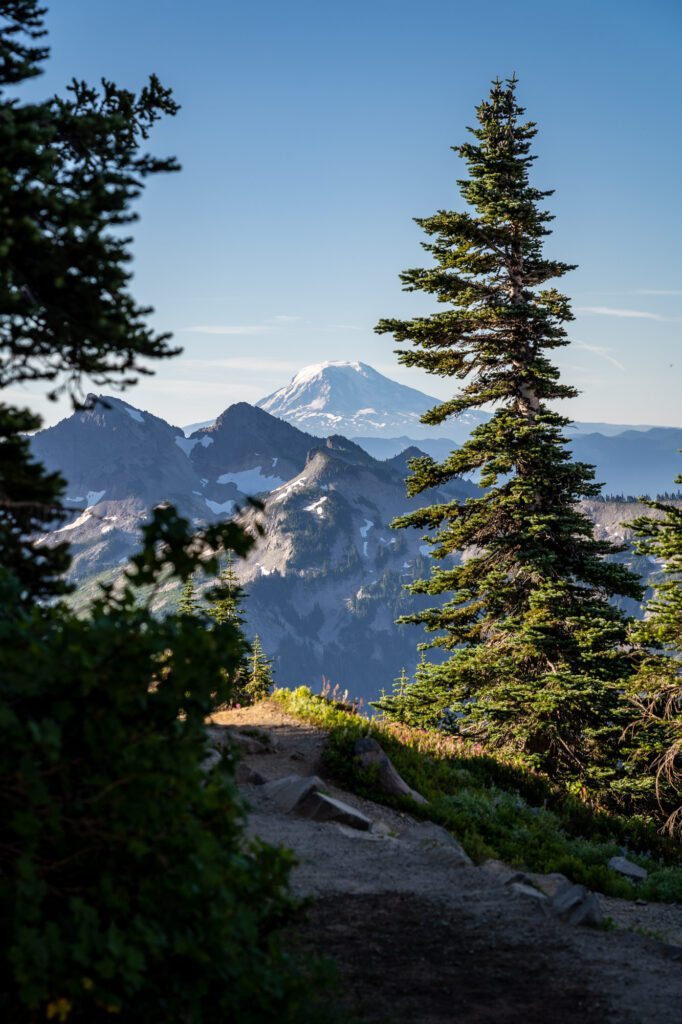
After climbing, you’ll arrive at Panorama Point, which has amazing views out to the south and features just about every peak in southern Washington and Oregon.
It’s a good place to stop for a snack and a break, AND there’s a pit toilet here in the summer (BYO-toilet paper).
However, the most impressive view of Rainier’s south face awaits you after a short climb from Panorama Point, which takes you to the highest point on the trail.
From the top of that rocky outcropping behind Panorama Point, the view is sublime. Both of Rainier, and of the surrounding peaks and mountain ranges.
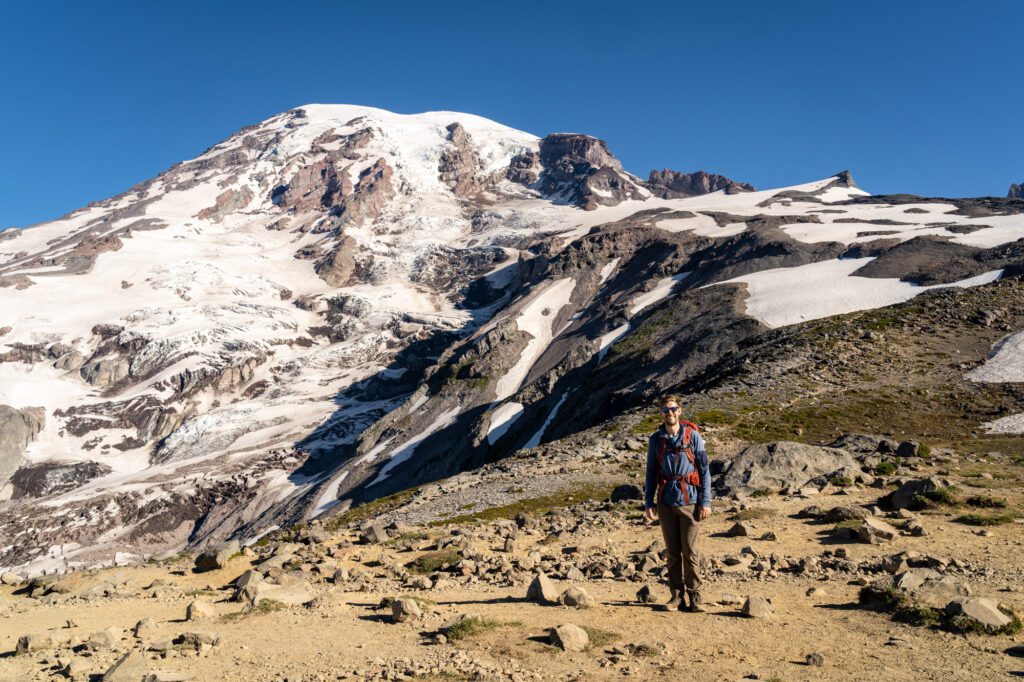
From there, it’s all downhill. You’ll descend through the high alpine terrain, which is noticeably more rocky than the lush meadows on the first half of the trail (we always find this fascinating).
You’re likely to find a few snow patches on this section of trail, which lingers through August most years (check in at the visitor center before you leave to see if it’s doable).
You’ll enter the forest, then there’s a short climb immediately before you get back to the visitor center.
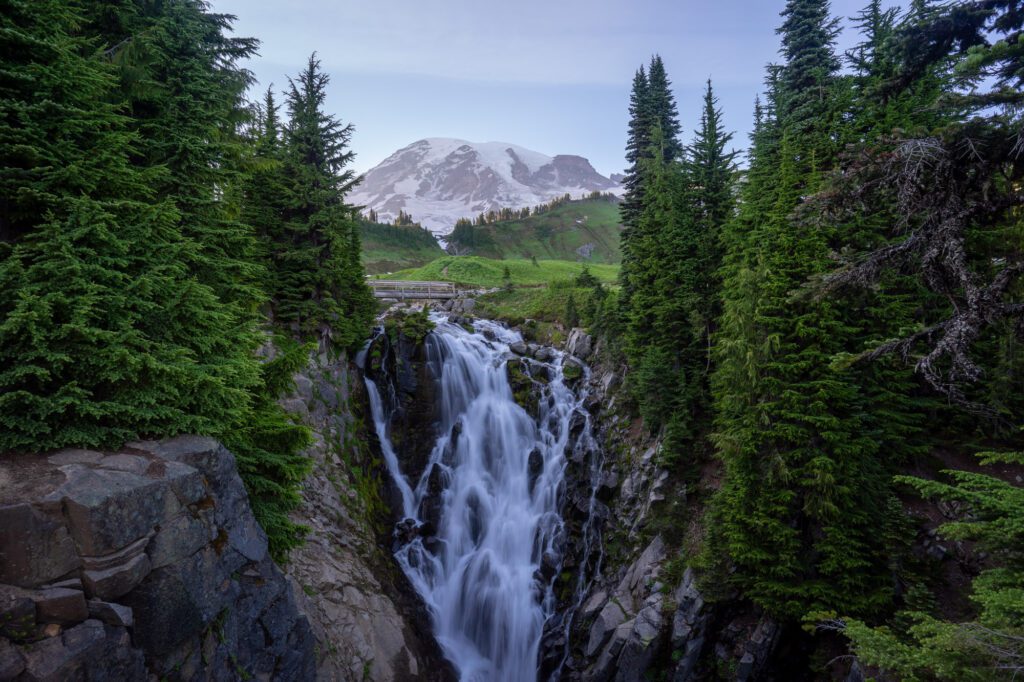
Don’t miss Myrtle Falls, which is right off of the trail on the way back to the starting point.
Make sure to use the restroom and fill water here before you leave!
12:00pm: Lunch at Reflection Lakes
After your hike, it’s time to enjoy your packed lunch! You can absolutely do this at the picnic tables near the visitor center, but we’d recommend hopping in the car and doing the short drive over to Reflection Lakes for a picnic with a view.
Though you should know that you are NOT allowed to picnic along the lakefront.
Instead, enjoy the view from the parking area, then take a walk down to the lake after you’re done eating.
For what it’s worth, we like the view from here, though you basically can’t go wrong in this area.
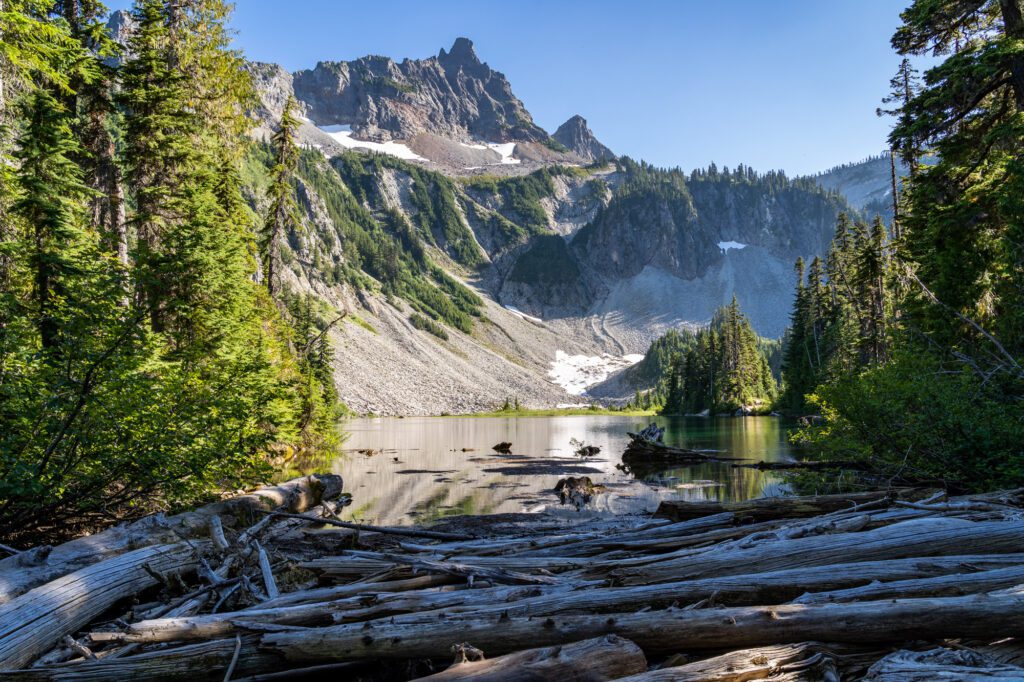
Optional: The Bench and Snow Lakes Trail
Depending on how you’re feeling after your morning hike, we have another great hike for you to tackle if you’re up for it.
While it’s only 2.2 miles, this hike isn’t quite as easy as it seems from the stats. However, we think it’s a great bang-for-your-buck, and both lakes are worth visiting.
The hike starts from a relatively small trailhead off of Stevens Canyon Road (here on Google Maps), and there are no restrooms or water fill stations here.
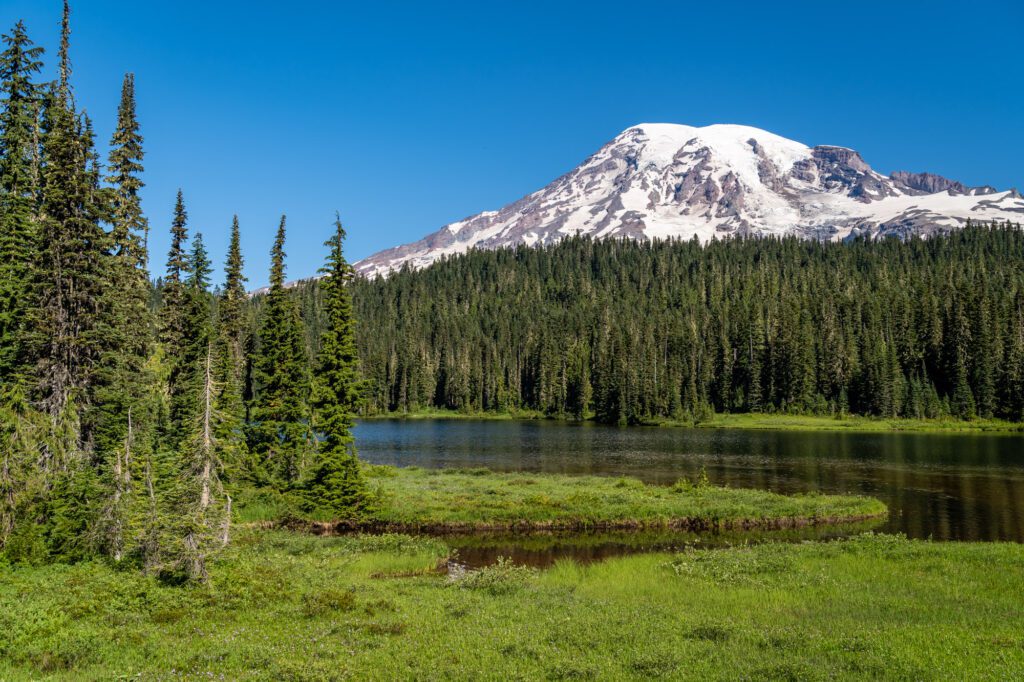
There are two gorgeous alpine lakes on this hike, and we liked them both. But if you’re worn out from the morning of hiking, we’d say that closer Bench Lake is a good compromise at 1.5 miles roundtrip.

The trail climbs from the parking lot, and then descends down to Bench Lake. From the shores of the lake, you’ll be treated to a picture-perfect reflection of Rainier on a clear, calm day.
If you’re up for it, it’s another half mile or so up to Snow Lake, where you won’t have a Rainier view, but you will find a gorgeous valley, a crystal clear blue-green lake, and a backcountry campground that you can hike into and camp at.
It’s a little bit of a steep climb right before the lake, and tired legs might make that a little tough.
You’ll reach a fork in the trail – make sure to go both directions. Left is a great view of the lake from the wooden footbridge that takes you to the campsites.
Head right and make your way to the far end of the lake, where the trail ends and you’ll find a great view of the valley with towering rocky peaks and some fun waterfalls.
Head back to the parking lot, and it’s time to make your way back downhill to Ashford and, sadly, the end of your day trip to Mount Rainier.
There are two stops to make on your way back down for great views. First is Inspiration Point, which is on your left on Stevens Canyon Road right before you turn left onto Paradise Road to head back down towards Ashford.
Second is Ricksecker Point, where you’ll have great views of the Mountain. It’s a few miles down Paradise Road from the turnoff to Stevens Canyon Road (and it’s actually between Narada and Christine Falls, your next two stops).
3:00pm: Stop at Narada Falls
These next three stops will take you to three impressive waterfalls on your way back down to Ashford.
The first is Narada Falls, which is on your left a mile and a half from Inspiration Point. It’s visible from the parking lot, but BY FAR the better view is down a short trail (it’s maybe a quarter mile) from the viewpoint below the parking lot.
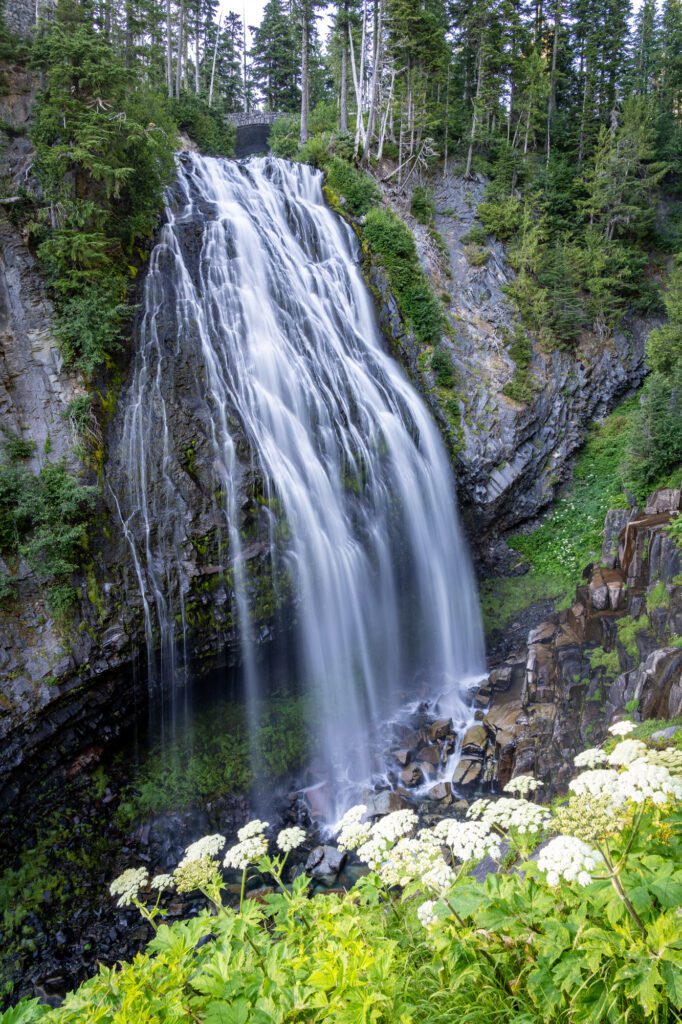
From there, you’ll be able to take in the falls in all their glory. The Paradise River plunges 168 feet over Narada Falls into the river below.
When the falls is in full sun, you also get a nice rainbow at the base of the falls (though it’s much harder to take a good long-exposure picture of the falls).
There are bathrooms here across the stone bridge from the parking lot.
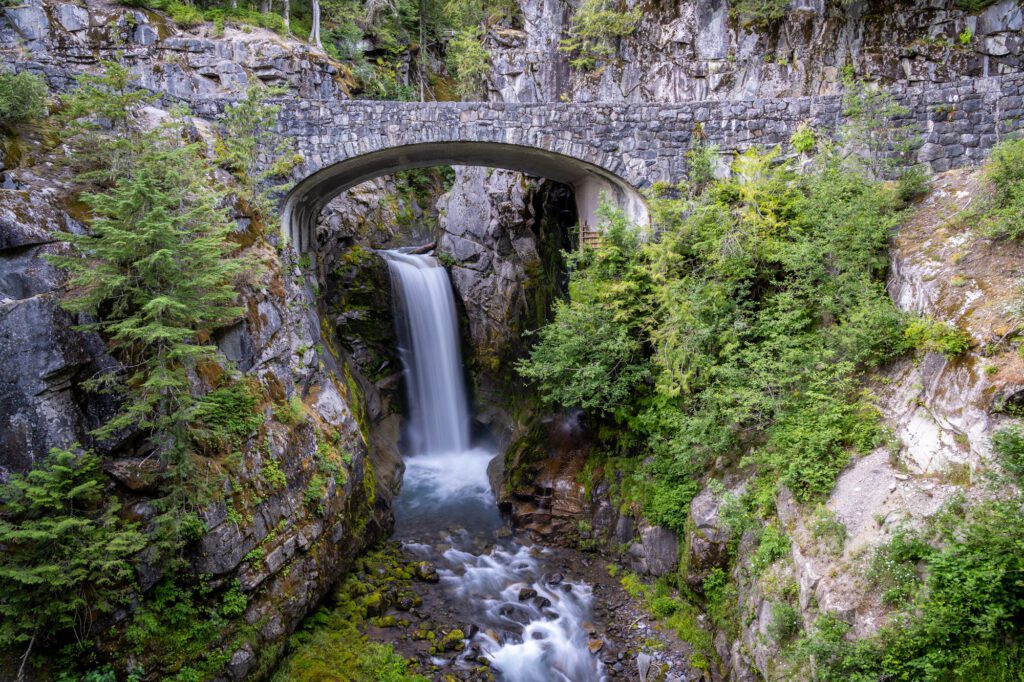
3:30pm: Marvel at Gorgeous Christine Falls
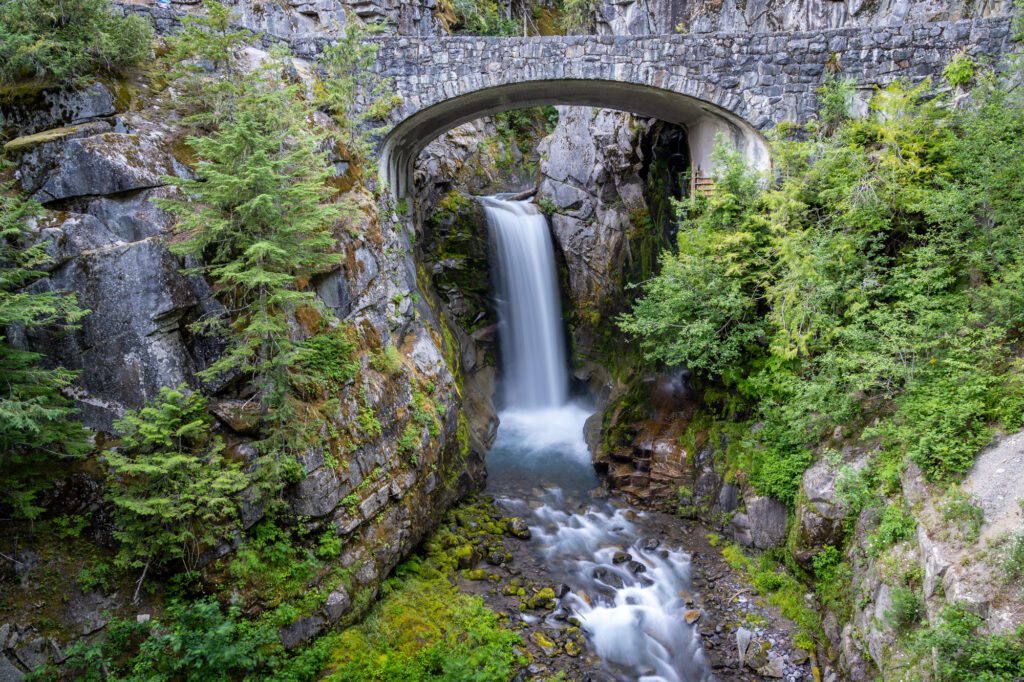
Next up is one of our favorite waterfalls in the park, not because it’s the most impressive, but because of the composition from a photography perspective. Compared to Narada and Comet (your next stop), Christine Falls is basically puny.
However, the framing with the stone bridge is pretty unbeatable.
It’s a tiny parking lot, and the falls is right off the road. It can be tough to park here, and you definitely don’t want to stop in the middle of the road to wait for a parking spot.
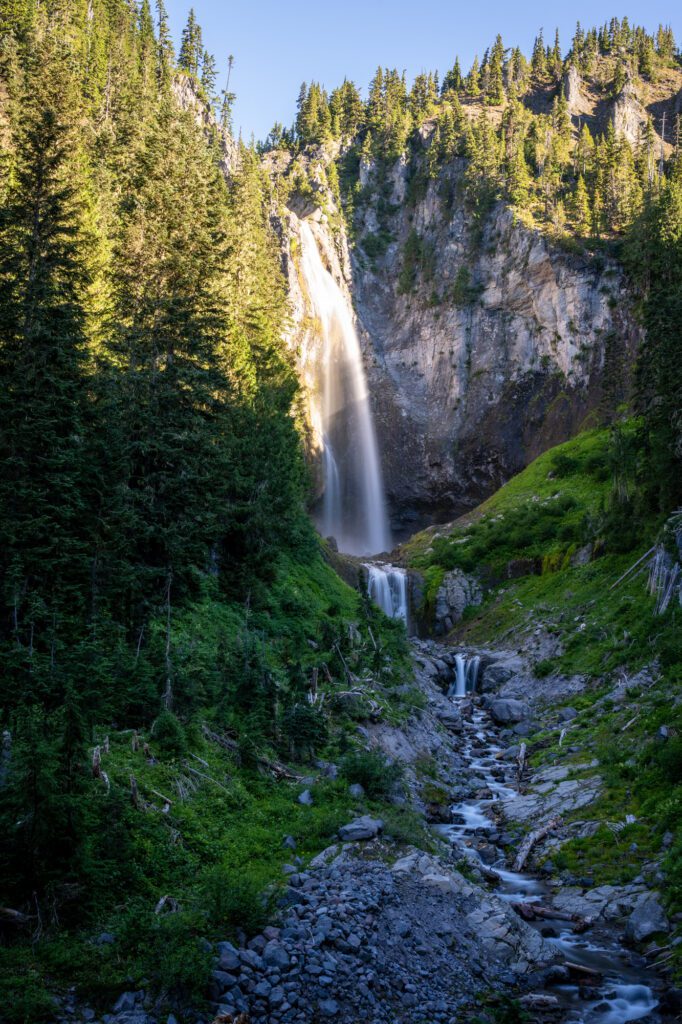
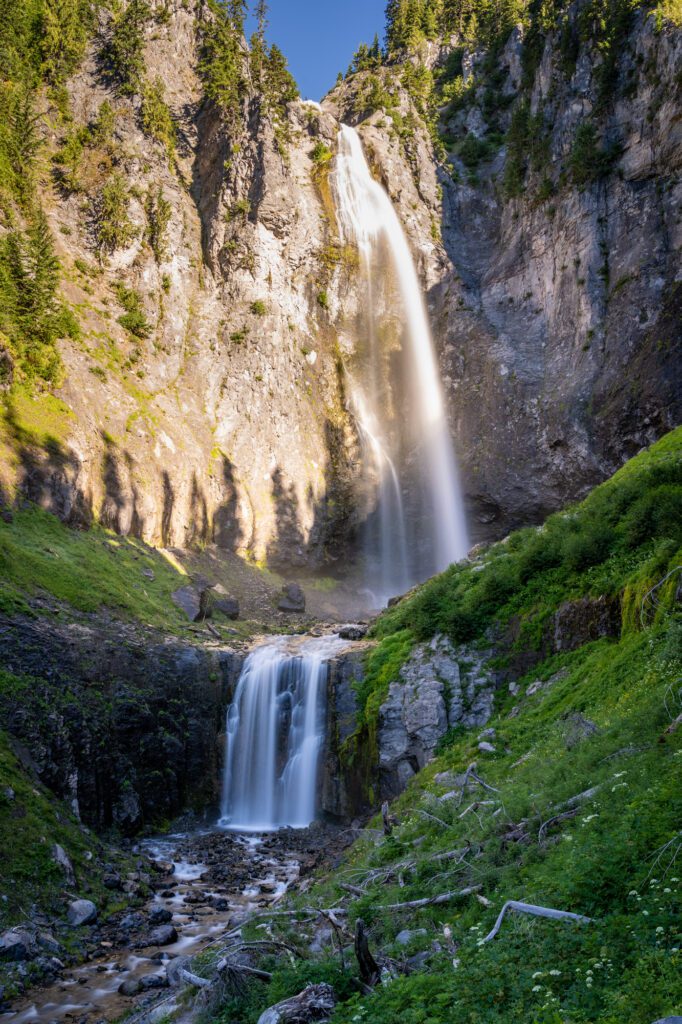
4:00pm: End with a Hike to Comet Falls (Plus a Bonus Waterfall!)
In some ways, we’ve saved the best waterfall for last. It’s a tough hike up to Comet Falls, but it’s by far the most impressive of the four waterfalls you’ve seen today.
Plus, there’s a SECOND impressive waterfall on the way up (right before Comet Falls) that we had no idea existed until we stumbled upon it on our way up. Two epic waterfalls for the price of one? Sign us up.
The hike to Comet Falls is 3.8 miles, with 900 feet of elevation gain. Not too tough, but with heavy legs, it’s going to be harder than it looks.
However, we think the payoff is well worth it. You’ll climb through the forest, then into a rocky alpine section (keep an eye out for pikas, an adorable little critter somewhat like a cross between a hamster and a bunny), and finally you’ll arrive at an impressive waterfall.
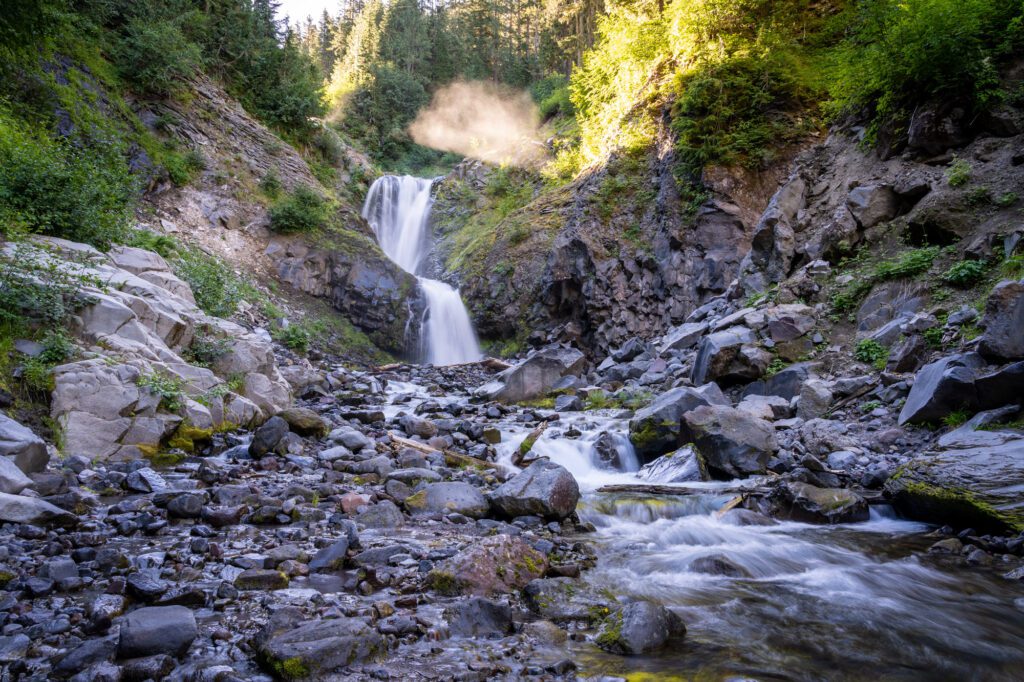
Which, funny enough, actually isn’t Comet Falls! It’s that bonus waterfall we talked about, which is actually called Bloucher Falls.
From there, it’s a short walk up the trail to your first view of Comet Falls, which is where you’ll see torrents of water fall 380 feet from the top of the falls into the multiple tiers of falls below. You can walk up the trail from that first viewpoint to a second, closer viewpoint.
You can continue from here up to Van Trump Park – “park” effectively means “meadow” when we’re talking about alpine regions – but it’s another two miles or so added, and an extra 1,000 feet of climbing in one mile.
Brutal, and probably not something you’re up for after miles of hiking already in the bag today.
After this hike, that’s a wrap! Continue down Paradise Road, exit the park through the Nisqually Entrance, and head home.
Planning a Trip to Mount Rainier National Park? You won’t want to miss our detailed guides to visiting Mount Rainier that are all based on our own personal experience exploring the park.
- All the Best Things to Do in Mount Rainier National Park
- How to Plan an Unforgettable Day Trip to Mount Rainier From Seattle
- Where to Stay near Mount Rainier National Park: A Complete Guide
- The Best Hikes in Mount Rainier National Park: A Helpful Hiking Guide
- Hiking the Skyline Trail: Is This the Best Hike in the Entire State?
- Hiking the Jaw-Dropping Burroughs Mountain Trail at Mount Rainier
- Hiking to Towering Comet Falls in Mount Rainier National Park
- The Naches Peak Loop: The Best Bang-for-your-Buck in Washington
How to Spend a Day in Mount Rainier National Park if You’re Not a Big Hiker (or Have Kids)
It’s certainly true that Mount Rainier is one of the best hiking destinations on the west coast, if not the entire country.
It is also true that Rainier is worth visiting even if you don’t do one of the big hikes in the park.
Whether you’re just not into hiking, or you have small kids who aren’t up for long treks, here’s how we’d amend the itinerary above to still have an awesome day in the park.
Start your day by heading straight to the main parking lot at the Henry M. Jackson Visitor Center.
Instead of hiking the Skyline Trail, which is six miles and an aggressive climb, we’d focus on two shorter trails (both are paved, if you have a stroller).
First, do the Nisqually Vista trail, which is just west of the visitor center. You’ll find blankets of wildflowers, some nice peek-a-boo views of Rainier, and one great view of Rainier’s southern face, with some informational signage about the Nisqually Glacier.
Next, walk back to the visitor center and head the other direction to Myrtle Falls, one of our favorite waterfalls in Washington.
There are some stairs that will make getting down to the viewpoint with a stroller difficult. Myrtle Falls is backed by the face of Rainier looming in the background, and it’s one of our favorite views in the park.
The view from the wooden footbridge just past Myrtle Falls isn’t half bad, either. See?
From there, hop in the car and head to Reflection Lakes for lunch.
If you’re up for it, drive to the Bench and Snow Lakes trailhead (here on Google Maps) and hike up to Bench Lake, which is about 1.5 miles and ~250 feet of elevation gain.
When you get there, if you’re lucky and it’s relatively calm, you’ll find a picture-perfect reflection of Rainier’s glaciated peak on the surface of the lake.
An alternative to the Bench Lake trail is to head to Ohanapecosh, which is another 40 minutes or so down Stevens Canyon Road. There, you’ll find a couple of relatively easy hikes (Grove of the Patriarchs and Silver Falls) that are good for kids and non-hikers.
Note: Grove of the Patriarchs is closed indefinitely because the bridge is washed out, and there is no date for reopening at the time of writing.
From there, you can follow the rest of the itinerary above as written, with the exception of Comet Falls, which is a three mile hike that is somewhere between easy and moderate.
The Best Time to Visit Mount Rainier National Park
We mentioned above that the best time to visit Mount Rainier is in the summer, when trails are snow-free, roads are open, and you’ll most likely have blue skies, warm weather, and those amazingly long Pacific Northwest days where it’s light out from 6:00am to 10:00pm.
Over the years running this site, we’ve realized that “summer” can mean completely different things to different people.
I used to take for granted that everyone knew what I meant when I said “summer is the best time to visit,” not realizing that growing up in the Pacific Northwest shaped my definition of the seasons.
For example, many people from the Midwest and East Coast think “summer” means June. However, if you show up at Rainier in June, you’ll be met with snowfields and closed roads.
For our purposes here, summer means mid-July through September. You can absolutely visit outside of those months, but there’s a chance you won’t be able to tackle some of the bigger hikes without proper snow equipment and experience.
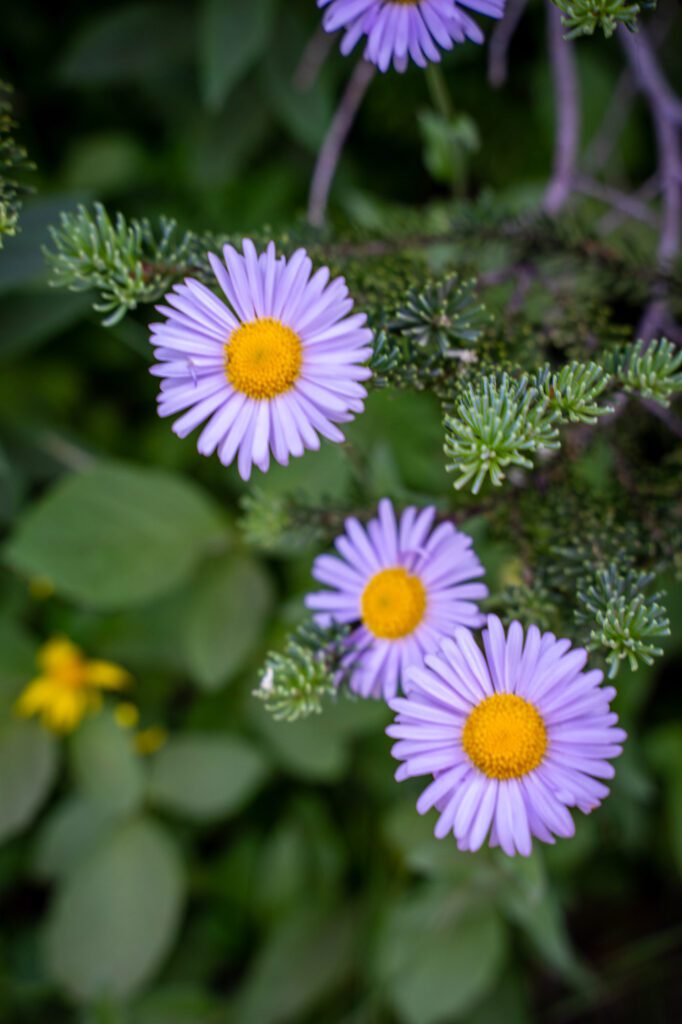
If you’re interested in wildflowers, you should try to plan a trip for late July, which is when the wildflowers emerge from hibernation and line the meadows at Rainier with blankets of white, red, purple, yellow, and just about every other color you can think of.
It’s usually the last week of July into the first week of August, but it depends on the year and the conditions in the spring and summer.
If you want fall color, come in mid-October. While there aren’t a whole lot of trees that turn colors at Rainier, the foliage on the ground turns all sorts of shades of red, orange, and yellow as fall descends on the Mountain.
Weather will be a bit more unpredictable – you might get sunny and warm, you might get cold and wet, you might get snow – but roads will still be open through October, allowing access to most of the park.
The upside of visiting Rainier in the winter is that, compared to the summer, it will feel like you have the Mountain to yourself. The downside is that it will be cold and snowy.
There’s some fun snowshoeing to be done, and there’s something really special about seeing Rainier’s meadows blanketed with snow.
However, a lot of the park facilities are closed in the winter, and you’ll need to be prepared to drive the windy road that climbs from the Nisqually entrance to Paradise in winter weather conditions.